

Graphics hardware acceleration in Microsoft Edge lets your graphics card (GPU) share the rendering workload with your main processor (CPU). Web pages and videos load and play more smoothly as a result. Starting with version 90, Microsoft turns this display setting on by default.
Turn it off if you see screen glitches, choppy video, or sudden browser crashes. Flipping this one switch is a quick way to find out whether the GPU is behind a display problem on your PC. This guide covers two ways to change it: per user in Edge settings, and for every account on the PC with a command or Registry Editor.
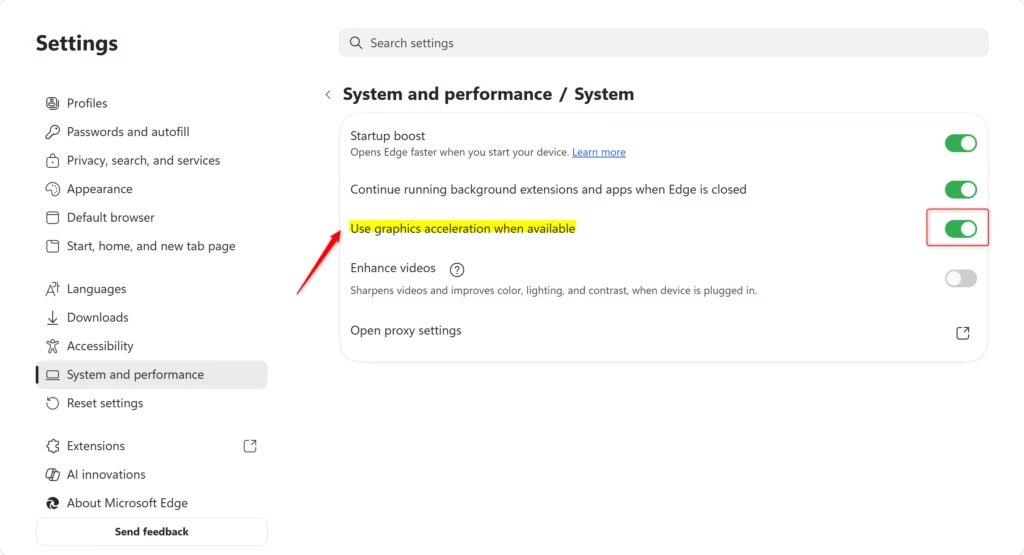
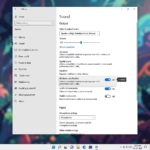
To enable or disable graphics hardware acceleration in Microsoft Edge, go to Settings System and performance. Toggle the “Use graphics acceleration when available” option to your desired setting. This improves performance or resolves display issues.
What Is Hardware Acceleration?
Hardware acceleration is a built-in Edge feature. When it is on, Edge hands graphics and text rendering to your graphics card instead of doing the work on the CPU. That frees up processing cycles, so background programs and other browser tabs have more room to run.
The benefit is easiest to notice with video, animations, and pages with a lot of graphics. On a PC with a weak or very old GPU, the gain is smaller.
Why Disable Hardware Acceleration?
Hardware acceleration is on by default, and it works well for most people. Occasional performance problems still happen, so treat turning it off as a troubleshooting step, not a tuning tweak. Use it for stubborn display problems such as choppy video playback or blurry fonts.
Outdated graphics drivers and incompatible display adapters often cause these conflicts. Before you leave the setting off for good, update your graphics driver and test again. If the problem goes away after the update, turn acceleration back on.
Option 1Change Settings in Microsoft Edge
This method changes the setting through Edge itself. It applies only to your own user account and does not touch system-wide configuration. You open the Edge settings menu, go to the System and performance page, and switch the graphics option on or off.
The steps below show exactly where to click. After you change the toggle, Edge shows a Restart button. Click it so the change takes effect. Edge reopens your tabs after the restart.
If the toggle is greyed out or marked as managed by your organization, a policy is controlling it. That policy may be one set by an administrator, or one you create with the machine-wide method later in this guide. Settings in the browser cannot override it.
- Open Microsoft Edge.
- Click the three-dot menu button (top right), then click Settings. You can also press Alt+F.
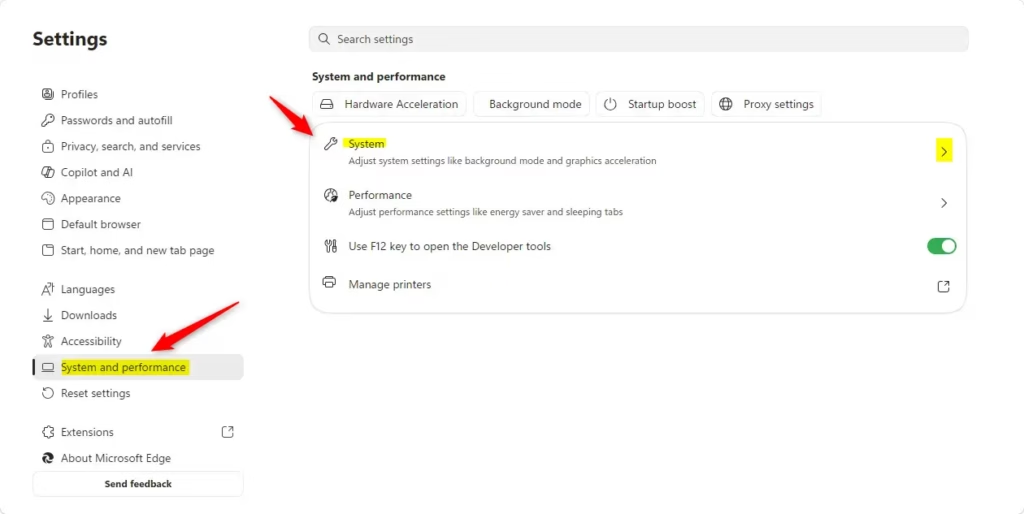
- In the left panel, click System and performance. Then click System in the right panel. If you don't see a left panel, click the three-line menu button at the top left.
- Find the option that says "Use graphics acceleration when available". Turn it On (default) or Off depending on what you need.
- Close the Settings tab when done.

Option 2Change Settings for All Users Using Registry
⚠️ Admin privileges required
This method applies the configuration globally. It overrides the setting each user has chosen in their own copy of Edge. You need an administrator account, and Windows will ask you to confirm with a User Account Control prompt.
Windows Terminal and Registry Editor both accomplish this task. Pick one method below. The command does the same job as the manual registry edit, so you do not need to do both.
Always Turn On Hardware Acceleration for Everyone
To turn on Edge hardware acceleration for all user accounts, you add a specific registry value. You can do that from Windows Terminal or from Registry Editor. Once the value is in place, Edge uses the graphics card to render pages for every user profile on the machine.
To use Windows Terminal, follow these steps:
- Right-click the Start button.
- Select Terminal (Admin).
- Click Yes when the User Account Control prompt appears. A terminal window opens with administrator rights.
- Paste the command below and press Enter. The terminal should report that the operation completed successfully.
- Close all Edge windows and open Edge again so it picks up the new policy.
reg add "HKEY_LOCAL_MACHINE\SOFTWARE\Policies\Microsoft\Edge" /v HardwareAccelerationModeEnabled /t REG_DWORD /d 1 /f
Alternatively, open Registry Editor (a built-in database for system configurations), navigate to the path below, and add the required value. Use the same value name and data that the command above sets.
- Open the Start menu and search for Registry Editor.
- Select Run as administrator, then click Yes at the prompt.
- Go to the path shown below. If a key in that path is missing, right-click the parent key, choose New Key, and name it to match the path.
- Right-click an empty area in the right pane and choose New DWORD (32-bit) Value. Name it and set its data to match the command above.
- Close Registry Editor and restart Edge.
Path: HKEY_LOCAL_MACHINE\SOFTWARE\Policies\Microsoft\Edge
Always Turn Off Hardware Acceleration for Everyone
To turn off Edge hardware acceleration for all user accounts, you set a machine-wide rule that stops the browser from using the graphics card. This helps when the same display glitches affect everyone who uses the PC. You can enforce the rule with a single command in Windows Terminal, or by adding a DWORD value in Registry Editor.
To use Windows Terminal, follow these steps:
- Right-click the Start button.
- Select Terminal (Admin) and click Yes at the User Account Control prompt.
- Paste the command below and press Enter. The terminal should report that the operation completed successfully.
- Close all Edge windows and reopen Edge. The graphics acceleration toggle in Edge settings should now be greyed out and managed by policy.
reg add "HKEY_LOCAL_MACHINE\SOFTWARE\Policies\Microsoft\Edge" /v HardwareAccelerationModeEnabled /t REG_DWORD /d 0 /f
Alternatively, open Registry Editor (a built-in database for system configurations), navigate to the path below, and add the required value. Use the same value name and data that the command above sets.
- Open the Start menu and search for Registry Editor.
- Select Run as administrator, then click Yes at the prompt.
- Go to the path shown below. If a key in that path is missing, right-click the parent key, choose New Key, and name it to match the path.
- Right-click an empty area in the right pane and choose New DWORD (32-bit) Value. Name it and set its data to match the command above.
- Close Registry Editor and restart Edge.
Path: HKEY_LOCAL_MACHINE\SOFTWARE\Policies\Microsoft\Edge
Allow User Choice (Default)
To undo the machine-wide rule and give users control of the setting again, run the command below in Windows Terminal. Open the terminal as administrator first, using the same steps as above. If you added the value by hand in Registry Editor, you can also delete it there.
Restart Edge afterward. The graphics acceleration toggle in Edge settings should no longer be greyed out, and each user can choose their own setting.
reg delete "HKEY_LOCAL_MACHINE\SOFTWARE\Policies\Microsoft\Edge" /v HardwareAccelerationModeEnabled /f
Summary
Hardware acceleration in Microsoft Edge offloads rendering tasks to your graphics card. That makes the browser run much faster than it would relying on the central processor alone. Leave it on unless you are chasing a display problem, and update your graphics driver before you decide to keep it off.
Was this guide helpful?

About the Author
Richard
Tech Writer, IT Professional
Richard is a writer at Geek Rewind who turns complex IT tasks into clear, step-by-step guides. He draws on years of hands-on experience in system administration and enterprise IT operations, focusing on Windows, Linux and WordPress: the problems people actually run into, and the fixes that work. His server and WordPress guides come from systems he runs himself. Richard builds and maintains the platform behind Geek Rewind, from its Ubuntu servers and Nginx configuration to its custom WordPress plugins. Many new tutorials start with readers' questions, and he's always glad to answer them in the comments.

No comments yet — be the first to share your thoughts!