How to Set Default Microphone in Microsoft Teams


The default microphone in Microsoft Teams is the sound input device the app uses for your voice during a call. Setting this up correctly stops audio dropouts and makes sure people on the other end hear you loud and clear.
You need to tell Teams which device to use whenever you plug in a new headset or switch between different microphones on Windows 11 or Windows 10. Choosing your preferred microphone in the settings menu keeps your meetings running smoothly without any audio mix-ups.
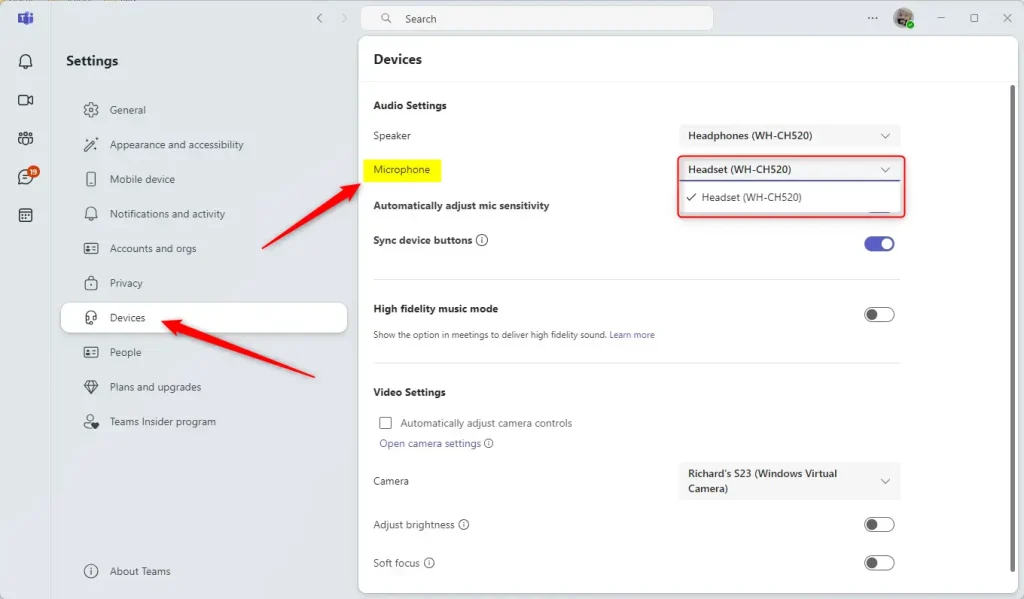
Select your preferred microphone from the Microphone drop-down menu in the Devices settings within Microsoft Teams. Click the three dots (…) next to your profile picture, then choose Settings, and navigate to Devices to make the selection.
How to change your microphone in Microsoft Teams
Setting your default microphone Teams uses takes just a few clicks inside the app settings. Open Microsoft Teams, click the three dots next to your profile picture, and open Settings. Click Devices on the left, and pick the microphone you want to use from the drop-down menu so callers can hear you.


Summary
Modifying your default microphone through the Settings menu allows you to switch between multiple hardware devices for clearer calls.Was this guide helpful?

About the Author
Richard
Tech Writer, IT Professional
Richard is a writer at Geek Rewind who turns complex IT tasks into clear, step-by-step guides. He draws on years of hands-on experience in system administration and enterprise IT operations, focusing on Windows, Linux and WordPress: the problems people actually run into, and the fixes that work. His server and WordPress guides come from systems he runs himself. Richard builds and maintains the platform behind Geek Rewind, from its Ubuntu servers and Nginx configuration to its custom WordPress plugins. Many new tutorials start with readers' questions, and he's always glad to answer them in the comments.

[…] message preview on or off, manage teams notifications during calls, set default speakers, set default microphone, enable high fidelity sound, and […]
[…] message preview on or off, manage teams notifications during calls, set default speakers, set default microphone, enable high fidelity sound, change mic sensitivity, set default camera, and […]
[…] preview on or off, manage teams notifications during calls, set default speakers, set default microphone, enable high fidelity sound, change mic sensitivity, set default camera, hide […]