How to Change Default Microphone in Windows 11

The default microphone in Windows 11 is the audio input your PC uses for voice calls, recording apps, and games. If you have more than one microphone connected, such as a USB headset and a built-in laptop mic, Windows uses only one of them as the default unless an app is told otherwise.
You can change it in under a minute from the Settings app, and you don’t need to install anything. This guide covers three ways to do it: the Settings app, the classic Sound Control Panel , and a per-app setting for when different programs need different microphones.
Open Settings System Sound, scroll to the Input section, and click the dropdown under “Choose a device for speaking and recording” to select your microphone. The new default takes effect immediately without restarting Windows.
Why Set a Default Microphone?
When the default is set correctly, calls, meetings, voice typing, and recording apps pick up the right device on their own. This matters most after you plug in a headset or USB microphone. Windows often switches to a newly connected device by itself, and that device may not be the one you want. Setting the default saves you from choosing an input by hand every time you open an app.
Apps that were already open when you made the change may keep using the old microphone until you close and reopen them.
Method 1The Quickest Way – Using Windows Settings
This is the main method, and it works on both Windows 11 Home and Pro. It changes the microphone for every app that follows the system default.
- Open Settings . Press Win+I. The Settings app opens.
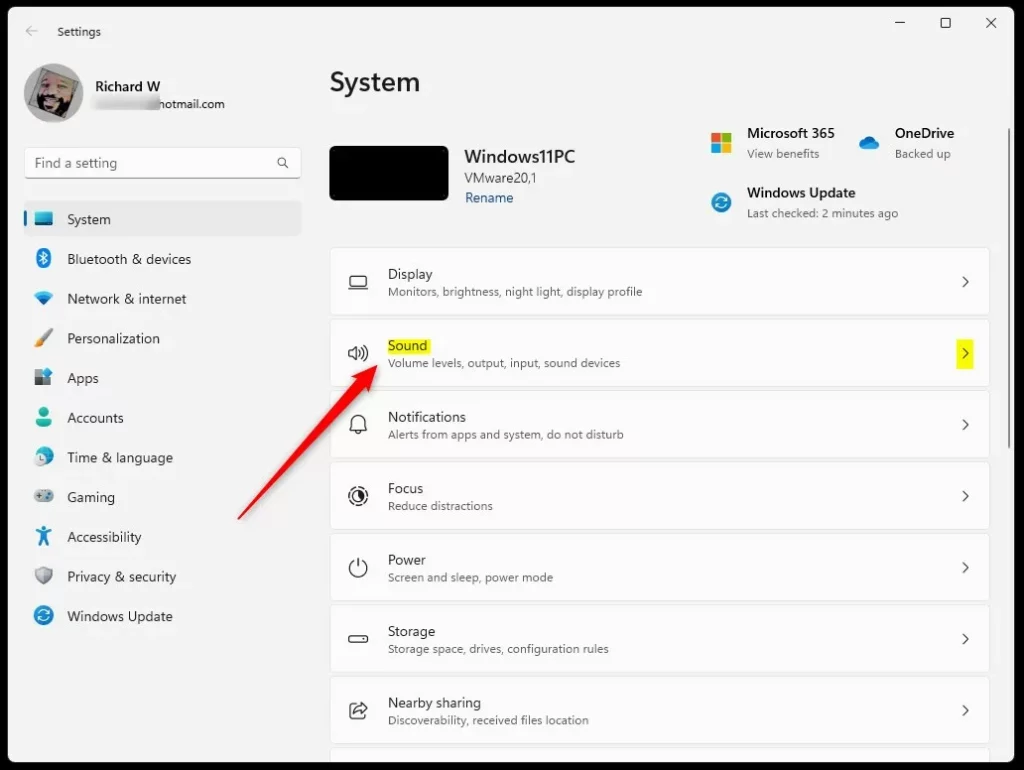
- Go to the Sound page. Click System in the left sidebar, then click Sound on the right. You should see your output devices at the top and an Input section further down.
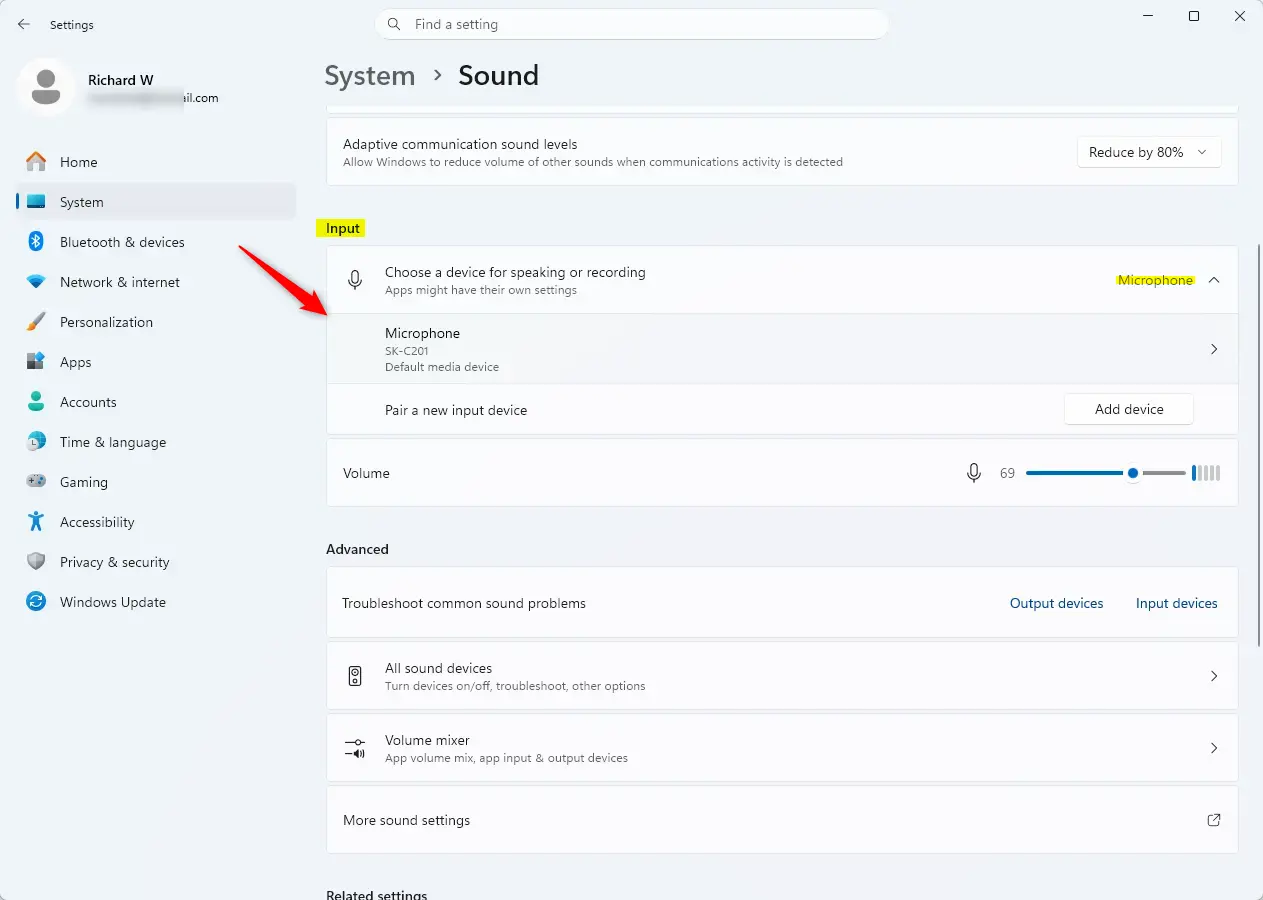
- Find the Input section. Scroll down until you reach Input. You will see “Choose a device for speaking and recording.”
- Pick your microphone. On most builds this is a dropdown, so click it to open the list of microphones. On newer builds of Windows 11 it is a list of devices with a selection circle next to each one. Either way, click the microphone you want to use. The selection now shows your chosen device, and that is your new default.
- Test it. This step is optional, but I recommend it. Speak into the microphone and watch the blue bar under the device selection. If it moves, Windows is hearing you. If it stays flat, try another device in the list or check that the microphone is not muted.
- Close Settings. The change is saved as soon as you make it, so there is no Apply or OK button.
If your microphone is not in the list, check the following:
- Make sure the device is plugged in firmly, or paired if it is Bluetooth.
- Try a different USB port.
- Check that the device has not been disabled. The Control Panel method below shows how to bring disabled devices back into view.
- Check Settings Privacy & security Microphone If microphone access is turned off, apps won't be able to hear you even when the right device is selected.
To undo the change, go back to the same list and pick your previous microphone.
Method 2Using the Classic Sound Control Panel
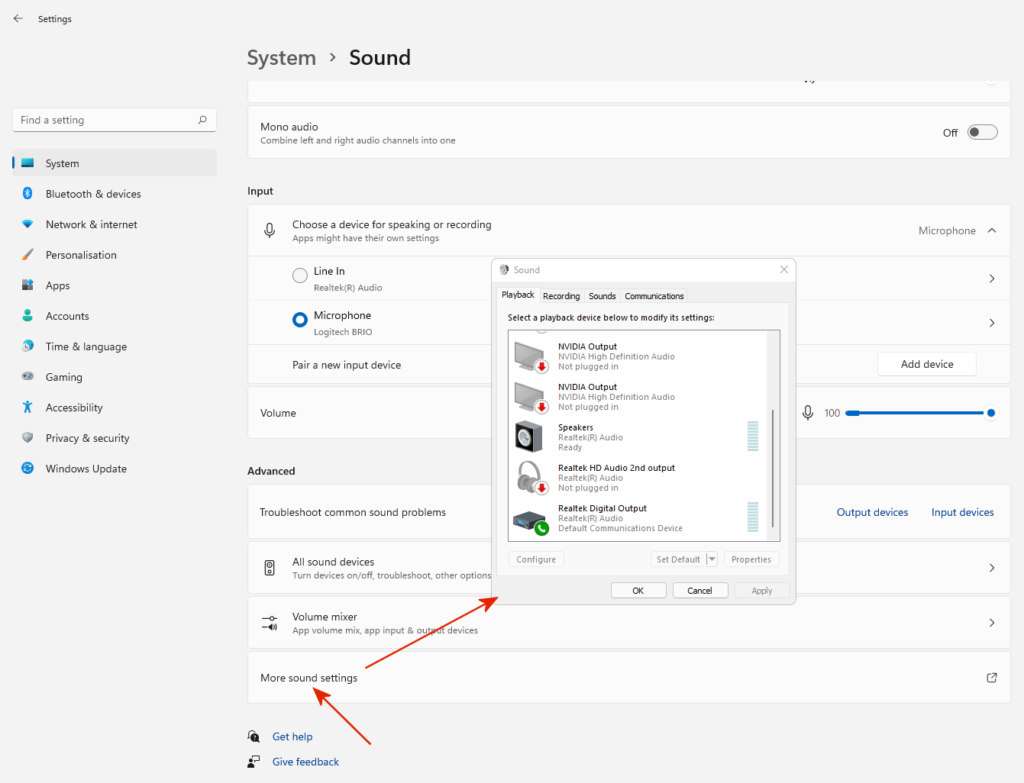
The classic Sound Control Panel is an alternative to the Settings app. It shows all your audio devices in one window, and it exposes options that the Settings page doesn't, such as a separate default for communications. It works the same on Home and Pro.
- Open the Control Panel. Type "Control Panel" in the Windows search bar and select it. If the window shows categories, set View by in the top-right corner to Large icons or Small icons. This is the "Icon view" mentioned in older guides. Alternatively, open Hardware and Sound and click Sound there.
- Open Sound. Click the Sound icon. A separate Sound window opens with your audio devices.
- Go to the Recording tab. Click the Recording tab at the top. It lists your microphones and other input devices, and each one shows a level meter that moves when it picks up sound.
- Select your microphone. The current default has a green checkmark and is labeled "Default Device." Click the microphone you want once to highlight it.
- Set it as the default. Click the Set Default button at the bottom of the window. You can also right-click the microphone and choose Set as Default Device. The green checkmark should move to the device you picked.
- Click OK. This closes the Sound window and saves your changes.
A few things can help if the list looks wrong:
- If your microphone is missing, right-click an empty area of the list and tick Show Disabled Devices. A disabled microphone will appear greyed out. Right-click it and choose Enable.
- The right-click menu also has Set as Default Communication Device. Some calling apps use this device rather than the main default. If a call app ignores your choice, check this setting.
- To undo the change, select your previous microphone and set it as the default again.
Method 3Setting Defaults for Specific Apps
For example, you might use a desk microphone for podcast recording while a video call app uses your headset.
- Open Settings. Press Windows key + I.
- Go to System Sound Click System in the left sidebar, then click Sound.
- Open the Volume mixer. Scroll down the Sound page and click Volume mixer. You will see a list of apps under Apps.
- Choose the app's input device. Find the app in the list. If its settings are collapsed, click the arrow next to it to expand them. Use the Input device dropdown to select the microphone you want that app to use. To make it follow the system default again, select Default.
- Close Settings. The app-specific choice overrides the system default for that app only.
Some notes on how this behaves:
- The Volume mixer mainly lists apps that are open and using audio. If you don't see your app, start it, make a sound or open a call, then check the list again.
- Apps such as Zoom, Teams, and Discord have their own microphone setting inside the app. If an app keeps using the wrong device, check its own audio settings first.
- You may need to restart the app before it uses the new microphone.
Summary
Setting the right default microphone means your PC uses the correct input for calls, meetings, and recordings. That matters most when you have several microphones connected. Use the Settings app for a quick change, the Sound Control Panel when you need the extra options such as the communications default, and the Volume mixer when one app needs its own microphone.
Have a question about this guide?
Answered by AI from this guide. Good questions may be added to this page — please don't include personal details.
Did this guide fix your problem?

About the Author
Richard
Tech Writer, IT Professional
Richard is a writer at Geek Rewind who turns complex IT tasks into clear, step-by-step guides. He draws on years of hands-on experience in system administration and enterprise IT operations, focusing on Windows, Linux and WordPress: the problems people actually run into, and the fixes that work. His server and WordPress guides come from systems he runs himself. Richard builds and maintains the platform behind Geek Rewind, from its Ubuntu servers and Nginx configuration to its custom WordPress plugins. Many new tutorials start with readers' questions, and he's always glad to answer them in the comments.
No comments yet — be the first to share your thoughts!