How to Set Default Speakers in Windows 11

Setting default speakers in Windows 11 lets you pick one main playback device so your music, games, and videos play through the right hardware automatically. This primary sound output replaces your built-in monitor speakers or old headphones with your preferred soundbar or desktop speakers for every app, so you don’t have to switch audio settings by hand each time.
You can manage your audio outputs in a few clicks using the Quick Settings menu or the main Sound settings page in Windows 11 version 22H2 and later. Both methods work the same on Home and Pro, and neither needs a restart. The change takes effect the moment you pick a device.
Open Settings with Win+I, go to System Sound, and click the dropdown under Output to select your preferred speakers. The audio routing changes immediately for all apps unless an individual app has its own output setting.
Select Default Speakers in 🪟 Windows 11
From then on, your music, games, and videos play through those speakers unless an app has its own output set. The steps below walk through each screen.
Step 1: Open Windows Settings
You can open Settings in either of two ways:
- Press Win + I on your keyboard. The Settings window opens straight away.
- Or click the Start button, then select Settings. If it isn’t pinned, type “Settings” into the Start menu and open it from the results.
Either way, you should now see the Settings window with the categories listed down the left side.

If you opened Settings by typing in the Start menu search box, press Enter to complete the search and open the top result.
Step 2: Go to Sound Settings
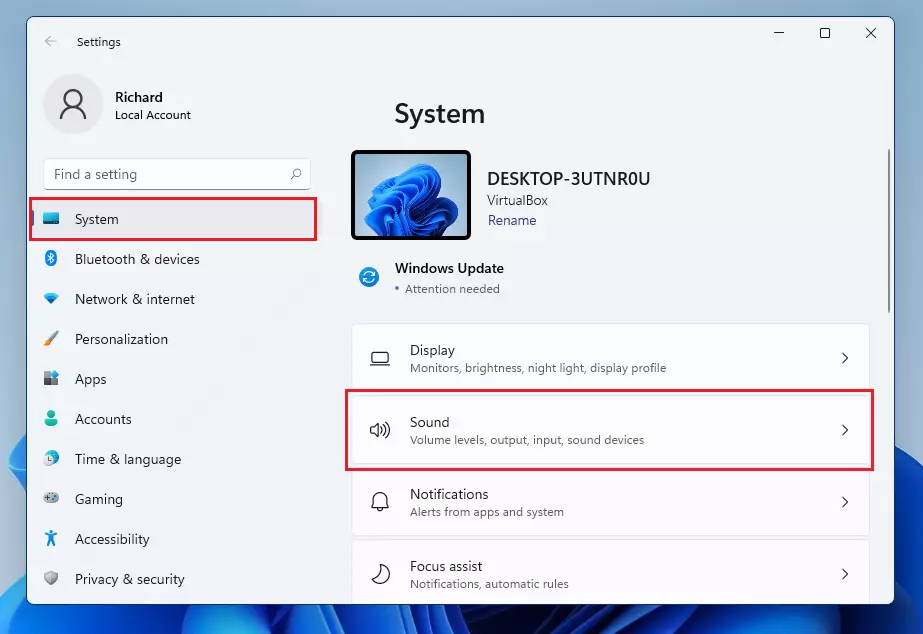
- In the Settings window, click System in the left menu.
- On the right side, select Sound.
You should now see the Sound page, with an Output section near the top and an Input section below it. If you only see a short list of categories, make sure System is the selected item on the left.
Step 3: Choose Your Output Device
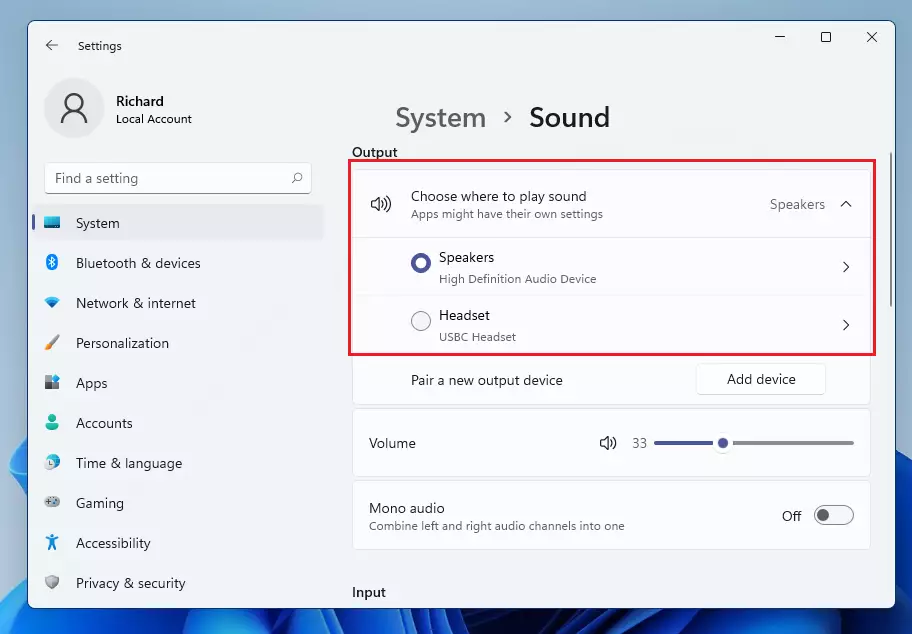
- Look for the section labeled Output.
- Find the option that says Choose your output device.
- Click the drop-down menu and pick the speakers or headphones you want to use as your default sound device.
The name of the device you picked now shows in the Output section. On some builds the Output section lists your devices directly, and you select one from that list instead of using a drop-down. The result is the same. Play a video or music clip to confirm the sound comes from the right hardware.
If the device you want isn't listed, see the troubleshooting notes near the end of this tutorial.
To check for overrides, open Settings System Sound Volume mixer, where you can set an output device for individual apps. If one app still plays through the wrong speakers, look there first, then in that app's own audio settings.
To undo the change, repeat the steps above and pick your previous device.
Quickly Switch Sound Devices from the Taskbar
To switch sound devices quickly from the taskbar, click the speaker icon in the bottom right corner of your screen and select the arrow next to the volume slider. This opens a list of all connected audio hardware, so you can change your active speakers or headphones without opening the main Settings app. It is the faster option if you swap between speakers and a headset often.
Step 1: Click the Speaker Icon
- Look for the speaker icon on the right side of the taskbar, in the system tray next to the network and battery icons.
- Click it.
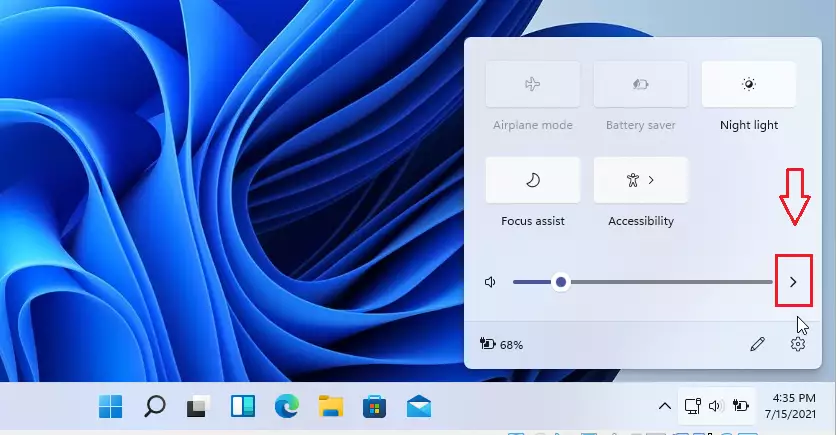
The Quick Settings panel opens, with a volume slider near the bottom. If the icon isn't visible, click the up arrow in the system tray to show hidden icons.

Step 2: See All Sound Devices
- Look for the arrow next to the volume slider. It is usually found in Windows 11 version 22H2 and later.
- Click the arrow.
A list of all your connected sound devices appears, such as speakers and headphones. This list lets you select the specific audio output you want to use. If you don't see the arrow, your version of Windows 11 may be older than 22H2, so run Windows Update or use the Settings method above.
Step 3: Pick Your Device
- Select the device you want to use from the list.
Windows switches sound output to that device right away, with no restart needed. The device you chose is now the active output, and it stays that way until you change it again.
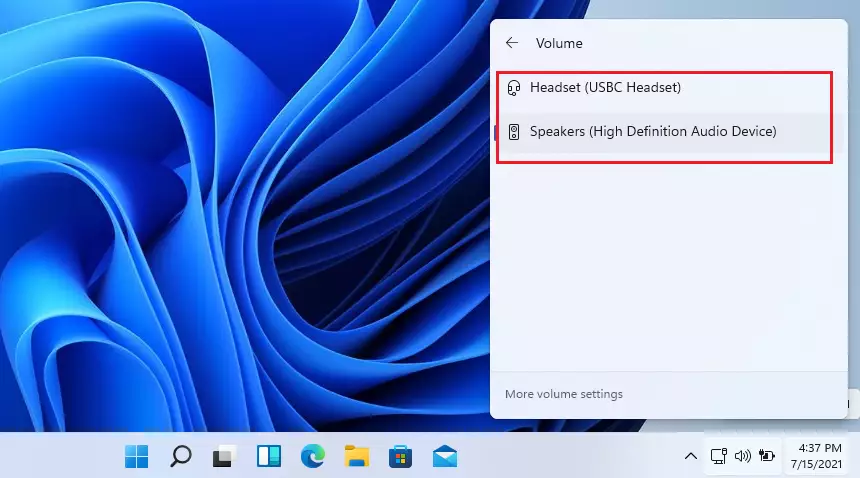
Connected audio devices, such as speakers and headphones, may not appear in Windows 11 settings if they lack proper physical connections or power. Windows also needs a brief period, often under 60 seconds, to detect newly plugged-in hardware.
If a device is still missing, work through these checks:
- Make sure the speakers are powered on and the volume knob on them isn't turned all the way down.
- Check that the cable is fully seated, or try a different port on the PC.
- For Bluetooth speakers or headphones, confirm they are paired and show as connected in Settings Bluetooth & devices
- Unplug the device, wait a few seconds, and plug it back in.
- On recent builds, open Settings System Sound and look under Advanced for All sound devices. A device that was disabled earlier shows up there, and you can turn it back on.
Summary
Assigning a default playback device keeps audio routing predictable across every application on your computer. Setting a default speaker in Windows 11 makes sure your sound always comes from the device you want, and you can switch between your speakers and headphones at any time using either the taskbar or the main Settings app.
- Setting a default speaker in Windows 11 makes sure your sound comes from the device you want.
- You can change your audio device anytime using the Settings app, under System Sound
- You can also quickly switch devices from the taskbar without opening Settings. The arrow next to the volume slider is available in Windows 11 version 22H2 and later.
- Some apps can use their own sound device, so check the app's settings and the Volume mixer if you hear sound from the wrong speakers.
- Keep your audio devices connected and turned on so Windows recognizes them. Give newly plugged-in hardware up to a minute to show up.
- For more help with Windows 11, visit the official Microsoft support page: https://support.microsoft.com/windows
Have a question about this guide?
Answered by AI from this guide. Good questions may be added to this page — please don't include personal details.
Did this guide fix your problem?

About the Author
Richard
Tech Writer, IT Professional
Richard is a writer at Geek Rewind who turns complex IT tasks into clear, step-by-step guides. He draws on years of hands-on experience in system administration and enterprise IT operations, focusing on Windows, Linux and WordPress: the problems people actually run into, and the fixes that work. His server and WordPress guides come from systems he runs himself. Richard builds and maintains the platform behind Geek Rewind, from its Ubuntu servers and Nginx configuration to its custom WordPress plugins. Many new tutorials start with readers' questions, and he's always glad to answer them in the comments.
No comments yet — be the first to share your thoughts!