How to Turn On or off Auto Unlock When Windows Recognizes Your Face in Windows 11

Windows Hello can unlock your PC as soon as it recognizes your face, so you don’t have to click past the lock screen first. This tutorial shows how to turn that auto-unlock behavior on or off.
Open Settings, go to Accounts Sign-in options, expand Facial recognition (Windows Hello), and check the box for Automatically dismiss the lock screen if Windows Hello recognizes your face. The auto-unlock turns on immediately with no restart needed.
What is Windows Hello?
Windows Hello lets you sign in to Windows 11 without typing a password. You can use your face, a fingerprint, or a PIN instead. Sign-in is quicker, and it is also safer. Your PIN works only on the device where you created it, so it is not exposed the way a standard password is. It is also backed by your Microsoft account.
That means the infrared camera built into many laptops and tablets, or a compatible external one. An ordinary webcam without infrared support usually can’t be used for Windows Hello face sign-in.
The auto-unlock option only appears after you have set up facial recognition. Once you have, you choose whether the lock screen goes away on its own when your face is recognized. With the option off, Windows still recognizes you, but you must dismiss the lock screen yourself (press a key or click) before it signs you in.
How to Turn On or Off Auto Unlock with Face Recognition
Option 1Use 🪟 Windows 11 Settings (Easy Way)
This is the easiest method and works the same on Windows 11 Home and Pro.
- Press Win+I to open Settings .
- Click Accounts in the left pane.
- Click Sign-in options on the right. You should see a list of sign-in methods under Ways to sign in.
- Under Ways to sign in, click the arrow next to Facial recognition (Windows Hello). The section expands and shows more options.
- Select the box for Automatically dismiss the lock screen if Windows Hello recognizes your face to turn auto-unlock on. Clear the box to turn it off.
- Close the Settings window. The change applies right away, and you don’t need to restart.
If you don’t see the Facial recognition entry, or the option isn’t there, check these things first:
- Your PC may not have a camera that Windows Hello supports. In that case Windows hides or greys out the face option.
- You may not have set up face sign-in yet. If a Set up button is showing, click it and follow the prompts, then come back to the checkbox.
- On a work or school PC, your organization may control Windows Hello. If the setting is greyed out, ask your administrator.
To undo the change, return to the same page and set the checkbox back the way it was.
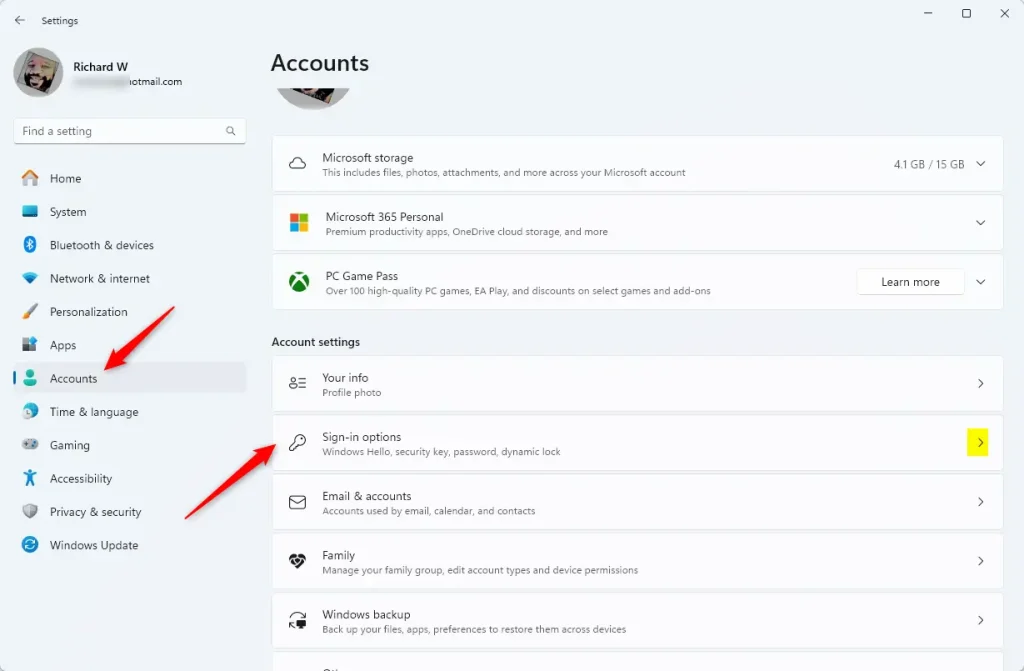
Here you expand the Facial recognition settings.

Then you switch the Automatically dismiss the lock screen option on or off.
Option 2Use Registry Editor (For Advanced Users)
You can also change this setting in the Windows Registry, the database where Windows stores its configuration. Use this method only if the option is missing from Settings or you need to set it on a specific account. First you look up your user's Security Identifier (SID), a unique ID for each account. Then you edit the registry entry that matches that SID.
Before you start, consider backing it up. In Registry Editor, click File Export, choose All as the export range, and save the file somewhere safe.
- Open Windows Terminal and choose Windows PowerShell. If it opens in another shell, use the drop-down arrow in the tab bar to open a PowerShell tab.
- Type this command and press Enter to list the user accounts and their SIDs:
Get-WmiObject win32_useraccount | Select name,sid
You should see a table of account names and SIDs. - Find the SID for the user you want to change. It looks like this: S-1-5-21-xxxxxxxxxx-xxxxxxxxxx-xxxxxxxxxx-xxxx.
- Open Registry Editor by typing
regeditin the Start menu and pressing Enter. Click Yes if User Account Control asks for permission. - In Registry Editor, go to this location. You can paste it into the address bar at the top:
HKEY_LOCAL_MACHINE\SOFTWARE\Microsoft\Windows\CurrentVersion\Authentication\Logon UI\FaceLogon - Look for a key (a folder in the left pane) named with the SID you found earlier, and click it. Its values appear on the right.
- On the right side, double-click
AutoDismissOn. An edit window opens. - Change the value to 1 to turn on auto unlock, or 0 to turn it off, then click OK.
- Close Registry Editor and Windows Terminal. Sign out and back in, or restart, so the change is picked up. Then lock your PC (Windows key + L) to test it.
To undo the change, open the same value and set it back to its previous number.
Here's the command showing user accounts and SIDs:
Here's how the registry folder looks:

This is the registry key where the face recognition settings are stored.
Helpful Links
Summary
Windows Hello facial recognition lets you unlock your PC with your face. You decide whether the lock screen is dismissed automatically or stays until you dismiss it. Use the Settings checkbox for the simplest route, and use the registry value only when Settings doesn't offer the option.
Was this guide helpful?

About the Author
Richard
Tech Writer, IT Professional
Richard is a writer at Geek Rewind who turns complex IT tasks into clear, step-by-step guides. He draws on years of hands-on experience in system administration and enterprise IT operations, focusing on Windows, Linux and WordPress: the problems people actually run into, and the fixes that work. His server and WordPress guides come from systems he runs himself. Richard builds and maintains the platform behind Geek Rewind, from its Ubuntu servers and Nginx configuration to its custom WordPress plugins. Many new tutorials start with readers' questions, and he's always glad to answer them in the comments.


No comments yet — be the first to share your thoughts!