Microphone access for specific desktop apps in Windows 11 lets individual programs such as voice recorders and games hear your audio while other software stays blocked. Windows 11 controls these permissions through its privacy settings so that unwanted apps cannot listen to you.
Advertisement
Windows updates and new app installs can reset or turn off these permissions without warning. If a program cannot hear your voice, check the permissions before you suspect the hardware. You will need to turn access on for that app in the system settings. The steps below cover the Settings ⚙️ app first, then Registry Editor for advanced users, then what to do if the app still hears nothing.
⚡ Quick Answer
Open Settings ⚙️, go to Privacy & security›Microphone, and set Microphone access and Let apps access your microphone to On. For desktop programs such as.exe apps, also turn on Let desktop apps access your microphone at the bottom of that page. The change applies without a restart, but close and reopen the app so it notices the new permission.
Advertisement
Checking Global Microphone Settings
Start with the system-wide switch. If it is off, no app can ask for or use the microphone, and the app-level options further down are greyed out or hidden. Everything here is in Settings, and no restart is needed.
Open Settings by pressing the Win and I together.
Select Privacy & security from the left sidebar. The privacy options appear on the right.
Windows 11 Start menu with Settings gear icon highlighted.
Scroll down to the App permissions section and click Microphone.
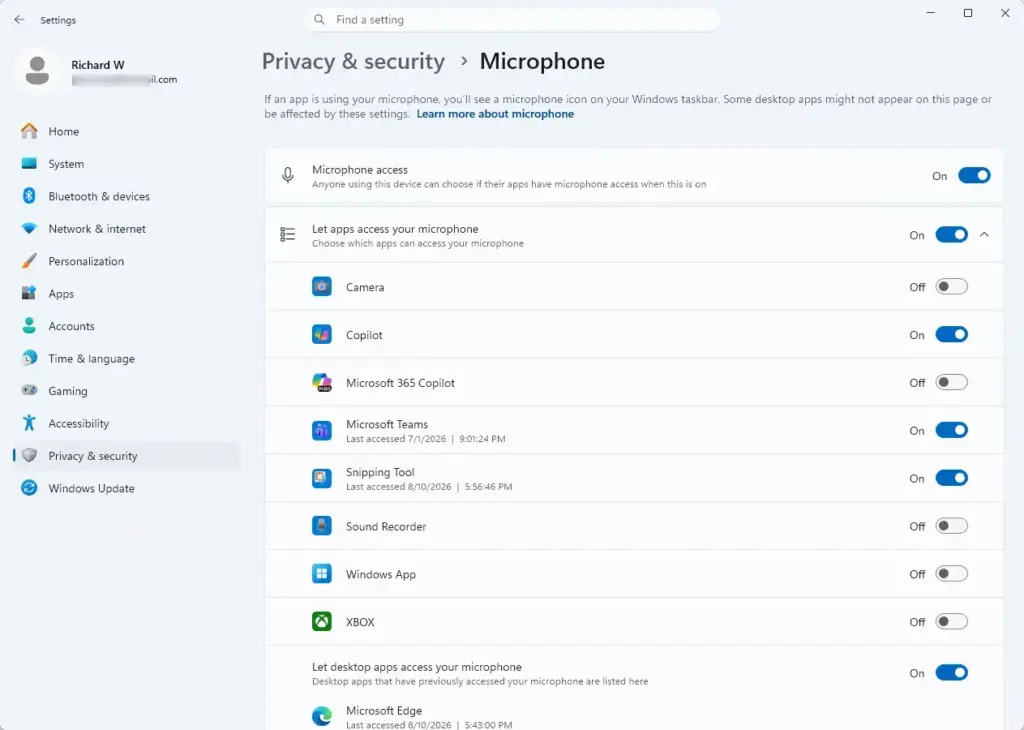
Settings › Privacy & security › Microphone
You should see the microphone page with several toggles and a list of apps.
Set the Microphone access switch to On.
Set the Let apps access your microphone switch to On. The list of apps below it should now be active instead of greyed out.
If these switches are greyed out, or you see a message that some settings are managed by your organization, the PC is controlled by a work or school policy. You will need your administrator to change it. On a Home edition PC that you manage yourself, a greyed-out switch is rare. If you see one, check whether a work or school account is connected to the PC. To undo any of this, set the same switches back to Off.
Allowing Specific Desktop Apps
📝Good to KnowPrograms you install from the web, such as classic .exe or .msi applications, are treated differently from Microsoft Store apps.
They share one switch on the same page, Let desktop apps access your microphone. If it is off, these programs will not get audio from your microphone, even when the main switches are on.
Scroll down to the bottom of the page and set Let desktop apps access your microphone to On.
Find your application in the list underneath this toggle. Many desktop apps only appear in this list after they have tried to use the microphone, so open the app, start a recording or call, then check the list again. Desktop apps often show only a “last accessed” time and are controlled by this one toggle. If your app has no switch of its own, that is normal.
Close the app completely and reopen it. Many programs only check for the microphone when they start, so they will not notice the change until then.
Turning off Let desktop apps access your microphone blocks all desktop apps at once. Windows 11 cannot block a single desktop app through this toggle. Individual desktop apps can be blocked only by editing the NonPackaged registry keys in the next section, which is not officially supported.
Advertisement
Two things in Windows 11 help you work out which app is actually listening. First, the Microphone page shows a Recent activity section, which lists apps that have recently used the microphone. If you are not sure which program is picking up your audio, or you see one you do not recognize, look there. Second, while an app is using the microphone, a microphone icon appears in the taskbar tray (the notification area at the right end of the taskbar). Hover over it to see which app is using the microphone. If the icon shows while you are not on a call or recording, check Recent activity to find the app. The icon disappears when nothing is using the microphone.
Enabling Microphone Access via the Registry
Registry Editor lets advanced users change app permissions directly. You open it from the Run dialog and edit the consent keys. This gives a program permission without going through the Settings menu. It also helps when Settings does not show the app you need.
⚠️WarningRegistry changes can cause system instability if entered incorrectly.
Back up the registry before proceeding. In Registry Editor, use File then Export, choose All as the export range, and save the .reg file somewhere safe. To restore it later, double-click the file. You need an administrator account to run Registry Editor.
Press the Windows key and the R key together to open the Run dialog box.
Type regedit and press Enter to open Registry Editor. Click Yes if User Account Control asks for permission. Registry Editor opens with a folder tree on the left.
Navigate to the following path: HKEY_CURRENT_USER\Software\Microsoft\Windows\CurrentVersion\CapabilityAccessManager\ConsentStore\microphone
Look for a subkey matching your specific application name or package ID. If you need to manage non-packaged traditional apps, navigate to: HKEY_CURRENT_USER\Software\Microsoft\Windows\CurrentVersion\CapabilityAccessManager\ConsentStore\microphone\NonPackaged. Subkeys there are named after the program's file location, so look for the one that matches your app's .exe.
Double-click the Value entry inside the target application key. The Edit String window opens.
Change the value data to Allow to grant permission, or Deny to revoke it, then click OK.
Close Registry Editor and restart the app. If the change does not seem to take effect, sign out and back in. Check that the matching switches in Settings still agree with what you set, because Settings writes to these same keys and can overwrite your edit. To undo a change, set the value back to what it was, or double-click the .reg backup you exported earlier.
Advertisement
Troubleshooting Common Microphone Access Errors
If you have enabled microphone access for the app and it still hears nothing, the problem is usually the input device rather than permissions. Common causes are the wrong input device being selected, a muted or very low input level, or a hardware mute switch.
Check for a physical mute button or switch on your headset, USB microphone or laptop keyboard. Some laptops have a mute key with a small indicator light.
Open Settings, then go to System›Sound
Scroll to the Input section and click your microphone in the list. If several devices are listed, pick the one you are actually speaking into.
Check that the input volume is not set to zero, and speak while watching the level bar. If the bar moves, Windows is receiving your voice.
Open the app's own audio settings and make sure it uses the same microphone. Some apps keep their own device choice and ignore the Windows default.
If your microphone does not appear at all, unplug it and plug it back in, try another USB port, and check that no other app is holding it exclusively. If the device still does not appear, reinstall its driver from the manufacturer's site or from Device Manager.
What to do next
Once access is on, test the microphone before you rely on it in a call or recording. A quick test confirms that both the permissions and the input device are working.
Open Settings, then go to System›Sound
Under Input, select your microphone and use the built-in test or watch the input level bar while you speak. On recent builds you will see a Start test button that reports the input volume.
Open the built-in Sound Recorder app from the Start menu, record a few seconds of speech, and play it back to judge the quality.
Open the app you wanted to use and make a short test recording or call there, since this checks the permissions you changed. While it records, the microphone icon should appear in the taskbar tray.
If you want hands-free control, Windows 11 also includes voice features. Voice typing starts with the Windows key and H, and voice access is under Settings›Accessibility›Speech. Both rely on the same microphone permissions you set up above.
Advertisement
Frequently asked questions
Why won't my iPhone allow access to my microphone for some apps?
iPhone apps need microphone permission before they can hear you. Go to Settings›Privacy›Microphone to see which apps have access. Toggle off any app you don't want listening, or turn on access for apps that need it. iOS requires you to grant permission individually for each app.
Why is my iPhone microphone not working for certain apps?
Check if the app has microphone permission in Settings›Privacy›Microphone. Make sure the toggle next to the app is on. If it's already on, try toggling it off and back on. Restart the app afterward. Also check that your microphone hardware itself isn't muted or blocked.
How do I turn on the microphone for all apps on my iPhone?
iOS doesn't have a single switch to enable microphone for all apps at once. You must grant permission individually. Go to Settings›Privacy›Microphone and toggle on each app separately. Some apps may also need permission enabled within their own settings.
How do I find out which apps have access to my microphone?
Open Settings and tap Privacy›Microphone You'll see a complete list of all apps with their permission status shown by a toggle switch. Apps with the toggle on have microphone access. Apps not listed haven't requested permission yet.
Still have a question?
Answered by AI from this guide. Good questions may be added to this page — please don't include personal details.
📬 Get new Windows tips in your inbox
One email when we publish something worth your time. No spam, unsubscribe anytime.
Richard is a writer at Geek Rewind who turns complex IT tasks into clear, step-by-step guides. He draws on years of hands-on experience in system administration and enterprise IT operations, focusing on Windows, Linux and WordPress: the problems people actually run into, and the fixes that work.
His server and WordPress guides come from systems he runs himself. Richard builds and maintains the platform behind Geek Rewind, from its Ubuntu servers and Nginx configuration to its custom WordPress plugins.
Many new tutorials start with readers' questions, and he's always glad to answer them in the comments.
One email when we publish a guide worth your time — new Windows features, the fixes that actually
work, and a heads-up when Microsoft breaks something. Unsubscribe in one click.
📬 Get new Windows tips in your inbox
One email when we publish something worth your time. No spam, unsubscribe anytime.



No comments yet — be the first to share your thoughts!