How to Change App Permissions for Webcam Access in Windows 11 Privacy Settings

App permissions for webcam access in Windows 11 control which software can use your computer camera. They stop unwanted apps from turning it on behind your back. The switches live in the Privacy & security section of the Windows Settings app.
Blocking a program here stops it from getting video from the camera straight away. You can change access for individual apps like Zoom or Teams at any time, and you can reverse any change by flipping the same switch back.
This guide also covers the related camera settings in Windows 11: testing the feed, updating drivers, and fixing common picture problems. If a camera is blocked in Privacy settings, none of those other fixes will help, so check permissions first.
Open Settings , select Privacy & security from the left menu, scroll to App permissions and click Camera. Toggle the main Camera access switch on or off, then switch individual apps on or off below. Changes apply immediately without restart.
Opening the Windows Settings App
Every camera setting starts in the Settings app. There are two quick ways to open it.
- Press Win+I on your keyboard. The Settings app opens.

Windows 11 Start menu with Settings gear icon highlighted. - Or click the Start button and select the gear-shaped Settings icon. You will see the same window.
Navigating to Bluetooth & Devices
Webcams are listed with your other hardware under Bluetooth & devices. This is where you confirm Windows can see the camera at all.
- Open the Settings app.
- Select Bluetooth & devices from the left-hand sidebar. The device list appears on the right.
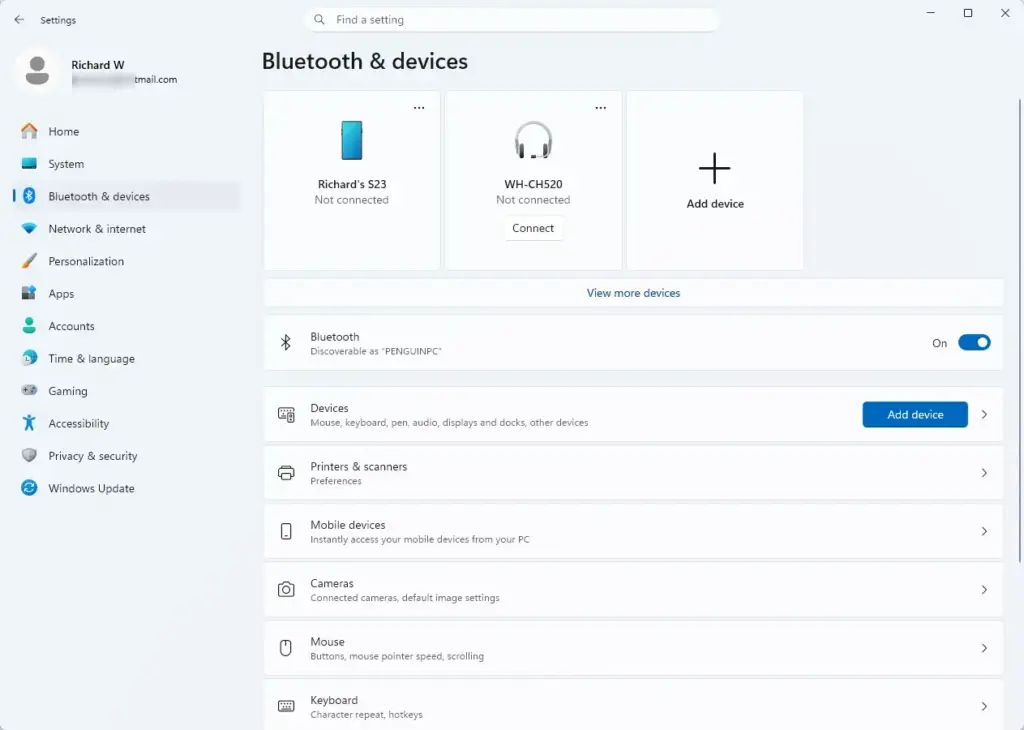
Windows Settings menu highlighting the Bluetooth and devices option for printers - Click Cameras. You will see every camera Windows recognizes, built-in or USB.
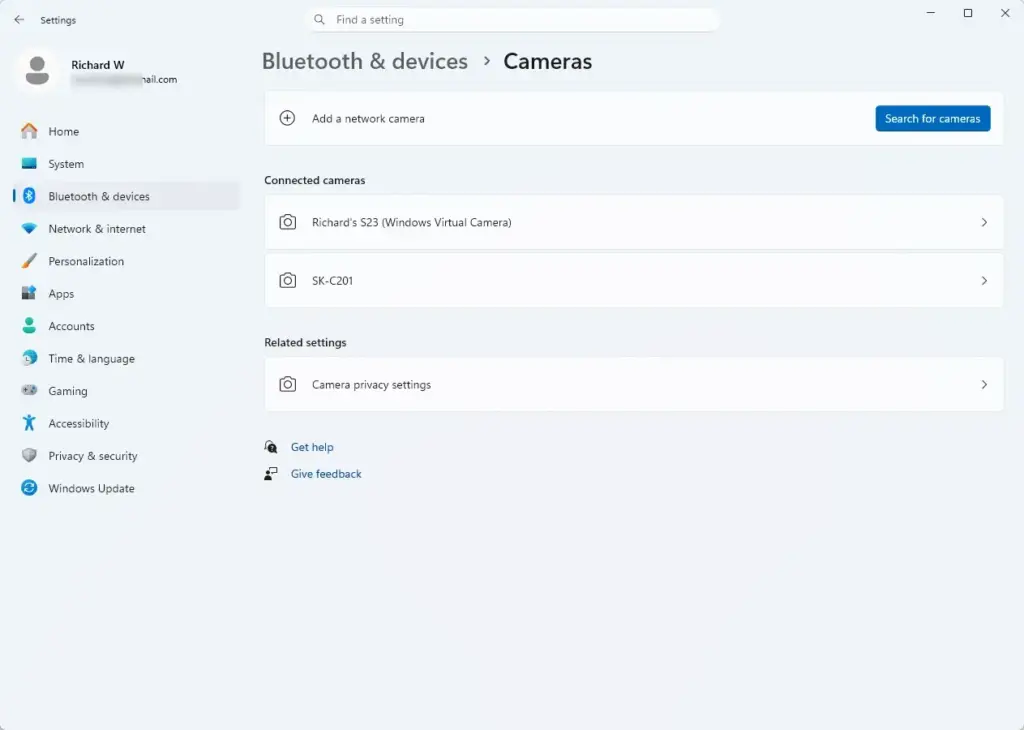
Settings › Bluetooth & devices › Cameras
If your camera is missing from the list, unplug it and plug it back in. If it is a built-in camera, check your laptop for a physical privacy shutter or a function-key camera switch. The driver and hardware sections further down cover the other likely causes.
Configuring Connected Cameras
The camera page lets you test your video feed and adjust basic properties like brightness and contrast. Do this before an important call to check your framing, fix lighting problems, and spot connection errors.
- Under Cameras, click your specific camera in the list. Its settings page opens.
- Look at the live video preview at the top. Check your framing and lighting.
- Drag the Brightness slider left or right until the exposure suits your room. The preview updates as you move it.
- Drag the Contrast slider to set how strongly light and dark areas separate in your video.
The options on this page depend on the camera and its driver. Some cameras show extra controls, and others show only these two sliders. If the preview is black, the camera is probably blocked, covered, or in use by another app. Check the permissions in the next section.
Managing Privacy and App Access
This is the main part of the guide. The Privacy & security page controls which software can use your webcam. You can switch camera access off completely, or allow it for only the apps you trust.
- Open the Settings app and select Privacy & security from the left menu.

- Scroll to the App permissions section and click Camera.
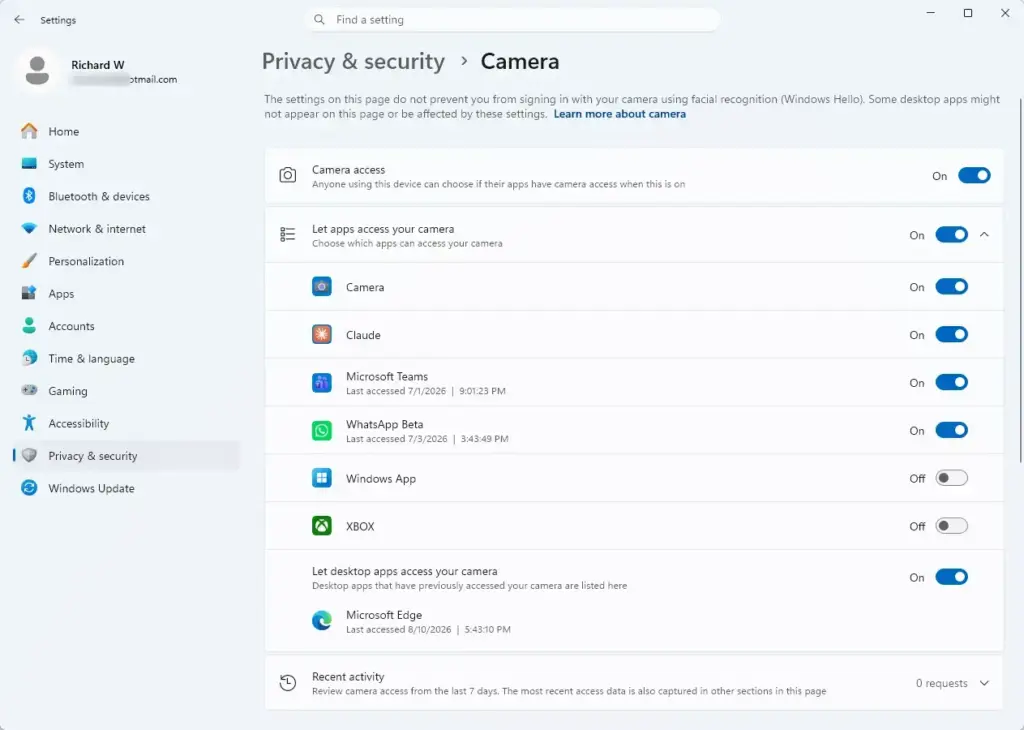
Settings › Privacy & security › Camera - Set the main Camera access switch to On or Off. This controls every application at once. When it is off, the individual switches below are greyed out or hidden.
- With camera access on, scroll down the list of installed software. Toggle the switch beside each program to grant or deny it camera access.
Two things catch people out. First, desktop programs, such as classic installed versions of Zoom or Teams, are often controlled by a separate switch, Let desktop apps access your camera. If an app is not in the main list, check that switch. Depending on your Windows 11 version, desktop apps may be listed in their own section or in the main list. Second, if a call app cannot see your camera, check this page before you reinstall anything.
Settings changes apply right away, and you do not need to restart. An app that was already running may need to be closed and reopened before it notices the change. To undo anything, return to this page and flip the switch back. On a work or school PC, an administrator may have locked these options, in which case the switches stay greyed out.
Using Manufacturer Control Software
Manufacturer control software offers advanced camera settings that the standard Windows sliders do not include. These can include digital zoom, pan, tilt, and custom color profiles. Brands like Logitech, Razer, and Microsoft provide companion apps for this, and the apps can also install firmware updates.
Download it from the manufacturer's own support site, not a third-party download page. These applications run in the background and override the default Windows settings while they are active.
If your picture changes unexpectedly or the Windows sliders seem to have no effect, a companion app running in the background is a likely cause. Open it and check its settings.
Troubleshooting Common Video Quality Issues
Most video quality problems have simple causes. Choppy feeds, blurry images, and dark pictures usually come from a dirty lens, poor lighting, or background apps competing for the camera. Wipe the lens with a microfiber cloth, close other video programs, and check your USB connection. That usually restores a clear picture.
If the feed is choppy or freezes, close any background applications that might be using the video stream at the same time. This includes a second video call app, a screen recorder, or a browser tab with a camera test open. Also check that the USB cable plugs directly into a high-speed port on the computer, not an unpowered USB hub.
If the picture is dark, add light in front of you rather than behind you. Then adjust the Brightness slider as described earlier.
Updating Camera Drivers via Device Manager
Updating the camera driver in Device Manager can fix communication errors between your webcam and Windows. Windows downloads the latest software from Microsoft's update service. If your maker publishes a newer driver only on its own site, use the manufacturer's app or download page instead. You need administrator rights on the PC to install the new files.
- Right-click the Start button and select Device Manager.
- Click the arrow next to Cameras to expand the list of imaging devices. On some PCs the webcam appears under Imaging devices or Sound, video and game controllers instead.
- Right-click your webcam and select Update driver.
- Choose Search automatically for drivers. Windows scans your system and the internet for the newest software.
If Windows reports that the best driver is already installed, the driver is probably not the problem. Restart the PC after any driver update, even if Windows does not ask.
Advanced Exposure and Focus Adjustments
Advanced exposure and focus adjustments stop your webcam from constantly hunting for light or blurring your face when you move. Locking focus and brightness manually gives you a steady picture during video calls.
- Open your camera properties in the Windows Settings app or in your manufacturer's utility. Windows Settings only shows the controls your camera driver provides, so autofocus and exposure options are often found only in the manufacturer's app.
- Find the autofocus setting and turn it off if the lens keeps blurring during calls.
- Set the focus slider by hand so the picture is sharp where you normally sit.
- Turn off automatic exposure if bright windows behind you leave your face in deep shadow. Then set the exposure by hand until your face is clearly lit.
Manual settings stay fixed, so if you change your lighting or move your chair, adjust them again. To go back, turn autofocus and automatic exposure back on.
If this didn't work
If nothing above works, work out whether the webcam itself is broken or Windows is at fault. Test the camera on another computer. If it works there, the problem is probably in your Windows installation. If it fails there too, the device or its cable is likely faulty.
Try a different USB port, and replace the cable if it looks damaged. Also open Windows Update in Settings and install any pending updates, including optional ones. These can restore camera settings that stopped working after a bad update or driver change.
Frequently asked questions
Where do I find the settings for my camera?
Open Settings with Windows Key + I. Go to Bluetooth & devices in the left sidebar, then click Cameras. You'll see all connected cameras and can adjust brightness, contrast, and other hardware properties from here.
How do I find my camera access settings?
Press Windows Key + I to open Settings. Select Privacy & security from the left sidebar, then click Camera. You'll see which apps have permission to use your webcam and can toggle each one on or off individually.
What are the 5 basic camera settings?
Basic camera settings usually include brightness, contrast, saturation, focus, and exposure. In Windows, access these through Settings Bluetooth & devices Cameras. Some apps like Zoom or Teams have their own camera settings within the application.
How to set phone camera settings?
This question is about phone cameras, not Windows. On most phones, open Settings, find Camera or Photos, and adjust brightness, resolution, grid lines, timer, and flash. Exact steps vary by Android or iPhone model.
Still have a question?
Answered by AI from this guide. Good questions may be added to this page — please don't include personal details.
Did this guide fix your problem?

About the Author
Richard
Tech Writer, IT Professional
Richard is a writer at Geek Rewind who turns complex IT tasks into clear, step-by-step guides. He draws on years of hands-on experience in system administration and enterprise IT operations, focusing on Windows, Linux and WordPress: the problems people actually run into, and the fixes that work. His server and WordPress guides come from systems he runs himself. Richard builds and maintains the platform behind Geek Rewind, from its Ubuntu servers and Nginx configuration to its custom WordPress plugins. Many new tutorials start with readers' questions, and he's always glad to answer them in the comments.
No comments yet — be the first to share your thoughts!