How to Access Your Downloads Folder in Windows 11 File Explorer

The Downloads folder in Windows 11 File Explorer holds every file you’ve downloaded from the internet. The fastest way to open it is to click Downloads in the Quick access section on the left sidebar, if it’s pinned there.
If Downloads isn’t showing in Quick access, you have three other quick options: type the folder path into the address bar, search for it from the Start menu , or find it through This PC. Each method takes just a few seconds.
This article walks you through every way to reach your Downloads folder and what to do if it vanishes from the sidebar. It also covers how to change where new downloads save to, how to move the entire folder to a different drive without losing any files, and what to check if downloaded files seem to disappear on their own.
Open File Explorer and click Downloads in the Quick access list on the left sidebar, or click This PC and double-click the Downloads tile. You can also type Downloads into the address bar and press Enter. The folder opens immediately and lists your newest files at the top.
Open Downloads from File Explorer’s Quick Access list
Quick access is the shortcut list at the top of File Explorer ’s sidebar, and Downloads is one of the folders Windows pins there by default.
- Open File Explorer by clicking the folder icon on the taskbar , or by pressing Win+E. A sidebar appears on the left with sections for Quick access, This PC, and others.
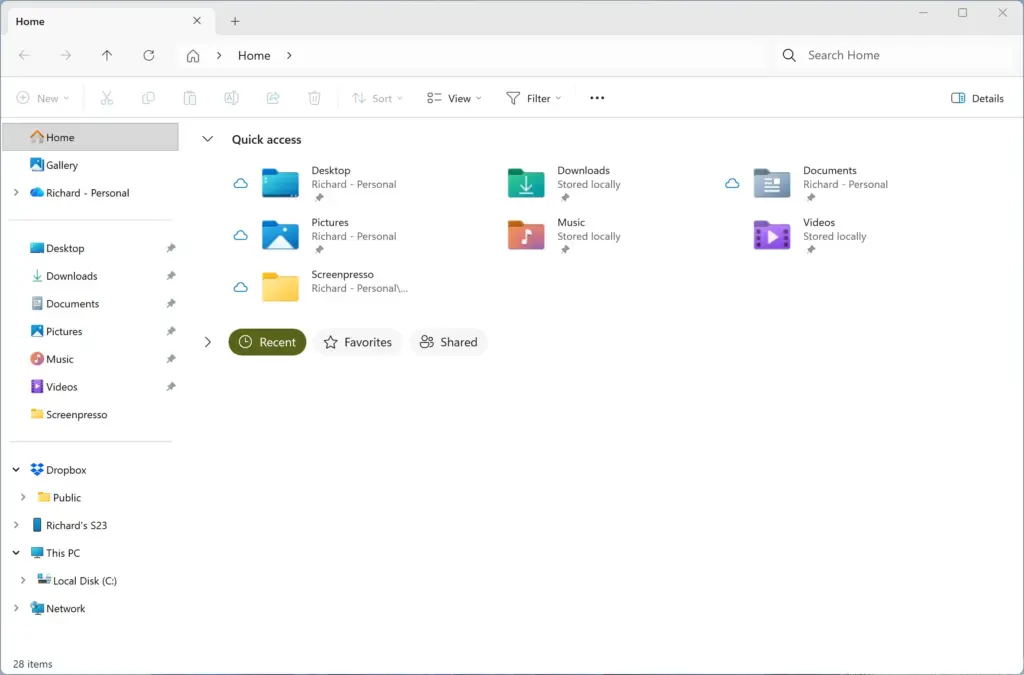
File Explorer - Click Downloads in the Quick access list. The main pane now shows every file you’ve downloaded, usually with the newest at the top.
If Downloads isn’t in that list, skip ahead to the section on a missing Downloads folder below. It’s a quick fix.
Open Downloads by typing the path in the address bar
This is the quickest method if File Explorer is already open to a different folder and you don’t want to hunt through the sidebar.
- Click inside the address bar at the top of any File Explorer window. This is the bar that normally shows your current folder path. The path turns into editable text.
- Type
Downloadsand press Enter. Windows resolves this to your user profile’s Downloads folder and opens it directly, without needing the full path.
You can also type the full path, C:\Users\USERNAME\Downloads, replacing USERNAME with your actual Windows account name. Use this version if you’ve moved the Downloads folder to a non-default location and the short version stops working.
Find Downloads under This PC
If you prefer browsing by drive rather than using shortcuts, Downloads is also listed as one of the default folders under This PC.
- Open File Explorer and click This PC in the sidebar. The main pane switches to show your drives and a row of folder tiles, including Desktop, Documents, Downloads, Music, Pictures, and Videos.
- Double-click the Downloads tile to open it.
These folder tiles under This PC are the same physical folders as the ones in Quick access. They link to the same location on your drive, so anything you see in one view matches the other.
Search for Downloads from the Start menu
This is handy when File Explorer isn’t already open and you want to jump straight to the folder.
- Click the Start button or press the Win, then start typing
downloads. Search results appear as you type. - Look at the results. Windows lists the Downloads folder as a system location. It often appears labelled as Downloads on this computer rather than as a document or app result. That label tells you it points at the actual folder, not at a downloaded file with “download” in its name.
- Click that result, or press Enter if it’s already highlighted. File Explorer opens straight to the Downloads folder.
Pin Downloads to Quick access for faster access later
If you find yourself using one of the methods above every time, pinning the folder saves a few clicks going forward.
- Open the Downloads folder using any of the methods above.
- Right-click Downloads wherever it appears, either in the sidebar under This PC or as a tab if you have it open, and choose Pin to Quick access. It now sits permanently in the Quick access list near the top of the sidebar.
To remove it later, right-click the pinned entry in Quick access and choose Unpin from Quick access. This only removes the shortcut. The folder and everything in it stay exactly where they are.
What to do if Downloads is missing from File Explorer
A few things can cause the Downloads shortcut to disappear from Quick access or stop opening properly. Work through these checks in order, starting with the simplest.
- Check whether it’s just unpinned rather than missing. Open This PC and look for the Downloads tile. If it’s there, it was simply unpinned from Quick access. Pin it again using the steps above.
- If Downloads doesn’t appear under This PC either, the folder itself may have been deleted, renamed, or moved without updating Windows’ record of its location. Open File Explorer , go to 📁C:\
Users\ (replacing USERNAME with your account name), and check whether a folder named Downloads is actually there.USERNAME - If the folder exists but File Explorer still won’t open it correctly, right-click it, choose Properties, and open the Location tab. Compare the path shown with where the folder actually sits on disk. If they don’t match, click Restore Default to point it back at
C:\Users\USERNAME\Downloads, then click OK. - If the folder was deleted entirely, create a new folder named Downloads in your user profile folder. Then repeat the Properties and Location steps above so Windows and your apps know where to send new files.
Windows stores the location of your Downloads folder in the registry, under HKEY_CURRENT_USER\Software\Microsoft\Windows\CurrentVersion\Explorer\User Shell Folders. Editing that key directly is possible, but it’s easy to point Windows at the wrong place and break other shell folders in the process. Stick with the Properties and Location tab method above unless you’re comfortable troubleshooting registry edits and have a backup of the key first.
Change where new downloads are saved
This doesn’t move your existing Downloads folder. It only changes where future downloads from apps land. Your files already in Downloads stay put, and you don’t need to restart.
- Open Settings with Win+I, then go to System Storage
- Click Advanced storage settings, then click Where new content is saved. You’ll see a list of content types (apps, documents, music, photos and videos), each with a drive dropdown next to it.
- Use the dropdown next to the content type you want to redirect and pick a different drive. Click Apply to confirm.
If you can’t find Where new content is saved on your PC, it may not be offered on your Windows 11 build. In that case, use the Properties and Location method in the next section instead. It works on every edition, Home and Pro.
This setting applies to Windows generally, not to your web browser’s download location. If you want to change where your browser saves downloaded files, do that in the browser’s own settings. In most Chromium-based browsers, including Microsoft Edge and Chrome, that’s under the browser’s Downloads settings page, where you can set a custom save folder or have it ask every time.
The browser is also a quick way to reach files you’ve just downloaded. In Edge or Chrome, press Ctrl+J to open the browser’s downloads list, then use its open-folder option to jump to the folder in File Explorer . In Edge, that’s in the menu of the downloads panel. In Chrome, use Show in folder next to a file. The exact wording differs a little by browser version, but either route lands you in the folder the browser is saving to.
Move the Downloads folder to a different drive
This is useful if your C: drive is low on space, or you want downloads to live on a secondary drive by default. It changes where Windows and all apps will look for the folder, so read the notes below before you start.
If you're moving Downloads to an external or secondary drive, that drive must be connected and available when you sign in. If it isn't, downloads can fail, or the folder can revert to its default location. A fixed internal drive is the safer choice. Avoid USB drives that you unplug regularly.
If you later delete the new location without moving the files back, you'll lose everything inside.
- Open File Explorer and find the Downloads folder under This PC or in Quick access.
- Right-click Downloads and choose Properties. The Downloads Properties window opens.
- Click the Location tab. You'll see the current path, something like
C:\Users\USERNAME\Downloads.
Copy it to another drive or to cloud storage first. Also, don't choose the root of a drive or the whole drive as the target. Create or select a dedicated folder on the new drive, ideally a new empty folder named Downloads. If you point Downloads at a drive root, the files from this folder get mixed in with everything else on that drive, and the move and any later undo become messy and risky.
- Click Move, then browse to the dedicated folder on the new drive where you want Downloads to live, and click Select Folder. The new path now shows on the Location tab.
- Click OK, then click Yes when Windows asks whether to move all the existing files from the old Downloads folder to the new one. Windows copies everything over and removes the old folder once the move finishes. With a lot of files this can take a few minutes.
If you click No instead, Windows points new downloads at the new location but leaves your existing files behind in the old folder. You'd then have files split across two places, so it's worth choosing Yes unless you have a specific reason not to.
To undo the move later, repeat these steps and set the location back to C:\Users\USERNAME\Downloads, choosing Yes again to move the files back.
Why your Downloads folder might look emptier than expected
If files you downloaded have disappeared, Storage Sense might be deleting them automatically rather than a File Explorer problem. Storage Sense is a built-in Windows 11 feature that frees up disk space automatically. It can be configured to delete files from your Downloads folder after they've sat untouched for a set number of days.
- Open Settings System Storage, then click Storage Sense.
- Check the option under Configure cleanup schedules for files in your Downloads folder. If it's set to a specific number of days, Storage Sense is removing files automatically on that schedule. If it's set to Never, Storage Sense isn't the cause.
- Turn it off or change the interval if you'd rather manage Downloads cleanup yourself. The change applies immediately.
It's also worth knowing that OneDrive's Folder Backup feature, which can back up and sync your Desktop, Documents, and Pictures folders, does not include Downloads. If you're relying on OneDrive to keep a copy of downloaded files, it won't. Anything in Downloads stays local to that PC unless you move or copy it into a folder OneDrive is actually backing up.
What to do next
With Downloads pinned and easy to reach, it's worth setting up Storage Sense properly so the folder doesn't quietly fill up with old installers and files you've already dealt with. If you're also trying to free up drive space more broadly, look at moving other user folders (Documents, Pictures, Music) using the same Properties and Location method covered here for Downloads. The same precautions apply: back up first, keep the new drive connected, and pick a dedicated folder rather than a drive root.
Frequently asked questions
Where can I find my Downloads on this device?
Open File Explorer and look for Downloads in the Quick access section on the left sidebar. If it's not pinned there, click This PC, then open your user folder and find the Downloads folder inside. You can also press Windows key + E to open File Explorer quickly.
Where do I locate my Downloads on my computer?
Press Windows key + E to open File Explorer. Click Downloads in the Quick access sidebar on the left. If Downloads isn't there, click This PC, then your user folder name, and find Downloads inside. The folder path is also C:\Users\[Your Username]\Downloads.
Why are my Downloads not showing up?
Downloads might be hidden if your view settings are filtering it out. Open File Explorer, click View at the top, then make sure Hidden items is checked. If the folder was moved, check your entire hard drive using File Explorer's search bar. You can also restore Downloads by opening its Properties Location tab and clicking Restore Default.
How do I make downloaded files show up on my desktop?
Right-click a downloaded file in File Explorer and select Send to, then Desktop. To send downloads automatically to your desktop, change the download location in your browser's settings, or move the Downloads folder via Properties Location. However, it's cleaner to keep downloads organized in the Downloads folder.
Still have a question?
Answered by AI from this guide. Good questions may be added to this page — please don't include personal details.
Did this guide fix your problem?

About the Author
Richard
Tech Writer, IT Professional
Richard is a writer at Geek Rewind who turns complex IT tasks into clear, step-by-step guides. He draws on years of hands-on experience in system administration and enterprise IT operations, focusing on Windows, Linux and WordPress: the problems people actually run into, and the fixes that work. His server and WordPress guides come from systems he runs himself. Richard builds and maintains the platform behind Geek Rewind, from its Ubuntu servers and Nginx configuration to its custom WordPress plugins. Many new tutorials start with readers' questions, and he's always glad to answer them in the comments.
No comments yet — be the first to share your thoughts!