
Microsoft Edge lets you choose which websites can use your camera, and you can change that choice at any time. The quickest way is to open edge://settings/content/camera in the address bar and press Enter. Changes apply once you reload the tab.
The settings cover three cases: all sites, one specific site, and the site you have open right now. Windows 11 also has its own camera privacy switches. If either one is off, Edge cannot use the camera, even when the Edge setting says it can.
Some options look missing or greyed out. This usually happens because of a Windows setting or a policy set by your organisation. This guide shows the Edge steps and the Windows switches to check. The labels are for current Edge on Windows 11, so they may look a little different on another version.
To allow or block camera access in Microsoft Edge, paste edge://settings/content/camera into the address bar and press Enter. Turn Ask before accessing (recommended) off to block all websites, or on to be prompted each time. Add a specific site to the Allow or Block list.
What the Camera Permission in Edge Controls
When a website wants your webcam, for a video call, an online exam or a photo upload, Edge shows a permission prompt. Edge saves your answer as a site permission (a saved decision about what one website may do). You can review and change those decisions at any time.
Two layers decide whether a website gets video:
- Edge’s site permissions. These control which websites may ask for the camera, and whether Edge asks you first.
- Windows privacy settings. These control whether any desktop app, Edge included, can reach the camera at all. If Windows blocks it, nothing you set in Edge helps.
Edge only offers the camera to secure pages (addresses starting with https://). A site on plain http:// cannot request it, whatever you set here.
Edge stores camera permissions separately for each profile. If you use more than one profile, repeat the steps in each one.
Open the Camera Settings Page in Edge
This page lists every site you have allowed or blocked, and holds the master switch for camera prompts. You can reach it two ways.
- Open Microsoft Edge.
- Click the address bar, type
edge://settings/content/cameraand press Enter.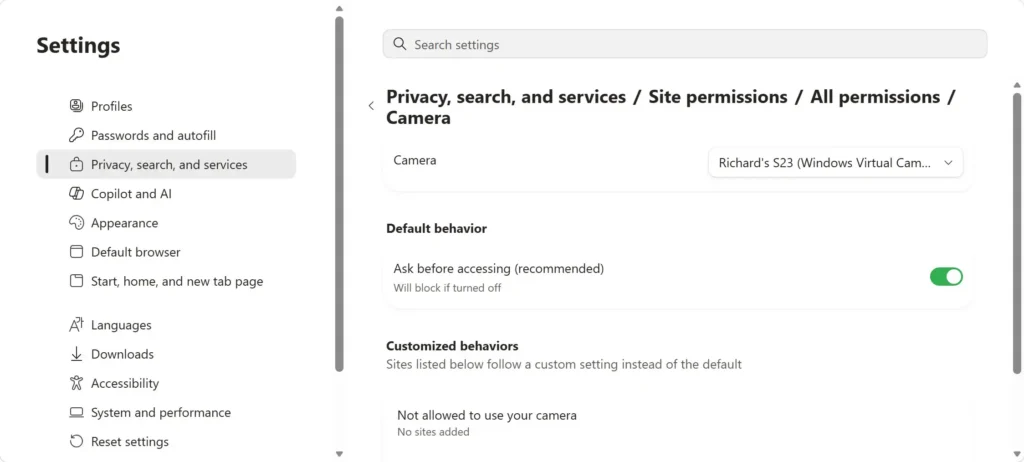
You should see a page titled Camera. It has a toggle labelled Ask before accessing (recommended), followed by Block and Allow lists.
If you prefer the menus, select the Settings and more button (the three dots at the top right) > Settings >
Privacy, search, and services >
Site permissions, then scroll to All permissions and select Camera. The final result is the same page. 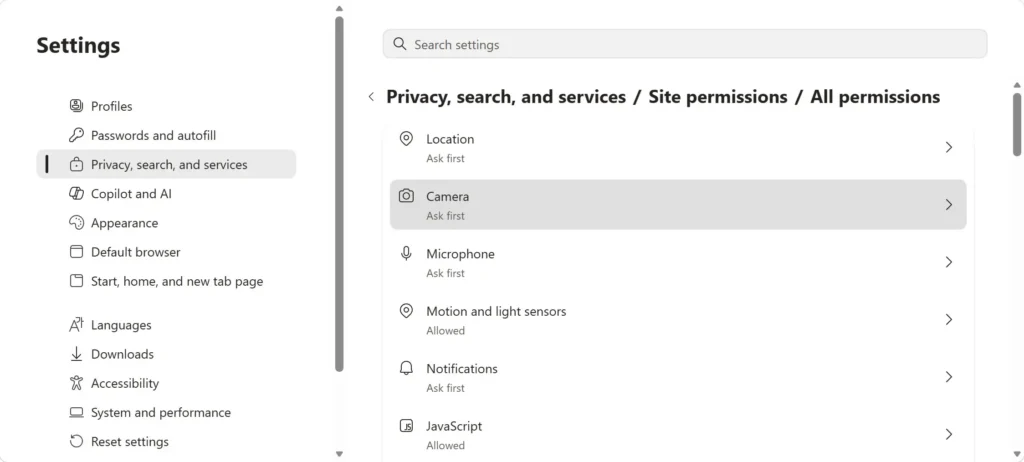
Block Camera Access for All Websites
Use this when you want no website to use your camera, for example on a shared PC or one set up for public use. It does not touch Windows or other apps.
- Open
edge://settings/content/camera. - Turn Ask before accessing (recommended) off.
The camera is now blocked for websites, and they stop showing the prompt. Check the Allow list afterwards. A site you previously allowed may keep its permission, so remove any you no longer trust (see the section on individual sites below).
Reload any open tab that was using the camera. Edge may show a banner saying the page needs a reload to apply the new setting.
Let Websites Ask for Camera Access Again
Use this to restore the default behaviour, where a site asks and you decide.
- Open
edge://settings/content/camera. - Turn Ask before accessing (recommended) on.
The next time a site requests the camera, Edge shows a prompt in the top left of the window with Allow and Block options. Recent builds also offer a temporary choice such as allowing it for this visit only.
Edge does not give you a switch that allows every site silently. You approve sites one at a time, either from the prompt or from the Allow list described next. That is by design, because a global "allow" would let any page switch on your webcam.
Allow or Block a Specific Website
Use this when you trust one site, such as your company's meeting page, and want it to stop asking. You can also use it to block one site and leave the rest on Ask.
- Open
edge://settings/content/camera. - Find the list you want. Choose Allow to let the site use the camera without asking, or Block to stop it from asking at all.
- Select Add next to that list. A box titled Add a site opens.
- Type the site address, for example
https://example.com. - Select Add to confirm.
The address appears in the list you chose. If it is on the Block list, the site gets no prompt and no video. If it is on the Allow list, it can start the camera as soon as the page asks.
A site can only be on one list at a time. If you add a site to Block and it already sits in Allow, remove the old entry. Select the three-dot menu (…) next to it and choose the remove option.
Change the Permission for the Site You Are On
This is the fastest way to fix one page, such as a video call that cannot find your camera. It saves you a trip to the settings page.
- Open the website in Edge.
- Click the padlock icon (or the tune icon on some builds) at the left end of the address bar. The label is View site information.
- Select Permissions for this site. If you do not see it, the site info panel may already list permissions directly.
- Find Camera and open its drop-down.
- Choose Allow or Block. Ask (default) returns the site to the normal prompt.
- Reload the page when Edge asks you to.
You should see the camera icon in the address bar. A crossed-out camera means access is blocked for this site. Selecting that icon lets you change the choice right there.
It clears every saved permission for the site (camera, microphone, location and others), not only the camera, so use it only if you want a clean slate.
Check That 🪟 Windows 11 Lets Edge Use the Camera
If Edge shows Allow but the video stays black, or the site says it cannot find a camera, Windows may be blocking access. These switches sit above Edge's settings.
Changing the device-wide camera switch can require an administrator account on some PCs. If a toggle will not move, sign in with an administrator account or ask the person who manages the PC.
- Open Settings (press Windows + I).
- Go to Settings Privacy & security Camera
- Turn Camera access on. If it is off, every app on the PC loses the camera, and Edge does too.
- Turn Let apps access your camera on.
- Scroll down and turn Let desktop apps access your camera on. Edge is a desktop app, so this switch is the one that matters most. On Windows 11, it applies to all desktop apps at once, and there is no separate switch for Edge.
Under that switch, Windows lists the desktop apps that have used the camera recently. If Microsoft Edge appears there with a recent time, Windows is letting it through.
Edge sites then cannot use it even if they are on the Allow list. Other desktop apps lose access too, including the Zoom or Teams desktop apps, so be sure that is what you want.
Restart Edge after changing these switches. Edge reads the Windows setting when it opens the camera, and a tab already running a call may not notice the change.
Why the Camera Option Is Missing, Greyed Out, or Ignored
Most problems fall into the cases below. Find the problem that matches your screen, then check its cause below.
The Setting Says "Managed by Your Organization"
If the toggle is greyed out, or Edge shows a message that your browser is managed, an administrator has set a policy (a rule pushed to the browser by a work or school account). You cannot override it from Edge's settings.
To confirm, open edge://policy. It lists every policy active in the browser. If you see camera-related entries, contact your IT team to change them. On a personal PC with no work or school account, a leftover policy can come from earlier software, so check there as well.
Administrators who want to enforce the camera setting across many PCs need a browser policy. This guide does not give the policy name or the registry value (the low-level Windows setting behind a rule) because they have not been verified here. [Registry method: to be verified]
The Site Never Shows a Prompt
There are three common reasons:
- The site is on the Block list, or Ask before accessing (recommended) is off. Edge blocks the request silently, and you see only the crossed-out camera icon.
- The page uses http:// rather than https://. Edge does not offer the camera to insecure pages.
- You dismissed the prompt earlier. Some builds treat repeated dismissals as a block. Reset the site's permission from the padlock panel and reload.
The Permission Is Allowed but No Video Appears
Check these in order:
- Close any other app that might hold the camera, such as the Camera app, Teams or Zoom. Most webcams serve one app at a time.
- Check the Windows switches in the previous section.
- If your PC has a physical privacy shutter or a keyboard key that disables the camera, make sure it is open. Many laptops have one.
- Restart Edge, then reload the page.
The Choice Does Not Stick
InPrivate windows (Edge's private browsing mode) do not keep site permissions after you close them. Decisions made there disappear, so the site asks again next time. Use a normal window if you want Edge to remember.
Likewise, if you clear browsing data and tick Site permissions in the list, Edge wipes your saved Allow and Block decisions. If a site you allowed is asking again, this is a likely cause.
Undo the Changes
Everything above can be reversed from the same places.
- Undo a site-wide block or allow. Open
edge://settings/content/camera, find the site in the Block or Allow list, open its three-dot menu (…) and remove it. The site goes back to asking. - Undo a global block. Turn Ask before accessing (recommended) back on.
- Undo a Windows-level block. Go to Settings Privacy & security Camera and turn the switches back on.
- Clear one site's choices. Use Reset permissions in the padlock panel.
You do not need to restart Windows for any of these. Reload the affected tab, and restart Edge if the camera still does not respond.
If This Didn't Work
If the camera still fails after the Edge and Windows settings are right, open edge://policy to see whether your organisation is enforcing a rule, then check Device Manager for a warning icon on the camera under Cameras or Imaging devices. Test the camera in the Windows Camera app. If it works there but not in Edge, the cause sits inside the browser, and the site's entry in the Block list is the first place to look. If it fails in both, the problem is the device or driver, and the next task is to update or reinstall the camera driver.
Once the camera works, the closest related job is the microphone, which you manage the same way at edge://settings/content/microphone.
Have a question about this guide?
Answered by AI from this guide. Good questions may be added to this page — please don't include personal details.
Did this guide fix your problem?

About the Author
Richard
Tech Writer, IT Professional
Richard is a writer at Geek Rewind who turns complex IT tasks into clear, step-by-step guides. He draws on years of hands-on experience in system administration and enterprise IT operations, focusing on Windows, Linux and WordPress: the problems people actually run into, and the fixes that work. His server and WordPress guides come from systems he runs himself. Richard builds and maintains the platform behind Geek Rewind, from its Ubuntu servers and Nginx configuration to its custom WordPress plugins. Many new tutorials start with readers' questions, and he's always glad to answer them in the comments.
No comments yet — be the first to share your thoughts!