How to Turn On Bluetooth LE Audio in Windows 11

Windows 11 includes support for Bluetooth LE Audio, a standard designed for crisper sound and lower battery drain during calls. It handles wireless data transmission more efficiently than older Bluetooth audio protocols. This guide shows how to check whether your PC can use it and how to switch it on or off, either in Settings or in the Registry Editor.
What is Bluetooth LE Audio?
Bluetooth LE Audio uses less power than older protocols. That extends battery life on wireless headphones and earbuds, and it can improve vocal clarity, which you notice most on calls.
When the feature is on, compatible headphones stream over the more efficient LE codec. Headphones that don’t support LE Audio keep working over regular Bluetooth audio, so turning the feature on won’t break an older pair.
Does Your 🪟 Windows 11 PC Support LE Audio?
LE Audio needs the right hardware as well as the right Windows version. Standard Bluetooth adapters lack the architecture for the protocol, so both the PC’s Bluetooth radio and its drivers must explicitly support the specification. Your headphones or earbuds must support it too.
- Run Windows 11 version 22H2 or newer. To check, open Settings System About and look under Windows specifications.
- Have Bluetooth hardware that supports LE Audio.
- Have drivers (software for hardware) that support LE Audio from your device maker. If the option is missing later, check the PC or Bluetooth adapter maker’s support page for a newer driver.
How to Turn Bluetooth LE Audio On or Off Using Settings
The Settings app has a direct toggle for this protocol. When you turn it on, compatible hardware switches to the low-energy transmission method. This works the same on Windows 11 Home and Pro.
- Open Settings :
- Click the Start menu and select Settings, or
- Press
Windows key + Ion your keyboard.
- On the left side, click Bluetooth & devices. The Bluetooth page opens on the right.
- On the right side, find and click Devices to open device options. You should now see your paired devices and related Bluetooth settings.
- Find the option Use LE Audio when available and switch it On or Off.
- If you have headphones connected, disconnect and reconnect them so they pick up the new setting.
To undo the change, return to the same page and flip the toggle back.
If you can't find it, check both of those first. To turn Bluetooth on, see this guide.
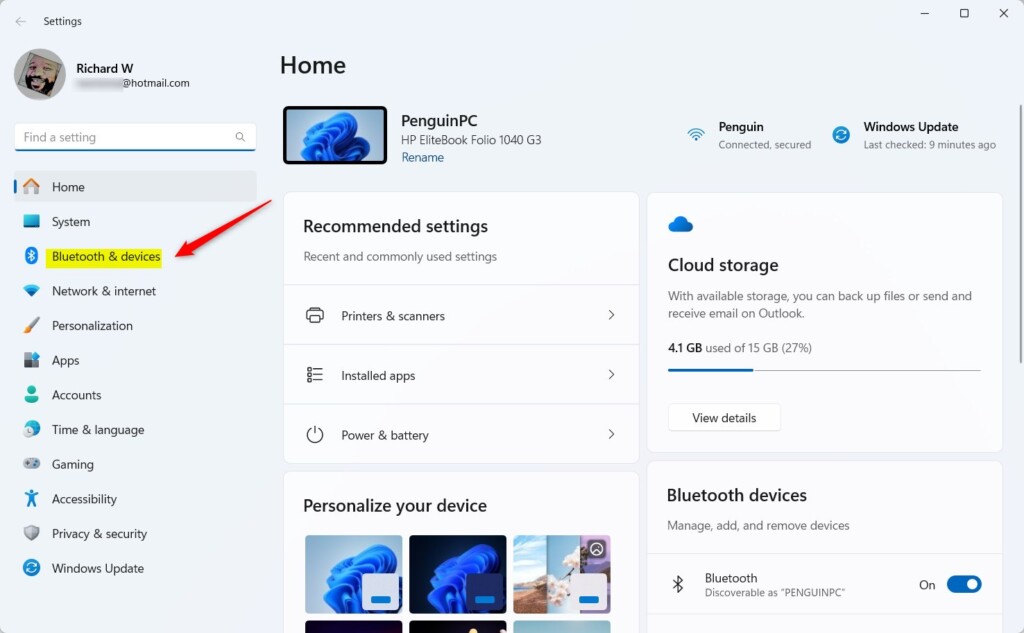
Windows 11 Bluetooth & devices Settings
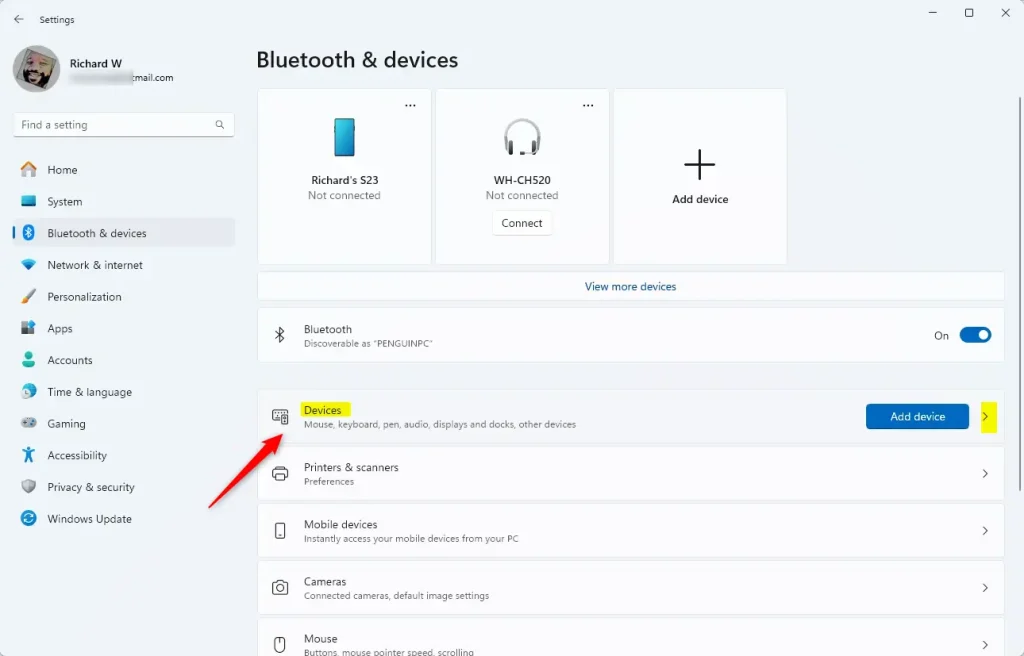
Devices section in Bluetooth & devices Settings
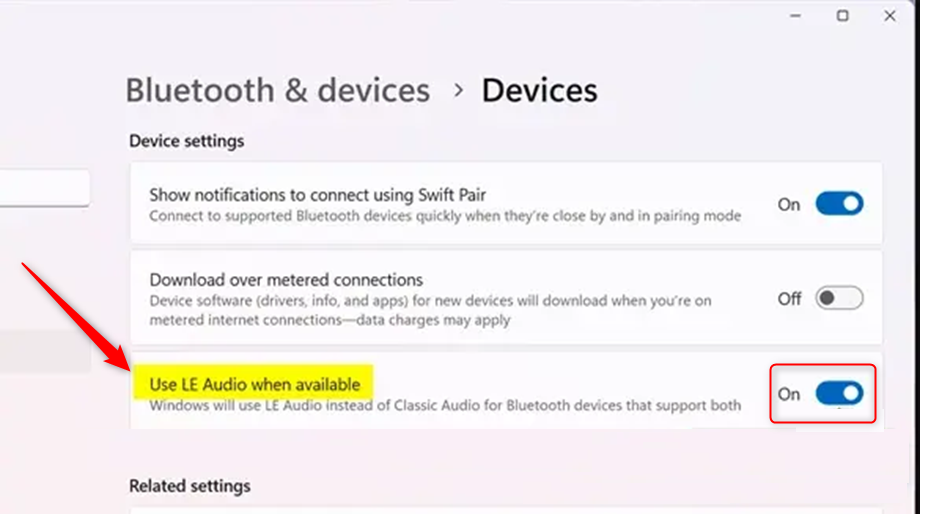
Toggle "Use LE Audio when available"
How to Turn Bluetooth LE Audio On or Off Using the Registry (Advanced)
You can skip the Settings app and change the setting in the Windows Registry instead. This method requires administrator privileges, and it works on both Home and Pro.
⚠️ Admin privileges required. Manual registry edits are an alternative way to configure the protocol, but mistakes can cause system instability. Back up the registry or create a system restore point first. Creating a registry backup or system restore point beforehand is a vital precaution.
- Open the Registry Editor:
- Press
Windows key + R, typeregedit, then press Enter.
- Press
- If User Account Control asks for permission, click Yes. The Registry Editor window opens.
- Go to this folder path:
Computer\HKEY_LOCAL_MACHINE\SYSTEM\CurrentControlSet\Control\Bluetooth\Audio\Bats - Right-click Bats and choose New DWORD (32-bit) Value. A new entry appears in the right pane with its name highlighted.
- Name it
UserPrefersClassicAudio. - Double-click the new entry and set its value data:
0to enable Bluetooth LE Audio1to disable Bluetooth LE Audio
- Click OK, then close the Registry Editor.
- Restart your PC for the changes to take effect.
To undo the change, open the same entry again and set it to 1, then restart. If something goes wrong, restore from the backup or restore point you made earlier.
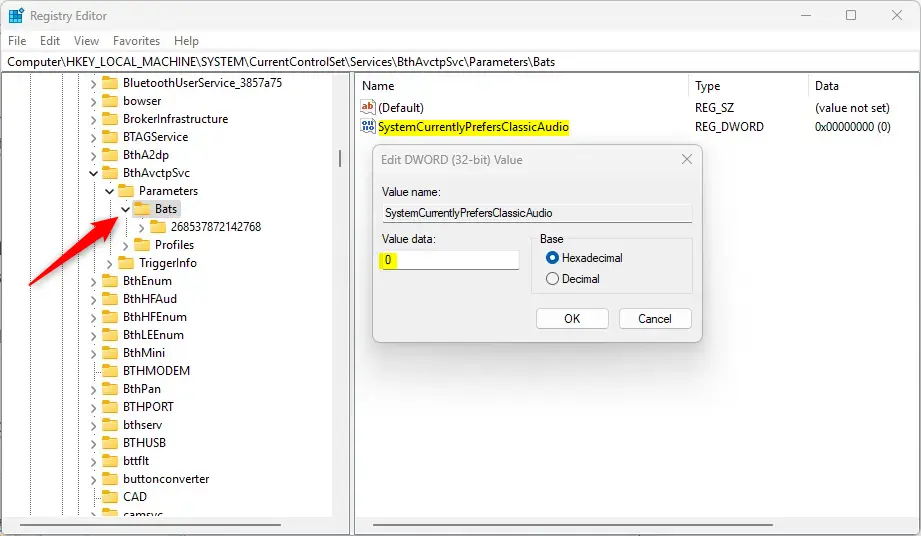
Editing the Registry to enable or disable LE Audio
Summary
- Bluetooth LE Audio gives better sound and longer battery life on compatible devices.
- Only some Windows 11 PCs support LE Audio, so make sure your PC meets the requirements: Windows 11 22H2 or newer, a supporting Bluetooth radio and supporting drivers.
- You can turn LE Audio on or off in the Settings app if your PC supports it.
- Advanced users can use the Registry Editor to change the setting, but they should be careful and back up first.
- Bluetooth must be turned on for the LE Audio option to appear.
- Check compatibility before you change anything. Headphones and a PC that both support LE Audio are what deliver the improved voice clarity and battery savings.
If the option never shows up, the cause is almost always hardware or drivers rather than a Windows setting. Update your Bluetooth driver from the device maker first, then check again.
Was this guide helpful?

About the Author
Richard
Tech Writer, IT Professional
Richard is a writer at Geek Rewind who turns complex IT tasks into clear, step-by-step guides. He draws on years of hands-on experience in system administration and enterprise IT operations, focusing on Windows, Linux and WordPress: the problems people actually run into, and the fixes that work. His server and WordPress guides come from systems he runs himself. Richard builds and maintains the platform behind Geek Rewind, from its Ubuntu servers and Nginx configuration to its custom WordPress plugins. Many new tutorials start with readers' questions, and he's always glad to answer them in the comments.


No comments yet — be the first to share your thoughts!