How to Adjust Volume Levels in Windows 11 Sound Settings

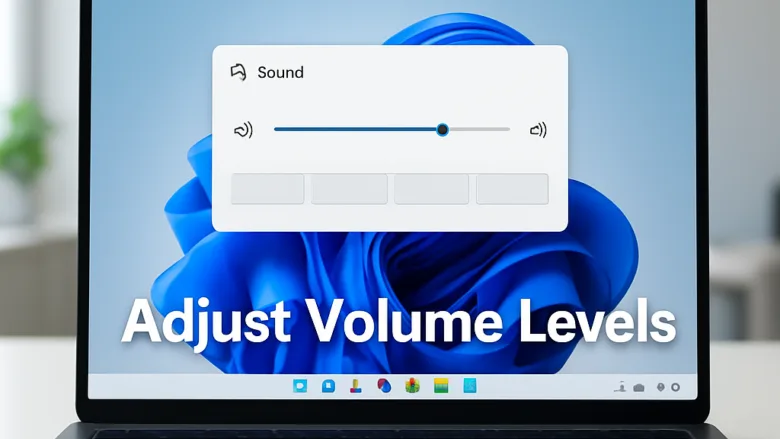
The speaker icon on the Windows 11 taskbar (bottom right of your screen) lets you change the overall volume with one quick slider. For more control, such as setting a different volume for each app, choosing which speaker or headset to use, or adjusting your microphone, open Settings System Sound
The steps below work on current Windows 11 builds, though the Sound page layout can shift between updates. Where a label or button position differs, the step says so. None of these steps need administrator rights unless the step says otherwise. They are the same on Home and Pro.
Select the speaker icon at the right end of the taskbar , then drag the volume slider in the Quick Settings panel. For per-app levels, open Settings System Sound and select Volume mixer under Advanced. You can also scroll the mouse wheel over the speaker icon or press Win+A to open Quick Settings directly. The slider shows a level from 0 to 100.
Change the volume from the taskbar
This is the fastest way to adjust the volume. It changes the master volume, which is the overall level for whichever device is currently playing sound.
- Select the speaker, network and battery icons at the right end of the taskbar . This opens Quick Settings, the panel of toggles and sliders above the clock. You can also press Win+A. You should see the panel with a volume slider near the bottom.
- Drag the volume slider left to lower the volume or right to raise it. The number next to the slider shows the level from 0 to 100.
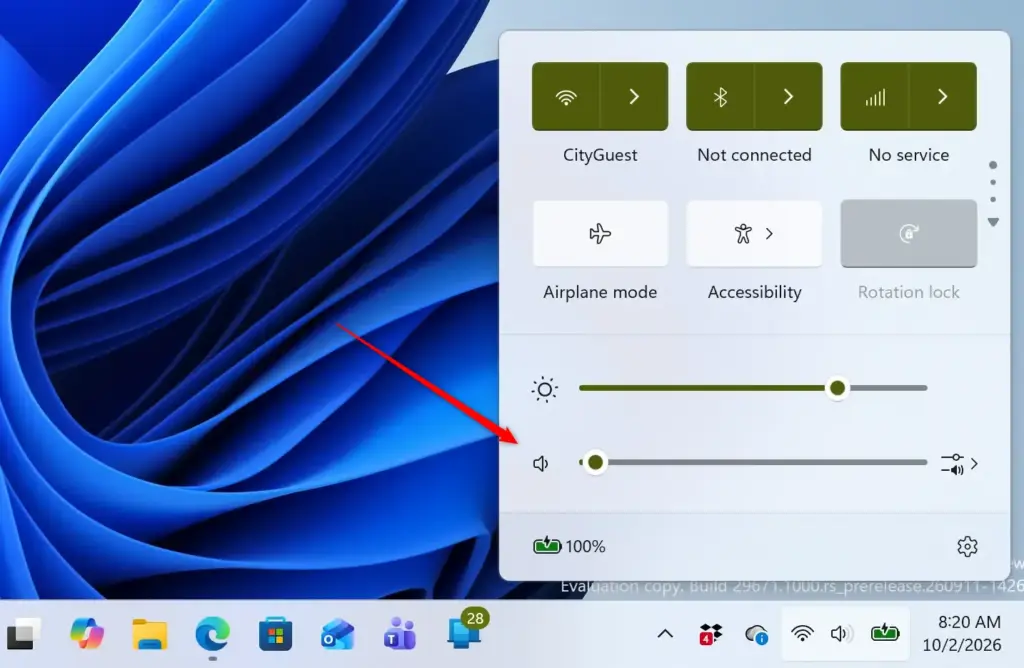
- Select the speaker icon to the left of the slider to mute or unmute. A muted speaker shows a line through it, and the slider drops to zero. Select the icon again to restore the previous level.
- Select the arrow to the right of the slider to pick a different output device, such as headphones instead of speakers. The list shows every playback device Windows currently detects. Select a device and sound switches to it straight away.
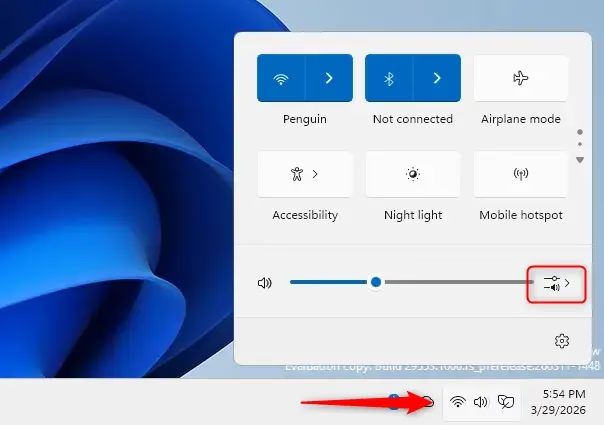
- On recent Windows 11 builds, look for a Volume mixer link or option next to the slider, usually in the same device list. Select it to open the per-app sliders directly, without going through Settings. If you do not see it, your build does not have it yet. Use the Settings route described later in this tutorial.
A few quicker options skip the panel entirely:
- Mouse wheel: point at the speaker icon in the taskbar and scroll. The volume changes in steps, and a small volume indicator appears on screen.
- Keyboard: use the volume keys on your keyboard. On many laptops these are Fn-key combinations, so you may need to hold Fn or switch off Fn Lock.
- Volume mixer shortcut: press Win+Ctrl+V to open the quick Volume mixer. This works only on supported builds. If nothing happens, your build does not include it, so use the Quick Settings link or the Settings page instead.
If the volume indicator does not appear when you use the keys but the volume still changes, the keys are working and only the overlay is hidden. If neither happens, jump to the troubleshooting section below.
Open the Sound settings page
The Sound page holds every volume control in one place: the output device, input device, per-app levels and the troubleshooting tools. Open it with one of these routes.
- Right-click the speaker icon in the taskbar . A small menu appears.
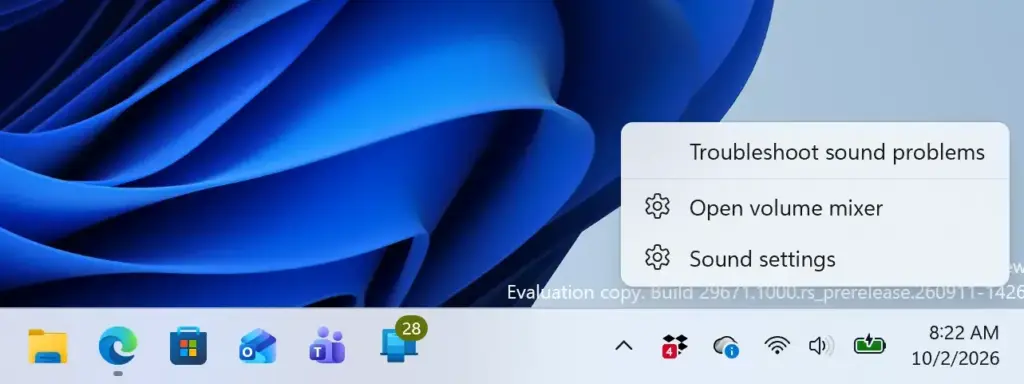
- Select Sound settings. The Settings app opens on System Sound
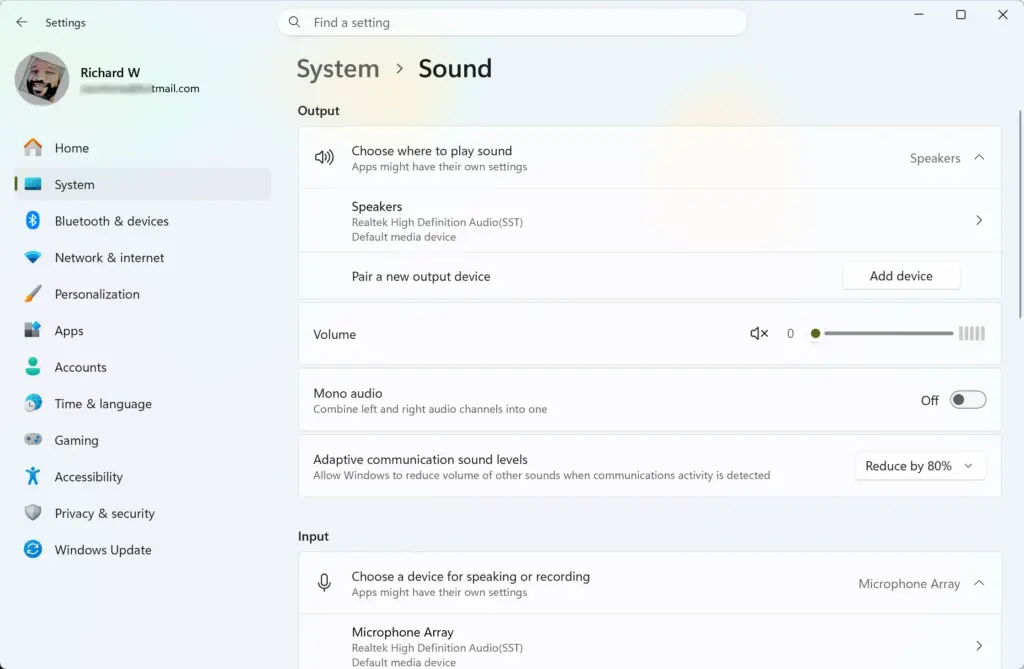
Settings › System › Sound
You can also press Win+I, select System, then select Sound.
The page has an Output section at the top, an Input section below it, and an Advanced section with the Volume mixer. Windows moves some of these controls between builds. If your page looks slightly different from the steps below, look for the same labels nearby.
Set the volume for an output device
Your laptop speakers, a Bluetooth headset and a monitor connected over HDMI can all sit at different levels. Set the level for the device you actually use, because changing the wrong one has no audible effect.
- Open Settings System Sound
Settings › System › Sound - Under Output, find the device you want to use. Select it so it becomes the active device, the one Windows plays sound through right now.
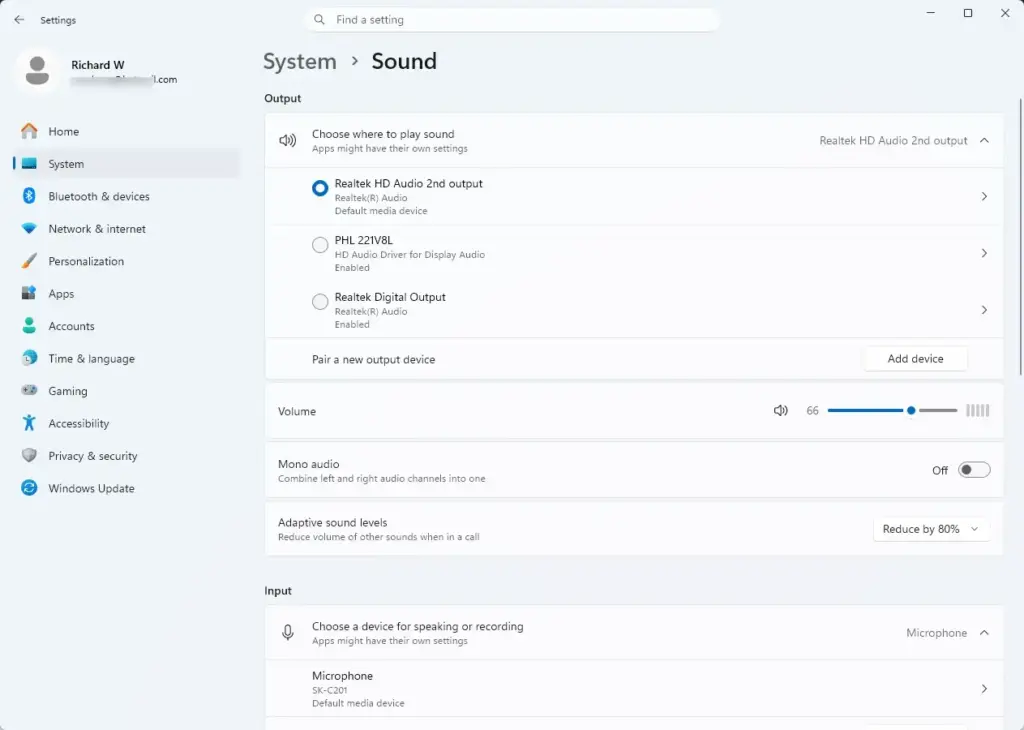
Settings › Sound › Output - Drag the Volume slider for that device. On some builds the slider sits on the main page. On others you select the device name first to open its properties page, where the slider appears at the top.
- Play a sound or a video to check the level. If you hear nothing, confirm the slider is above zero and the mute icon is not active.
If you opened the device’s properties page, scroll down it. Depending on the device and driver, you may find two options that affect how loud the sound seems:
- Spatial sound: a drop-down that turns on a surround-style effect for headphones or speakers. Spatial processing can make the same content seem louder, quieter or more spread out, even though the volume slider has not moved.
- Audio enhancements (the toggle may read Enhance audio): applies Windows or driver processing to the sound. This can also change how loud things seem.
If a device sounds louder or quieter than you expect at the same slider position, set Spatial sound to off and turn off the enhancements to compare. You can switch either back on at any time. These options only appear for devices that support them, so a missing option is not a fault.
If the device you want is missing from the list, see the troubleshooting section below.
Set the volume for individual apps with Volume mixer
Volume mixer is a page that gives every app its own volume slider. It lets you turn down a noisy browser tab without touching your music player. App levels work relative to the master volume. If the master volume is at 50 and an app slider is at 100, the app plays at the loudest level the device allows at that setting.
- Open Settings System Sound
- Scroll to the Advanced section and select Volume mixer. You should see a list of sliders.
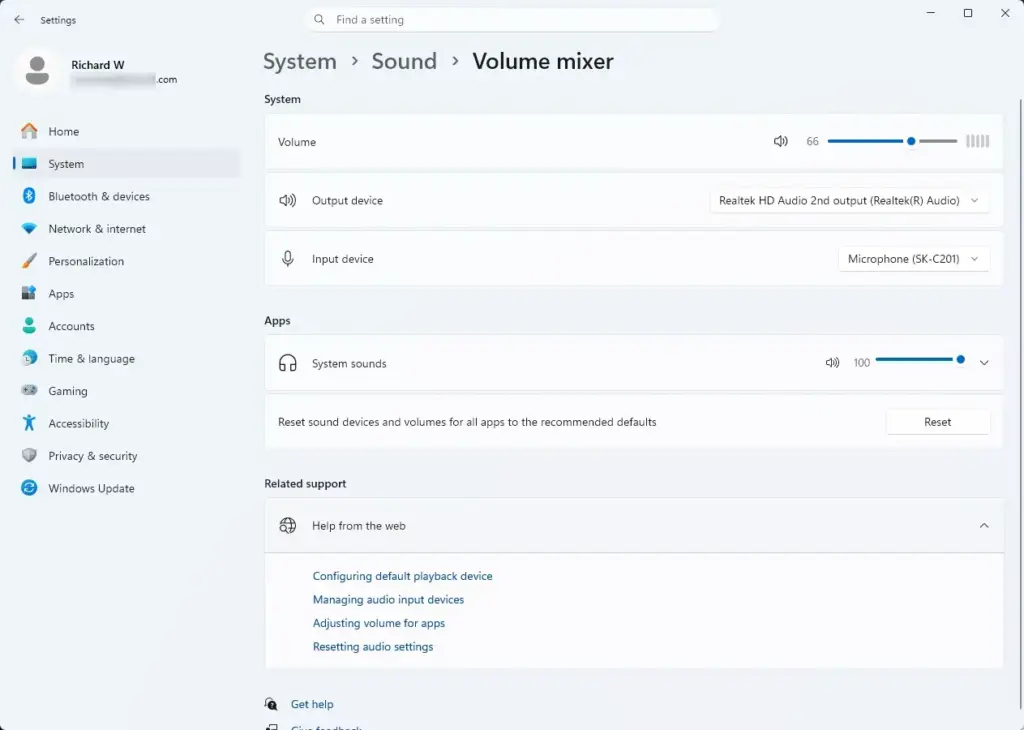
Settings › Sound › Volume mixer - Find the app in the list under Apps. Drag its slider to set its level.
- Use the System sounds slider to change the volume of Windows alerts and notification sounds. You can keep these quiet while leaving your media loud.
- Drag the Master volume slider at the top to change the overall level. This matches the slider in Quick Settings.
On builds that offer it, right-click the speaker icon in the taskbar and select Open Volume mixer. On recent builds, select the Volume mixer link next to the Quick Settings volume slider, or press Win+Ctrl+V on a supported build. The shortcut opens a compact mixer without opening Settings.
Each change takes effect immediately, so you can leave a video playing and adjust the slider while you listen.
If an app is missing from the Volume mixer
Volume mixer lists only apps that are open and have a sound session, meaning they have played audio or opened the audio device. If your app is not listed, open it and play something. The entry usually appears within a few seconds. Some apps release their sound session when they go quiet, so they can vanish from the list and return when audio starts again.
Send an app to a different speaker or headset
Under each app in Volume mixer, there is an output device setting. Open it and choose another device to play that app through. For example, you can send a video call to your headset and keep music on the speakers. The app keeps this choice until you change it or reset the sound devices (see the reset section below).
If an app does not respond to the change, close it and open it again. Some apps pick their output device only when they start.
Adjust the left and right balance
If one speaker sounds louder than the other, your balance is off. The modern Settings page does not give a simple balance slider on every build, so use the classic Sound dialog instead.
- Press Win+R, type
mmsys.cpl, and press Enter. The classic Sound dialog opens. You can also reach it from the Sound settings page by selecting More sound settings.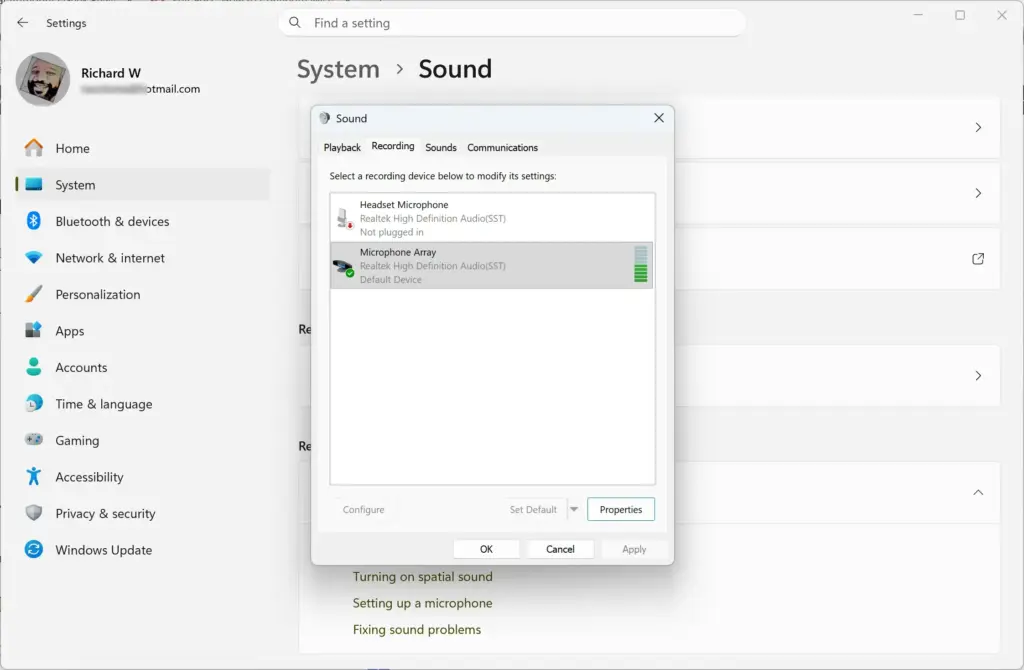
- On the Playback tab, select your speakers or headphones, then select Properties.
- Select the Levels tab.
- Select Balance. Two sliders appear, labelled L and R.
- Set both sliders to the same value for an even balance, then select OK.
- Select OK again to close the properties window.
If the Levels tab or the Balance button does not appear, the device or its driver does not support it. Some USB and Bluetooth devices control their own balance and hide this option.
Set the microphone input volume
A microphone has its own volume, called the input volume. If people say you sound too quiet on a call, raise this setting. If you sound distorted, lower it.
- Open Settings System Sound
- Scroll to the Input section and select your microphone from the list.
- Find the Input volume slider and drag it. Speak normally while you adjust it.
- Watch the test bar. Select Start test if the page offers it, speak for a few seconds, then check the result. A bar that fills most of the way without hitting the end is a good level.
Not every microphone shows an input volume slider. Some headsets and webcams control their own gain, which is the amplification of the microphone signal, inside the device itself, so Windows cannot override it.
Stop Windows from lowering the volume during calls
If your music or video suddenly gets quieter when you join a call, Windows is lowering other sounds on purpose. This feature is called ducking. By default, Windows reduces other sounds by 80 percent on many systems, though the default can vary by audio driver. This is one of the most common reasons people think their volume settings are broken.
- Press Windows key + R, type
mmsys.cpl, and press Enter. The classic Sound dialog opens. - Select the Communications tab.
- Under When Windows detects communications activity, choose an option: Mute all other sounds, Reduce the volume of other sounds by 80%, Reduce the volume of other sounds by 50%, or Do nothing.
- Select Do nothing to stop Windows from changing other sounds. Select OK to save.
You can reverse this at any time by returning to the same tab and picking Reduce the volume of other sounds by 80%.
Even out loud and quiet sounds
Some drivers include Loudness Equalization, which reduces the gap between the loudest and quietest parts of audio. It helps when one video is much louder than another. Whether it is available depends on your audio driver.
- Open the classic Sound dialog with
mmsys.cplas above. - On the Playback tab, select your device and select Properties.
- Select the Enhancements tab.
- Tick Loudness Equalization if it is listed, then select OK.
If the Enhancements tab is missing or empty, the driver does not offer it. On Windows 11, devices that support Windows audio enhancements may show an Enhance audio toggle (also labelled Audio enhancements on some builds) on the device's properties page in Settings System Sound instead. The same page may also have a Spatial sound option. Both can change how loud the audio seems. Turning them off is a quick way to test whether an enhancement is causing distorted or uneven sound. To undo the test, switch them back on.
If the volume slider is missing, greyed out or has no effect
Work through these checks in order. They go from the quickest to the most involved.
The speaker icon shows a red cross or "No audio output device"
Windows does not detect any playback device. Check that your speakers or headphones are plugged into the correct port, or reconnect a Bluetooth device. If the device still does not appear, restart the Windows Audio service. This step changes a system service, so it needs administrator rights.
- Press Windows key + R, type
services.msc, and press Enter. Approve the administrator prompt if it appears. The Services window opens. - Find Windows Audio in the list and right-click it.
- Select Restart. The status should show Running again after a few seconds.
Your device is missing from the Output list
Windows hides devices you have disabled. To bring one back, open Settings System Sound and look for Sound devices (called All sound devices on some builds). Select a device under Output devices or Disabled and choose Allow. The device returns to the list. If Windows asks for administrator approval, approve it.
Windows sound troubleshooter
Windows has a built-in tool that tests the audio service, drivers and device settings. It can fix simple faults on its own.
- Open Settings System Sound
- Under Advanced, select Troubleshoot common sound problems.
- Choose the device that has the problem and follow the prompts.
On some builds this entry has a slightly different name, such as Output devices under a troubleshooter list. Look for the one that mentions sound or audio.
The volume changes, but the sound stays too quiet
Check these before you reinstall anything:
- The app's own volume control, such as a video player or browser tab, may be low. Windows controls only what it sends out.
- The per-app level in Volume mixer may be low. Open it from Settings or from the link next to the Quick Settings slider to check.
- A monitor or soundbar connected over HDMI or DisplayPort may have its own volume control. Windows adjusts the signal, but the monitor applies its own level on top.
- A Bluetooth speaker or headset has its own volume as well. Raise it on the device itself.
- Spatial sound or audio enhancements on the device may be changing how loud the audio seems. Turn them off on the device's properties page to compare.
The volume slider moves, but nothing changes in the sound
You may be adjusting a device that is not the one playing sound. Open the output list again and confirm the correct device is selected. If the right device is selected and the problem remains, the audio driver may be at fault. Updating it needs administrator rights.
- Right-click Start and select Device Manager.
- Expand Sound, video and game controllers.
- Right-click your audio device and select Update driver. Approve the administrator prompt if it appears.
- Select Search automatically for drivers and follow the prompts.
If Windows reports that the best driver is already installed, check the PC or motherboard manufacturer's support page for an audio driver. Restart the computer after any driver install.
Reset all volume levels to the defaults
If your per-app levels and device choices are out of control, reset them all at once. This is useful after a driver change or when apps keep playing through the wrong device.
- Open Settings System Sound Volume mixer
- Scroll to the bottom of the page and select Reset. The label may read Reset sound devices and volume for all apps to the recommended defaults.
- Check the app sliders. They return to the default level, and each app goes back to the default output device.
Write down any levels you want to keep before you select Reset. Your master volume and your default output device are not affected.
What to do next
After a Windows feature update or an audio driver reinstall, check Volume mixer again. Per-app levels and device choices sometimes revert to the defaults, and the fix is to set them again. If you still have no sound at all after the troubleshooting steps above, the next thing to check is the audio driver in Device Manager. You can also try the device on another computer to rule out a hardware fault.
Frequently asked questions
How do I change the audio output in 🪟 Windows 11?
Open Settings System Sound. Scroll down to Advanced and select Volume mixer. Find the app or device you want to change, then pick a different speaker or headset from its dropdown menu. You can also change the default device at the top of the Sound page.
Where do I find my audio settings?
Press Windows key + I to open Settings, then go to System Sound For quick access to the volume slider, select the speaker icon on the taskbar in the bottom right corner. You can also press Windows key + A to open Quick Settings.
Which Sound format is the best quality in 🪟 Windows 11?
Windows 11 doesn't label formats as better or worse—it depends on your speakers and ears. Most people use the default setting. To see format options, go to Settings System Sound Advanced Output. Pick a format your speakers support for the clearest sound.
My 🪟 Windows 11 taskbar volume icon isn't working. How can I fix this?
Restart Windows first. If that doesn't work, go to Settings System Sound and check that a device is set as default under Output. If the icon still doesn't work, open Task Manager (Ctrl + Shift + Esc) and restart the Windows Explorer process.
Still have a question?
Answered by AI from this guide. Good questions may be added to this page — please don't include personal details.
Did this guide fix your problem?

About the Author
Richard
Tech Writer, IT Professional
Richard is a writer at Geek Rewind who turns complex IT tasks into clear, step-by-step guides. He draws on years of hands-on experience in system administration and enterprise IT operations, focusing on Windows, Linux and WordPress: the problems people actually run into, and the fixes that work. His server and WordPress guides come from systems he runs himself. Richard builds and maintains the platform behind Geek Rewind, from its Ubuntu servers and Nginx configuration to its custom WordPress plugins. Many new tutorials start with readers' questions, and he's always glad to answer them in the comments.
No comments yet — be the first to share your thoughts!