What to Do When Windows Firewall Blocks Apps You Need

Windows Defender Firewall is the built-in tool that decides which apps can talk over the internet or your local network. When it blocks an app you need, you can allow that app in a few clicks. Open Windows Security, go to Firewall & network protection, and choose Allow an app through firewall. Tick the app and pick the network types it can use.
If the app is missing from that list, or the allow entry does not help, you can add a custom rule in Windows Defender Firewall with Advanced Security. This needs an administrator account, which means you must be signed in as an admin to make the change. The steps take only a few minutes.
Work through the sections in order. The first one checks that the firewall is really the cause, so you do not change settings that were never the problem.
To stop Windows Firewall blocking an app, open Windows Security Firewall & network protection Allow an app through firewall, tick the app, and choose Private, Public, or both. Your network type must match the one you allowed. If the app is missing from the list, create a rule in Windows Defender Firewall with Advanced Security. You need an administrator account.
Confirm that the firewall is blocking the app
Many connection problems look like firewall blocks but come from the router, a VPN, or another security program. This test takes about a minute and tells you which it is.
Check for a Windows Security Alert
When an app first tries to accept connections from the network, Windows shows a Windows Security Alert that reads “Windows Defender Firewall has blocked some features of this app.” It offers two checkboxes, Private networks and Public networks, and two buttons, Allow access and Cancel.
If you clicked Cancel or closed the box, Windows does not ask again. The app stays blocked, and Windows can also create a block rule for it. Skip ahead to the allow steps below, then read the section on block rules.
Test with the firewall off for one network type
This step needs administrator rights.
- Press the Windows key, type Windows Security, and press Enter.
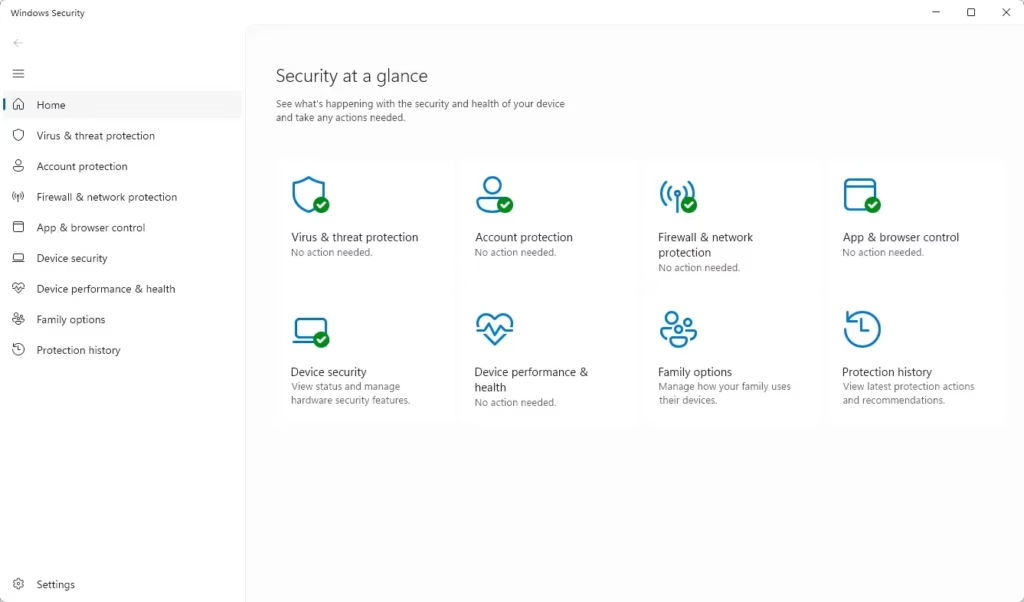
Windows Security dashboard showing an overview of PC protection status. - Click Firewall & network protection. You see three network types: Domain network, Private network, and Public network. One of them is marked (active).
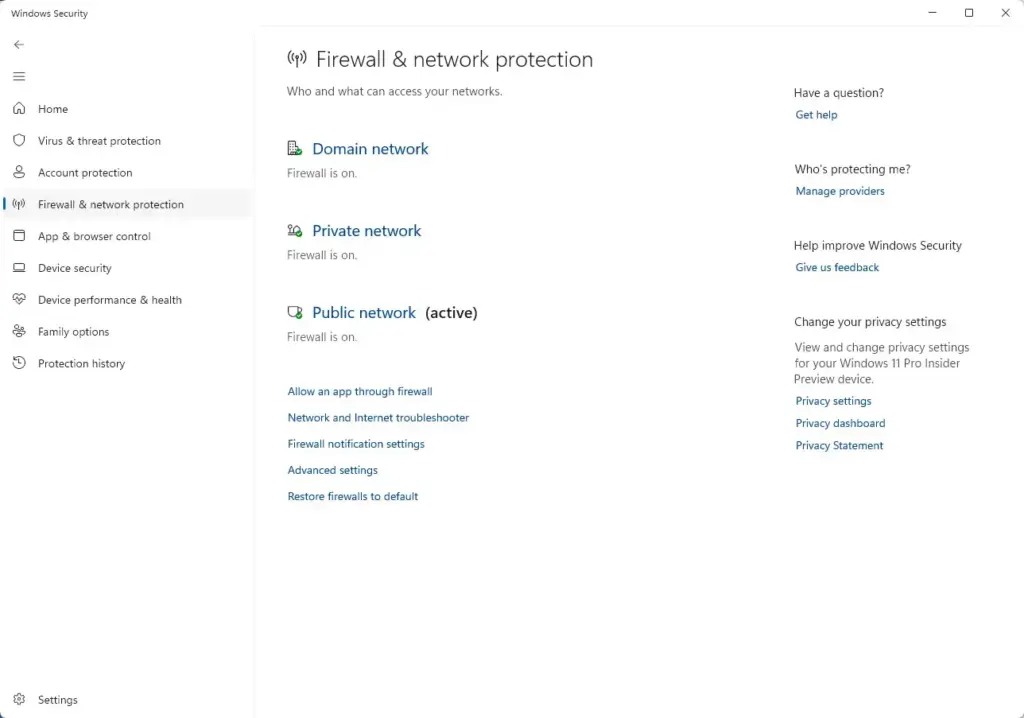
Windows Security › Firewall - Click the active network type.
- Under Microsoft Defender Firewall, switch the toggle to Off. Click Yes on the User Account Control prompt. The page now shows a red warning that the firewall is off.
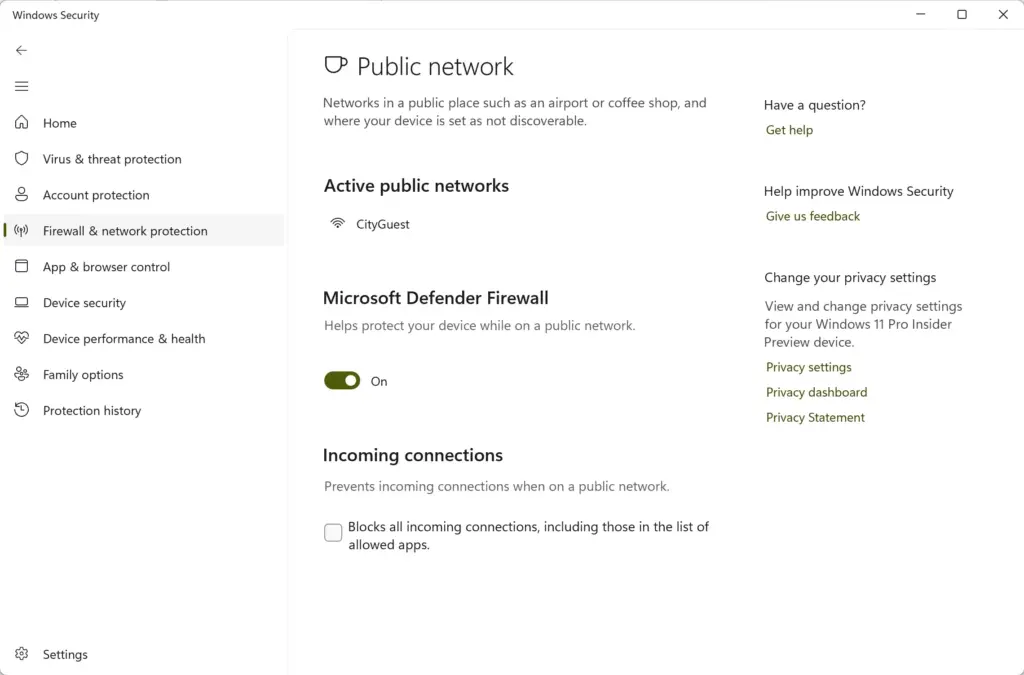
- Start the app or repeat the action that failed.
- Switch the toggle back to On straight away, whatever the result.
If the app works with the firewall off, the firewall is the cause and the rest of this article applies. If it still fails, the firewall is not the problem. Check the app's own settings, your router, or any VPN you run.
If the toggle is missing or says another provider manages your firewall, you have a third-party security suite installed. Its firewall is probably what blocks the app. Change the allow list in that product instead. The Windows steps below do not affect it.
Check which network type you are on
Windows applies firewall rules per network type. An app allowed on Private networks stays blocked on a Public one. This is the most common reason an allowed app still fails. It usually happens after you connect to a new network and pick the wrong type.
- Private network: a network you trust, such as your home. Other devices on it can find your PC.
- Public network: a network you do not control, such as a café or hotel. Your PC hides from other devices and the firewall is stricter.
- Domain network: used when the PC is joined to a work or school domain. You cannot choose this one yourself.
To see or change the type for the network you use now:
- Open Settings Network & internet
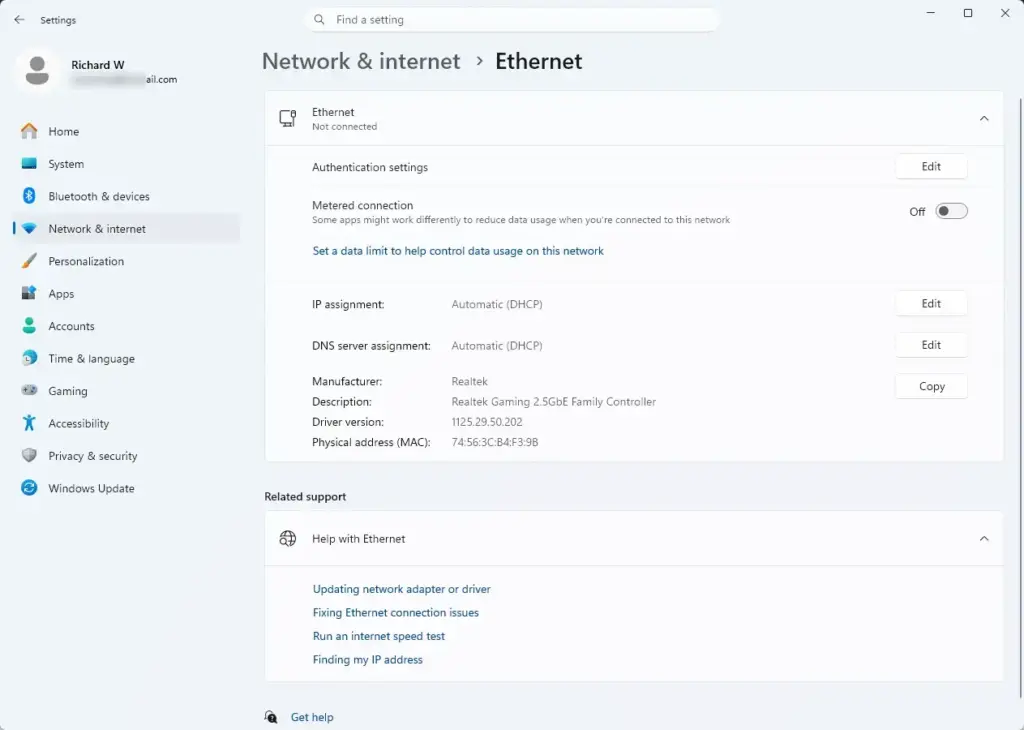
Settings › Network › Ethernet - Click Wi-Fi or Ethernet, whichever you use.
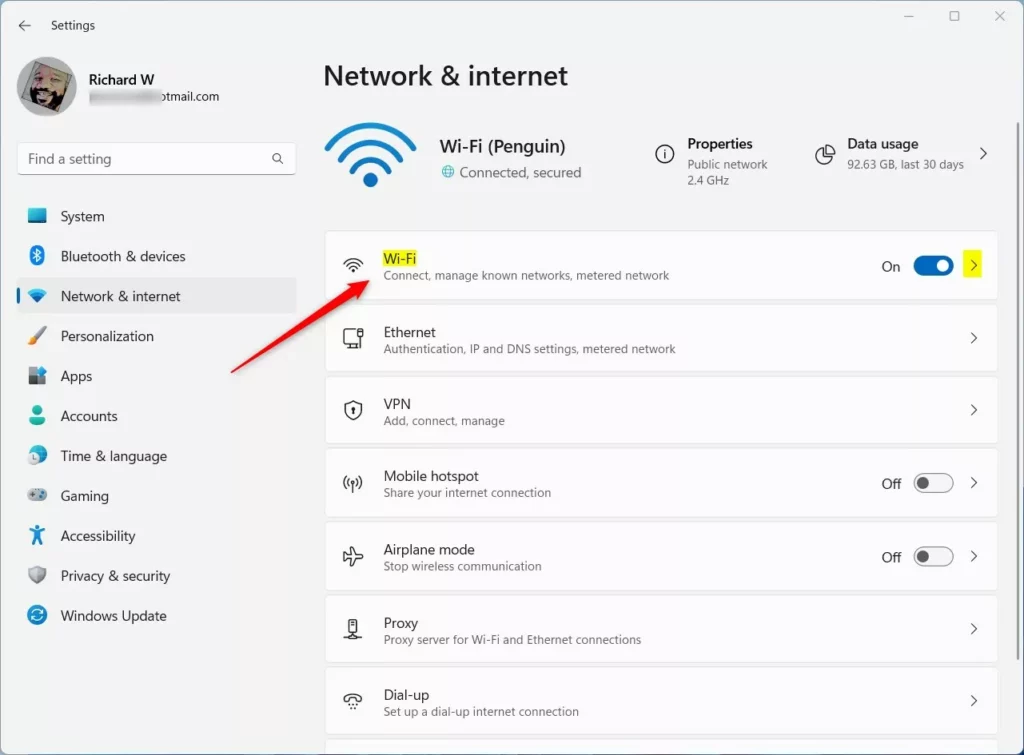
Windows 11 Wi-Fi networks profile tile for setting data limits. - For Wi-Fi, click the properties page for your connected network (the name of the network). For Ethernet, the options are on the page itself.
- Under Network profile type, select Private network only if you trust the network. Select Public network (Recommended) otherwise.
The change applies immediately. You do not need to restart. If you set a network to Private, apps allowed only on Private networks start working on it.
Allow an app through Windows Firewall
This is the main fix. It adds the app to a list of programs that the firewall lets communicate. The steps need administrator rights. A standard account cannot change the list.
- Press the Windows key, type Windows Security, and press Enter.
- Click Firewall & network protection.
Windows Security › Firewall - Click Allow an app through firewall. A Control Panel window titled Allowed apps opens, with a list of apps and two columns, Private and Public.
- Click Change settings. Click Yes on the User Account Control prompt. The list and the buttons below it are now active.
- Find your app in the list. Tick the box in the Private column if you use the app on a trusted network. Tick Public only if you must use the app on untrusted networks.
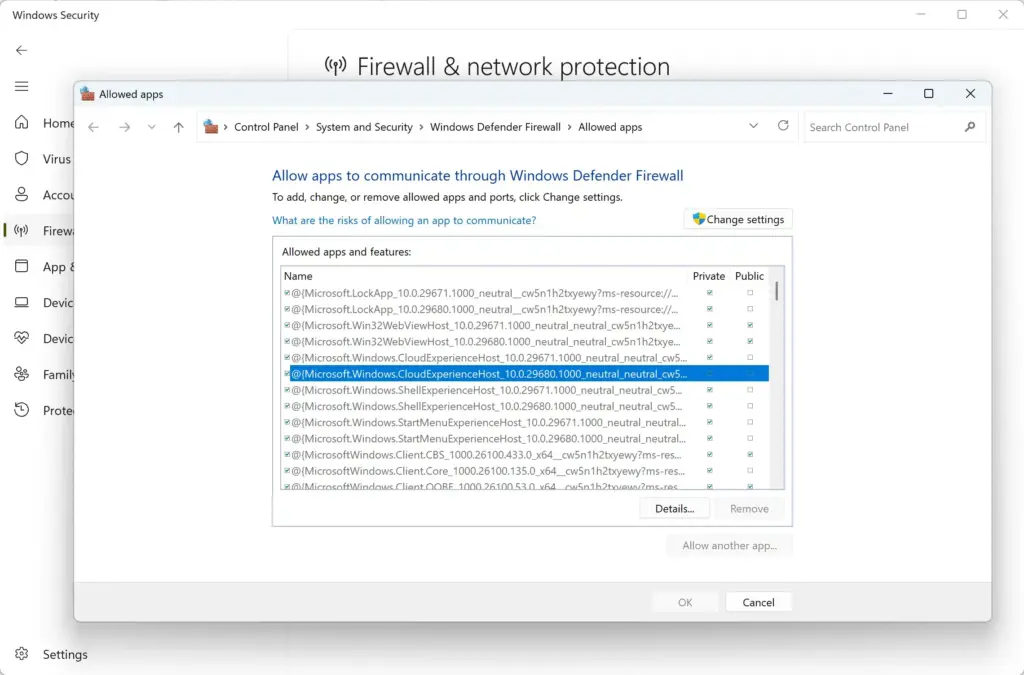
- Click OK. The window closes and the new settings apply at once.
- Restart the app and try again.
If Change settings is greyed out, you are not signed in as an administrator, or a policy from your organization controls the firewall. A work or school PC often locks this page. Ask whoever manages the PC to allow the app.
If the app is not in the list
Some programs never appear because they were never installed in a way that registers them with the firewall. Add the program yourself.
- In the Allowed apps window, with Change settings already clicked, click Allow another app.... If the button is greyed out, click Change settings first.
- Click Browse... and go to the app's program file. It ends in .exe and is usually in a folder under C:\Program Files or C:\Program Files (x86).
- Select the file and click Open.
- Click Network types..., tick Private and/or Public, and click OK.
- Click Add. The app now appears in the list with those boxes ticked.
- Click OK to save.
If you do not know where the program file is, right-click the app's shortcut on the desktop or in the Start menu and choose Open file location. Windows opens the folder that holds it.
Windows ties an allow entry to the exact file path. If an update installs the app into a new folder, the old entry no longer matches and the app is blocked again. Add the new file the same way.
Create a rule with Windows Defender Firewall with Advanced Security
The allowed apps list covers most cases. Use an advanced rule when the list does not fix the problem. You might also need one to allow a single port or to control outgoing connections. A port is a numbered channel an app uses for network traffic, such as 8080. You can also use a rule when you want more precise control over who can connect.
An inbound rule controls connections coming into your PC, and an outbound rule controls connections leaving it. By default, Windows allows outbound connections (ones your PC starts) and blocks inbound connections that nobody asked for. So most blocked apps need an inbound rule. This tool needs administrator rights.
- Press the Windows key, type Windows Defender Firewall with Advanced Security, and press Enter. Click Yes on the User Account Control prompt. A console window opens with a left pane of categories.
- Click Inbound Rules in the left pane.
- Click New Rule... in the right pane. The New Inbound Rule Wizard opens.
- Select Program and click Next. Choose Port instead if the app's documentation lists a port to open.
- Select This program path:, click Browse..., choose the app's .exe file, and click Next. For a port rule, choose TCP or UDP, select Specific local ports, enter the port number from the app's documentation, and click Next.
- Select Allow the connection and click Next.
- Tick the network types the rule applies to: Domain, Private, Public. Tick as few as you need, and click Next.
- Type a name you will recognize, such as Allow Example App, and click Finish. The rule appears in the Inbound Rules list with a green tick.
The rule is active immediately. Start the app again and test it. To block outgoing traffic from an app that never connects, repeat the steps under Outbound Rules instead.
Do not open a port you do not understand. An open port is a path into your PC, so use only the numbers the software publisher gives you.
Look for a block rule that overrides your allow rule
If the app is allowed and still fails, a block rule may be winning. Windows applies a block rule over an allow rule when both match. A block rule usually appears when you clicked Cancel on the Windows Security Alert, or when a security tool or the app's installer added one.
- In Windows Defender Firewall with Advanced Security, click Inbound Rules.
- Click the Action column header to sort the list. Rules with a value of Block group together.
- Look for a rule with your app's name, or one that points to the app's .exe file.
- Right-click the rule and choose Disable Rule. The icon next to it turns grey.
- Test the app again.
Deleting is permanent and you cannot get the rule back. To restore a disabled rule, right-click it and choose Enable Rule.
Create the rule from PowerShell
PowerShell gives the same result as the wizard in one command. It suits you if you set up many PCs or want a record of exactly what you changed. This method needs an administrator window.
- Right-click the Start button and choose Terminal (Admin). Click Yes on the User Account Control prompt. On some builds the entry is called Windows Terminal (Admin).
- Run this command, replacing the name and the path with your app's details. [Verification Required: the PowerShell command text is missing from the source and must be added before publishing.] This example allows the program on Private networks only.
New-NetFirewallRule -DisplayName "Allow Example App" -Direction Inbound -Program "C:\Program Files\ExampleApp\example.exe" -Action Allow -Profile PrivatePowerShell prints the details of the new rule when it succeeds. If you see an access-denied error, the window is not running as administrator. Close it and reopen it from the Start button's right-click menu.
To switch the rule off later without deleting it, run:
Disable-NetFirewallRule -DisplayName "Allow Example App"To remove it for good, run:
Remove-NetFirewallRule -DisplayName "Allow Example App"Other reasons an app is still blocked
The app's path changed after an update
Some apps install each new version into a new folder. A rule written for the old .exe file does not cover the new one. Add the new file with the steps above, then remove the old entry.
The problem is only on one network
If the app works at home and fails elsewhere, check the network type first. Public networks are stricter. If the app still fails, the network itself may be blocking the traffic. Hotel, school and office networks often block ports no matter what your PC allows. A firewall rule on your PC cannot override that.
A VPN or security suite adds its own filtering
VPN clients and security suites can add their own network rules or take over firewall management. If Windows Security says another provider is handling your firewall, change the rules there. Rules you add in Windows are ignored while the other firewall is in charge.
The firewall settings are damaged or tangled
After years of installs and removals, the rule list can contain conflicting entries. You can reset the firewall to its default state. This is hard to undo: it deletes every custom rule and every allowed app entry you added, including ones you may have forgotten. Apps then prompt you again the next time they need access. This step needs administrator rights.
- Open Windows Security and click Firewall & network protection.
- Scroll down and click Restore firewalls to default.
- Click Restore defaults, then click Yes on the User Account Control prompt.
- Open the app. When the Windows Security Alert appears, tick the network type you trust and click Allow access.
If you do not see Restore firewalls to default, your firewall may be managed by your organization or by third-party software.
Why an option is missing or greyed out
- Change settings or Allow another app... is greyed out. Your account is not an administrator, or you have not clicked Change settings yet. On a PC managed by an organization, a policy can lock the list. Only an administrator can lift it.
- The firewall toggle is missing. Another firewall is registered with Windows Security. Open Firewall & network protection and check which provider is listed.
- A page says settings are managed by your organization. A policy applies to the PC. Changes you make may be reset the next time the PC connects to the work network.
- Home and Pro editions. The steps in this article work the same way on Windows 11 Home and Windows 11 Pro. You do not need the Local Group Policy Editor (an admin tool that only Windows Pro includes) to allow an app.
You do not need to restart Windows after any change in this article. Firewall rules take effect immediately. Restart the app itself. It may have stored (cached) the failed connection and keep reusing it.
Undo an allow rule you no longer need
Remove access you no longer need. Every extra allowed app is an extra route into your PC.
- Open Windows Security Firewall & network protection Allow an app through firewall.
- Click Change settings and click Yes on the User Account Control prompt.
- Clear the Private and Public boxes next to the app to stop it from communicating. To remove an app you added yourself, select it and click Remove, then click Yes to confirm.
- Click OK.
For an advanced rule, open Windows Defender Firewall with Advanced Security, select the rule under Inbound Rules, and choose Disable Rule or Delete Rule. The Disable option keeps the rule so you can restore it later.
Keep the fix safe
- Allow an app only if you know where it came from. An app that asks for network access and that you do not recognize should stay blocked.
- Tick Private for home use. Tick Public only when you must.
- Do not leave the firewall switched off after testing.
- Allow the specific program file or port, not a wide range.
What to do next
If the app still fails after you allow it and remove any block rule, test it on a different network such as a phone hotspot. If it works there, the first network is blocking the traffic and your PC settings are not at fault. After a major app update, recheck the allowed apps list, because a new install folder can bring the block back. If you keep running into tangled rules, use Restore firewalls to default and allow only the apps you need as Windows prompts you.
How to allow an app through 🪟 Windows 10 firewall?
Open Control Panel, go to System and Security, and click Windows Defender Firewall. Select Allow an app or feature through Windows Defender Firewall, then click Change settings. Tick the app, choose the network types, and click OK. You need an administrator account to make this change.
How do I block an app on Windows?
Open Windows Defender Firewall with Advanced Security, then select Outbound Rules and click New Rule. Choose Program, browse to the app's .exe file, and select Block the connection. Name the rule and click Finish. This stops the app from sending data. You need an administrator account to create the rule.
How to block a game on the firewall?
Block a game the same way you block any app. Open Windows Defender Firewall with Advanced Security, select Outbound Rules, and click New Rule. Choose Program, point it to the game's .exe file, and select Block the connection. Repeat the steps under Inbound Rules if the game still gets through. You need an administrator account to make these changes.
Can a firewall block apps?
Yes. Windows Defender Firewall checks each app's network traffic against its rules and can allow or block it. You control this from Windows Security or from Windows Defender Firewall with Advanced Security. Blocking an app stops it from connecting to the internet or your local network until you change the rule.
Did this guide fix your problem?

About the Author
Richard
Tech Writer, IT Professional
Richard is a writer at Geek Rewind who turns complex IT tasks into clear, step-by-step guides. He draws on years of hands-on experience in system administration and enterprise IT operations, focusing on Windows, Linux and WordPress: the problems people actually run into, and the fixes that work. His server and WordPress guides come from systems he runs himself. Richard builds and maintains the platform behind Geek Rewind, from its Ubuntu servers and Nginx configuration to its custom WordPress plugins. Many new tutorials start with readers' questions, and he's always glad to answer them in the comments.
No comments yet — be the first to share your thoughts!