How to Enable or Disable Shield Up in Windows Firewall on Windows 11

Shield Up in Windows Firewall instantly blocks or allows all incoming network connections on Windows 11.
This security setting acts like a quick on/off switch for network traffic, overriding all other firewall rules. When you turn Shield Up on, Windows Firewall stops every incoming connection.
This is useful if you suspect a security threat and need to immediately cut off your PC from the internet. It helps protect you from unauthorized access, even from apps that normally have permission to connect.
Enable or disable “Shield up” by opening Windows Security, selecting Firewall & network protection, choosing your network profile, and toggling the “Block all incoming connections” option. This instantly blocks all incoming connections, overriding existing rules for maximum security.
How to Turn On or Off “Shield up” Mode in Windows Firewall
You can easily turn Windows Firewall Shield Up mode on or off using the Windows Security app. This feature adds an extra layer of protection by blocking all incoming connections to your computer, helping to keep it safe from unwanted access.
- Open the Windows Security app.
Alternatively, select Start > Settings > Update & Security > Windows Security > Open Windows Security.
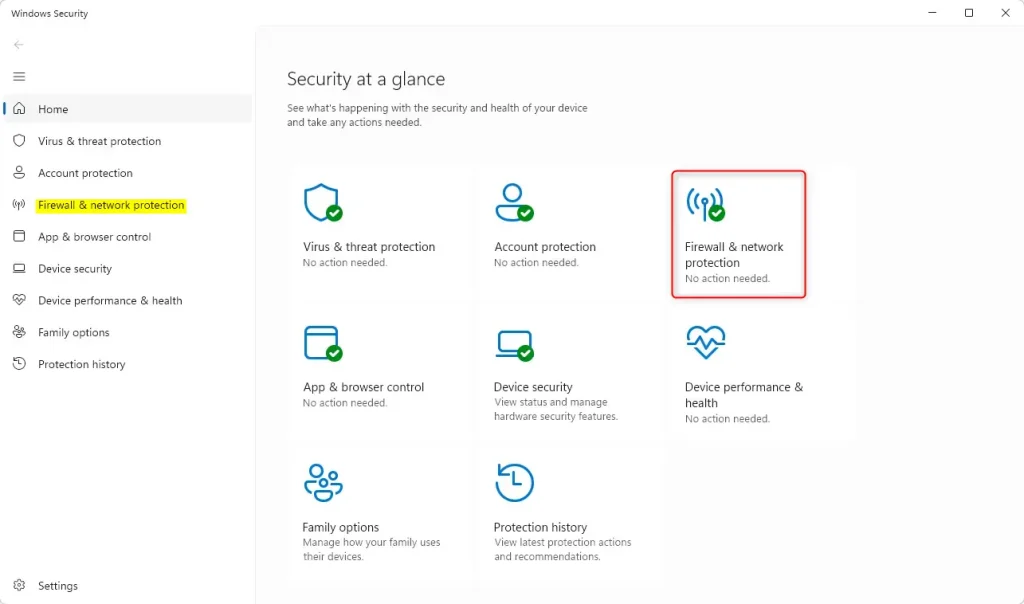
- In the Windows Security app, select “Firewall & network protection.”
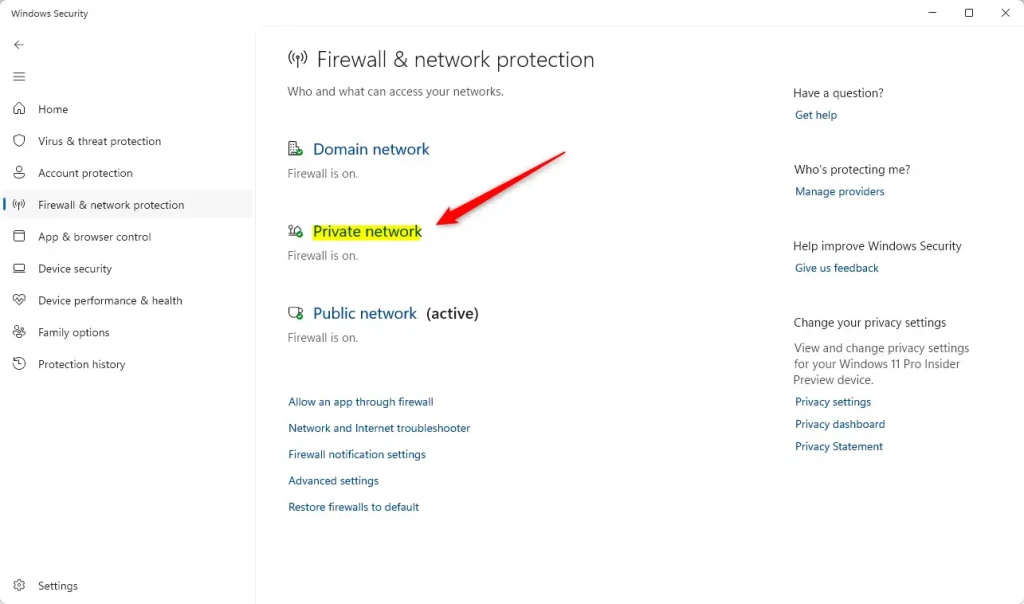
Windows Firewall in Windows Security app - Select the “Private network” profile.
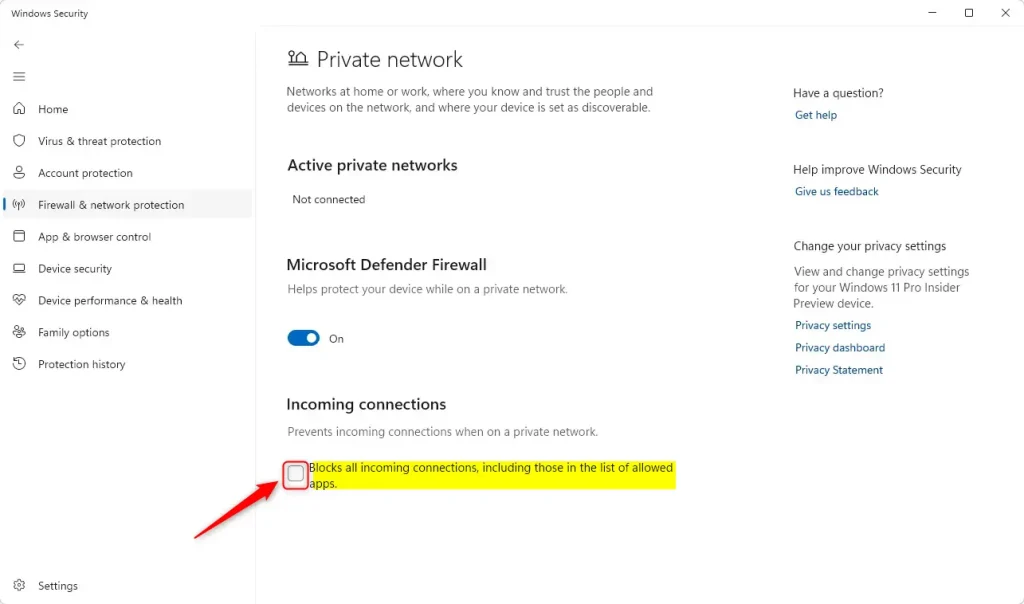
Windows Firewall private profile - Check the box next to “Block all incoming connections, including those in the list of allowed apps” to turn on “Shield up” mode.
To turn it off, uncheck the box .
Windows Security settings showing the block all incoming connections toggle option - When prompted, click the Yes button to confirm the changes.
- Close the Windows Security app when done.
Use Control Panel to Block All Incoming Connections
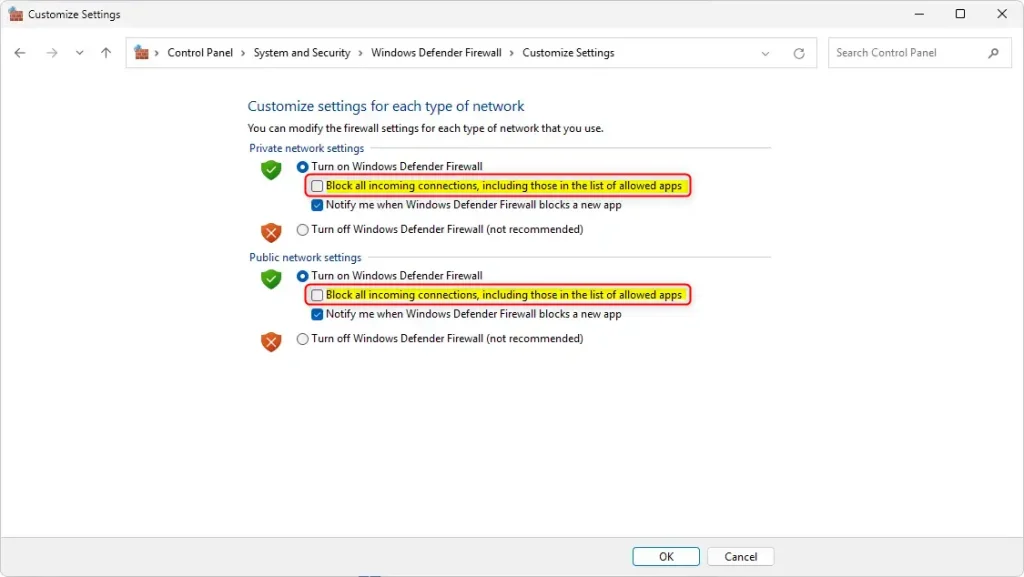
You can use the Control Panel to block all incoming connections, which is a good way to keep your computer safe. By going to System and Security, then Windows Defender Firewall, you can find the option to turn this protective feature on or off.
- Click the “Turn Windows Firewall on or off” link on the Windows Defender Firewall settings page.

Windows Defender Firewall in Control Panel - Check or uncheck the box next to “Block all incoming connections, including those in the list of allowed apps” to turn it on or off.
Windows Defender Firewall block all incoming connections - Close the Control Panel when you are done.
Turn On or Off Shield Up Mode Using the Windows Registry
You can turn Windows Firewall Shield Up mode on or off by making changes in the Windows Registry editor. This advanced method requires administrator permission, and involves navigating to a specific folder key to adjust the settings for this security feature.
Another way to enable or disable the “Shield up” feature is to use the Windows Registry editor.
- Open the Windows Registry and navigate to the folder key path below:
Computer\HKEY_LOCAL_MACHINE\SYSTEM\CurrentControlSet\Services\SharedAccess\Parameters\Firewall\StandardProfile - Right-click StandardProfile > New > DWORD (32-bit) Value and name the new DWORD
DoNotAllowExceptions. - Double-click
DoNotAllowExceptionsand change the value to1to block all incoming connections in the “Private network” profile.💡TipEnter0to turn it off and allow connections.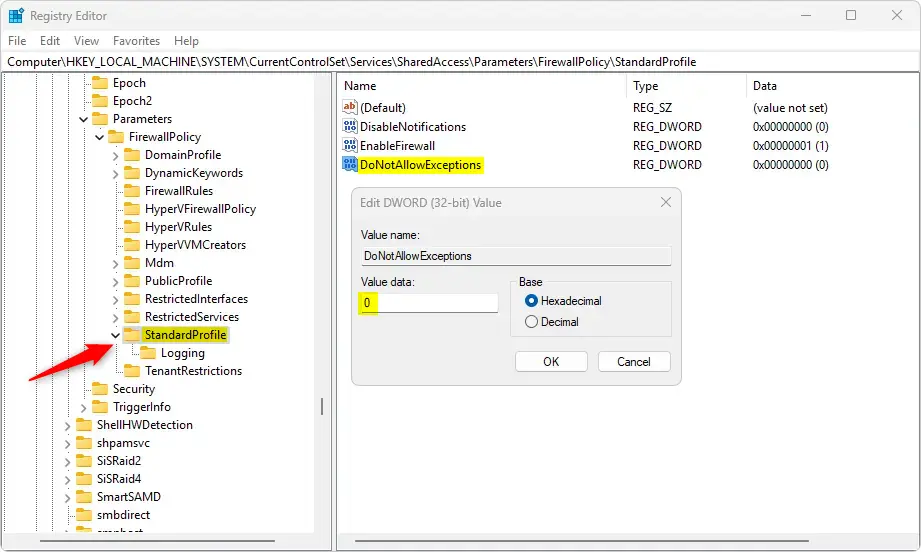
Windows Defender Firewall block all incoming connections registry - To do the same for the “Public network” profile, use this registry path:
Computer\HKEY_LOCAL_MACHINE\SYSTEM\CurrentControlSet\Services\SharedAccess\Parameters\Firewall\PublicProfileThen block or unblock all incoming connections using the
DoNotAllowExceptionsvalue name and enter1or0. - For the “Domain network” profile, use this path:
Computer\HKEY_LOCAL_MACHINE\SYSTEM\CurrentControlSet\Services\SharedAccess\Parameters\Firewall\DomainProfileThen block or unblock all incoming connections using the
DoNotAllowExceptionsvalue name and enter1or0. - Save your changes and restart your computer.
Summary
Turning Shield Up mode on or off in Windows Firewall is a simple way to increase your computer’s safety by blocking unwanted connections. You have several options to do this, including using the Windows Security app, the Control Panel, or the Windows Registry.
- Multiple ways to do it: You can enable or disable “Shield up” mode through the Windows Security app, Control Panel, or Windows Registry.
- Complete protection: When you turn on this mode, it blocks all incoming connections. It overrides any apps you’ve previously allowed.
- Easy to use: The steps are simple and take just a few minutes to complete.
- Different network types: You can apply these settings to Private, Public, or Domain networks based on what you need.
- Easy to change back: You can turn “Shield up” off anytime if you need to allow incoming connections again.
By following the steps in this article, you can keep your Windows 11 device safer and protect it from unauthorized access.
Reference: Microsoft
Is firewall block suspicious activity?
They can block known malicious IP addresses, restrict access to certain ports, and inspect network packets for suspicious content. However, firewalls alone are not sufficient to provide comprehensive protection against malware and viruses.
Was this guide helpful?

About the Author
Richard
Tech Writer, IT Professional
Richard, a writer for Geek Rewind, is a tech enthusiast who loves breaking down complex IT topics into simple, easy-to-understand ideas. With years of hands-on experience in system administration and enterprise IT operations, he’s developed a knack for offering practical tips and solutions. Richard aims to make technology more accessible and actionable. He's deeply committed to the Geek Rewind community, always ready to answer questions and engage in discussions.


No comments yet — be the first to share your thoughts!