How to Enable Remote Desktop in Windows 11

Remote Desktop is a built-in tool in Windows 11 that lets you control your PC from another laptop, tablet, or phone on your local network. It shows a live view of your desktop, so you can run apps, check files, and fix problems from anywhere in your house. The whole setup takes less than two minutes.
You need Windows 11 Pro or Enterprise to host a connection. Windows 11 Home devices can connect to other computers, but they cannot accept incoming connections. You also need administrator rights on the host PC to turn the feature on. If you are not sure which edition you have, open Settings System About and look under Windows specifications.
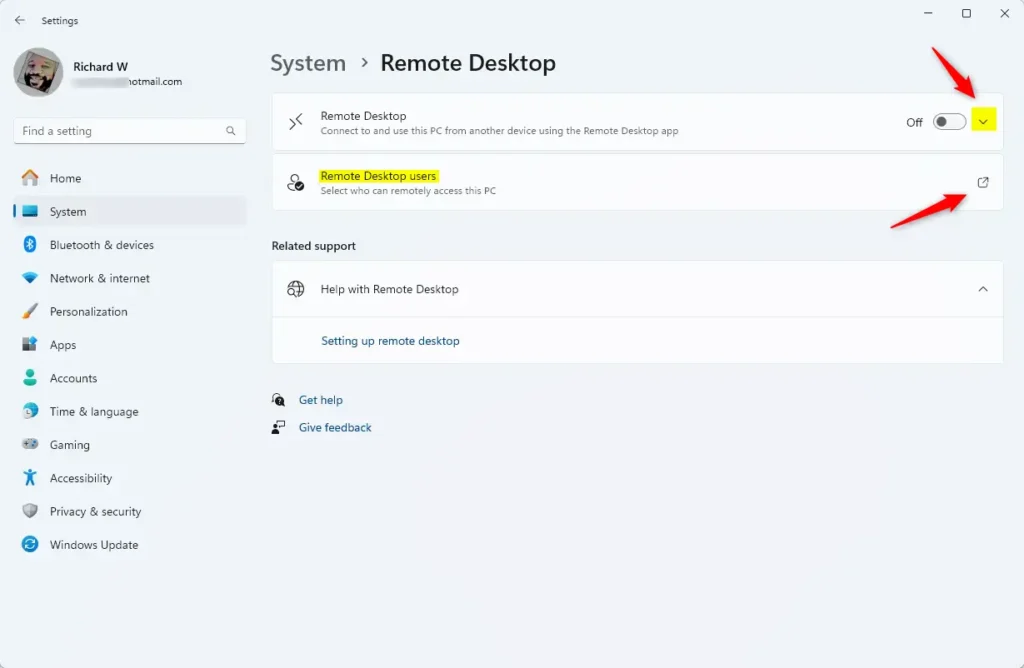
Open Settings System Remote Desktop and turn on the main switch. Click Confirm in the popup that appears. Remote Desktop is now enabled on your Windows 11 Pro or Enterprise PC, and other devices on your network can connect to it.
What is Remote Desktop?
Remote Desktop lets you connect to and control your computer from another device, such as a laptop, tablet, or phone. It works over your local network or, with the right network setup, over the internet. The host PC’s screen appears on the second device. You can run apps, open files, and fix problems as if you were sitting at the machine.
Windows leaves Remote Desktop turned off by default for security. You turn it on when you need outside access and turn it off again when your sessions are finished. The steps for both are below.
Why Use Remote Desktop?
- Work from anywhere by connecting to your home or office PC.
- Help friends or family fix computer problems remotely.
- Access your files and programs even if you’re away from your computer.
Remote Desktop gives you full access to your main computer and all its files. You can work from a laptop while traveling. You can reach heavy software on your desktop from a tablet in another room. You can also log into a family member’s computer and fix a software error without driving over there.
If it goes to sleep, the other device cannot reach it.
How to Turn On Remote Desktop in 🪟 Windows 11
To enable Remote Desktop, open Settings System Remote Desktop and turn on the main switch. Windows then asks you to confirm. Because the feature is off by default, no other device can connect until you do this.
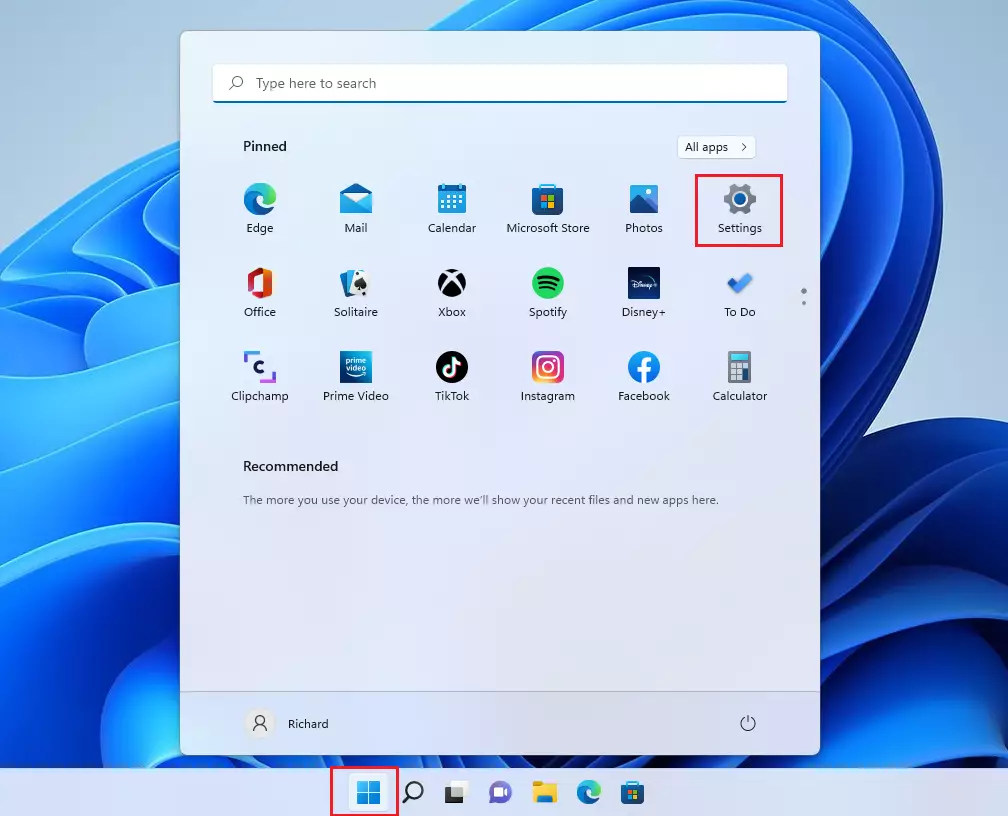
- Open the Settings app. Click the Start button (the Windows icon at the bottom-left corner), then click the Settings gear icon. You can also press the Windows key plus I. The Settings window should open on the System page.
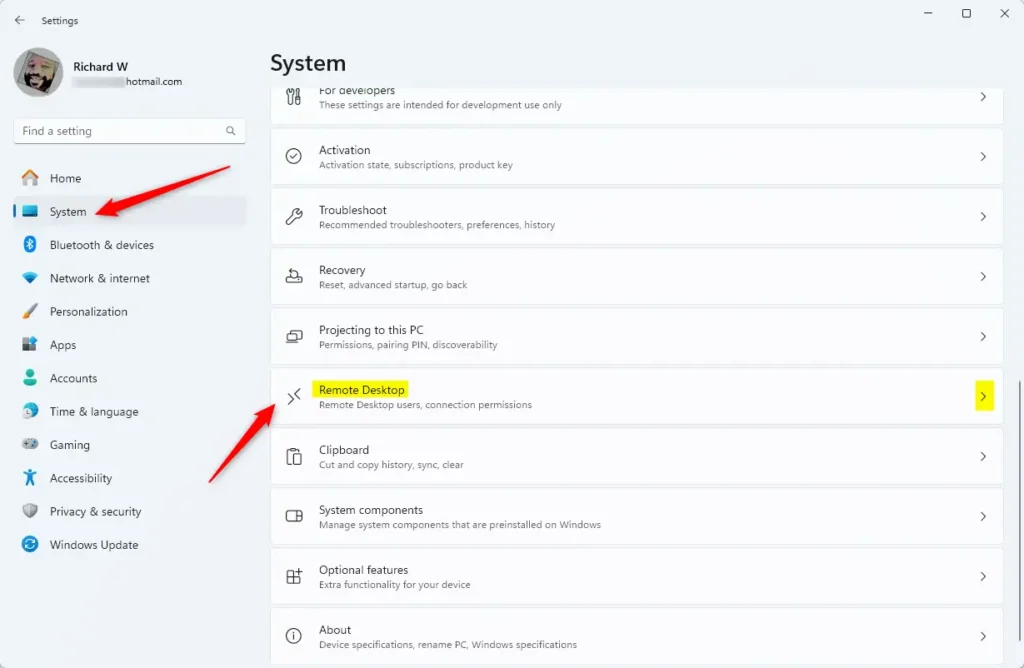
- In Settings, click System on the left side menu.
- Scroll down on the right side and click Remote Desktop. The Remote Desktop page opens with a switch at the top.
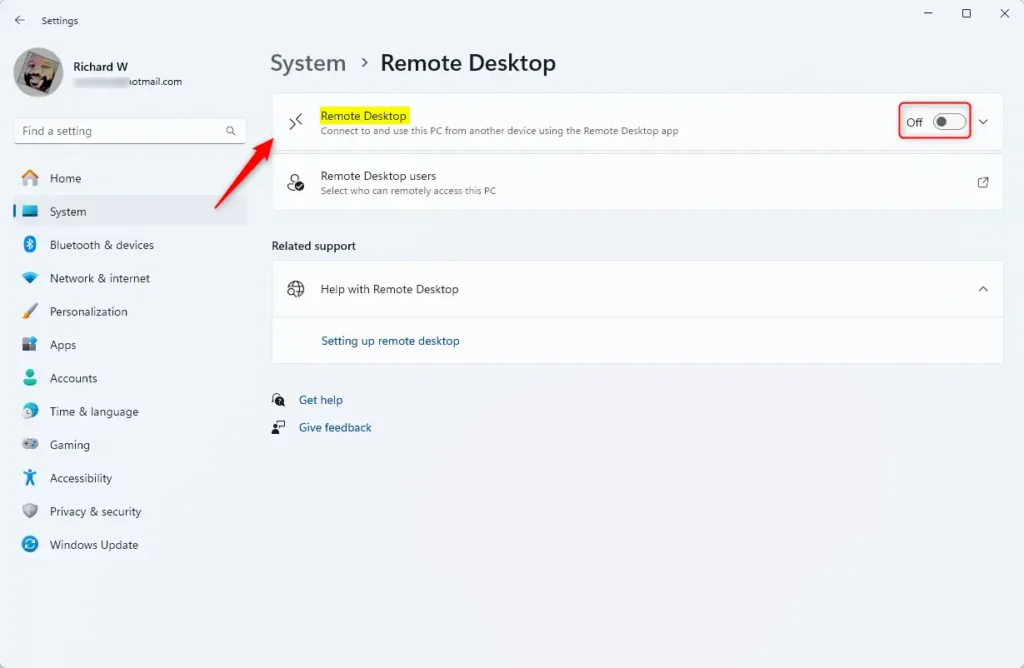
- Find the switch next to Remote Desktop and slide it to On.
- A confirmation message appears. Click Confirm to enable Remote Desktop. The switch should now read On.
If you do not see this switch, or it is greyed out, check two things. First, make sure you are signed in with an administrator account. Second, check your edition. Windows 11 Home does not offer the host option, so only Pro, Enterprise, and Education can turn it on.
You do not need to restart the PC. To undo the change, return to the same page and set the switch to Off.
How to Add Users Allowed to Connect
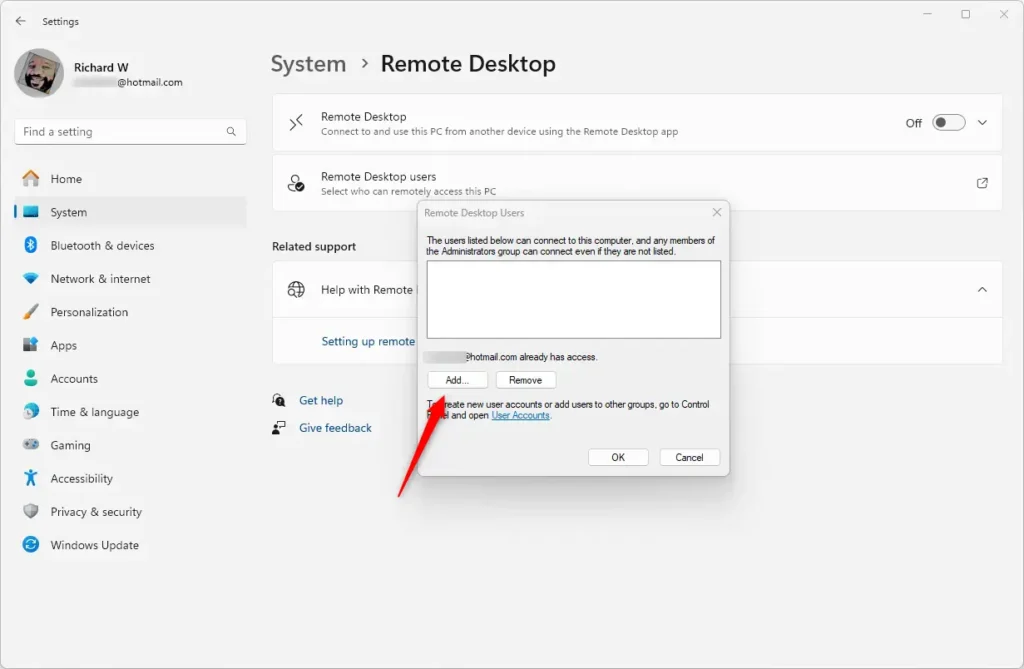
To let specific people connect, add their user accounts to the Remote Desktop permissions list. Administrator accounts on the PC can already connect, so you only need this step for standard users. Open the Remote Desktop page, click the link for users that can remotely access this PC, add the exact Windows account name, and save the changes.
- On the same Remote Desktop settings page, click the link that says "Users that can remotely access this PC" or Add users. A small window opens with the list of current remote users.
- Click the Add button.
- Type the username of the person you want to allow, then click OK. The name should now appear in the list.
If Windows says it cannot find the name, check the spelling and make sure the account actually exists on this computer. Accounts that have no password are generally refused for remote sign-in, so give the account a password first. To remove someone later, select the name in the same list and remove it.
Once this is set up, the PC accepts connections only from approved accounts that supply valid credentials. Approved users can reach the host's applications and files from another location. For example, team members can open project files stored on an office workstation while they work from home.
To connect, the other device needs the PC name, which is shown on the Remote Desktop page, and a Remote Desktop client. Windows includes one, and Microsoft offers clients for other platforms. On a local network, the two devices only need to be on the same network. For access over the internet, use a VPN rather than exposing the PC directly.
Summary
- Remote Desktop lets you use your Windows 11 computer from far away.
- It's turned off by default to keep your PC safe.
- You can turn it on anytime from the Settings app.
- Only people you add can connect to your PC remotely.
- Remember to think about security before enabling Remote Desktop.
Remote Desktop is a helpful tool that lets you control your computer from another device once you turn it on in the Settings app. Windows keeps it disabled by default to protect your data. You have to turn it on yourself and choose which user accounts may connect. Use strong passwords on those accounts, and switch Remote Desktop off when you no longer need it.
Have a question about this guide?
Answered by AI from this guide. Good questions may be added to this page — please don't include personal details.
Did this guide fix your problem?

About the Author
Richard
Tech Writer, IT Professional
Richard is a writer at Geek Rewind who turns complex IT tasks into clear, step-by-step guides. He draws on years of hands-on experience in system administration and enterprise IT operations, focusing on Windows, Linux and WordPress: the problems people actually run into, and the fixes that work. His server and WordPress guides come from systems he runs himself. Richard builds and maintains the platform behind Geek Rewind, from its Ubuntu servers and Nginx configuration to its custom WordPress plugins. Many new tutorials start with readers' questions, and he's always glad to answer them in the comments.
No comments yet — be the first to share your thoughts!