Open a Port in Windows Defender Firewall for One App in Windows 11

- 20 steps
- Needs administrator rights
To open a port for one app, create an inbound rule (a rule that governs traffic arriving at your PC). This rule ties a port number to a single program and controls traffic arriving at your PC. The quickest way is to open Windows Defender Firewall with Advanced Security, select New Rule, and choose the Custom rule type.
A port is a numbered channel that network traffic uses to reach an app. Other apps cannot use a port that is tied to one program’s rule. This is tighter than a rule for the port alone, which lets any program on the PC use the opening.
The console works the same on Windows 11 Home and Pro. You need an administrator account, the full path to the app’s .exe file, and the port number and protocol the app uses.
To open a port for one app in Windows Defender Firewall on Windows 11, create a Custom inbound rule in Windows Defender Firewall with Advanced Security. Select New Rule, choose Custom, set This program path to the app’s.exe file, then enter the port number and protocol the app uses. You need an administrator account.
Before You Start
Gather these four details first. The wizard asks for each one, and a wrong answer produces a rule that looks correct but never matches any traffic.
- The app’s .exe path. Right-click the app’s shortcut and select Open file location to find it. A typical path looks like 📁C:\
Program Files\ .ExampleApp\ ExampleApp.exe - The port number. The app’s documentation or settings page lists it. Examples are 8080 or 25565.
- The protocol. This is either TCP (a connection-based protocol that confirms delivery) or UDP (a faster protocol with no delivery confirmation). Games and streaming tools often use UDP. Web servers and remote tools usually use TCP.
- The direction. Inbound means traffic reaching your PC from elsewhere, such as a game server or file share running on it. Outbound means traffic leaving your PC. Windows allows outbound traffic by default, so most readers need an inbound rule.
Two limits apply before you begin. First, a rule in Windows Defender Firewall only controls the PC, so if people on the internet need to reach the app, your router must also forward the port to this PC. Second, if a third-party security suite manages your firewall, the Windows rule may have no effect. Before you build the rule, check whether Microsoft Defender Firewall is turned on.
Port Rule or Allow an App: Which One Do You Need?
Windows offers two related features, and they solve different problems. The Allow an app or feature through Windows Defender Firewall list in Control Panel lets an app use any port it asks for. You cannot choose the port there. If that is what you need, read how to allow apps through Microsoft Defender Firewall.
A Port rule type in the wizard opens a port for every program. A Custom rule combines a program and a port, so only that program benefits. That combination is what this post builds.
How to Open a Port in Windows Defender Firewall for One App in 🪟 Windows 11
These steps open a port in Windows Defender Firewall for one app by creating a Custom inbound rule. You need administrator privileges. Windows asks you to approve the console with a User Account Control prompt.
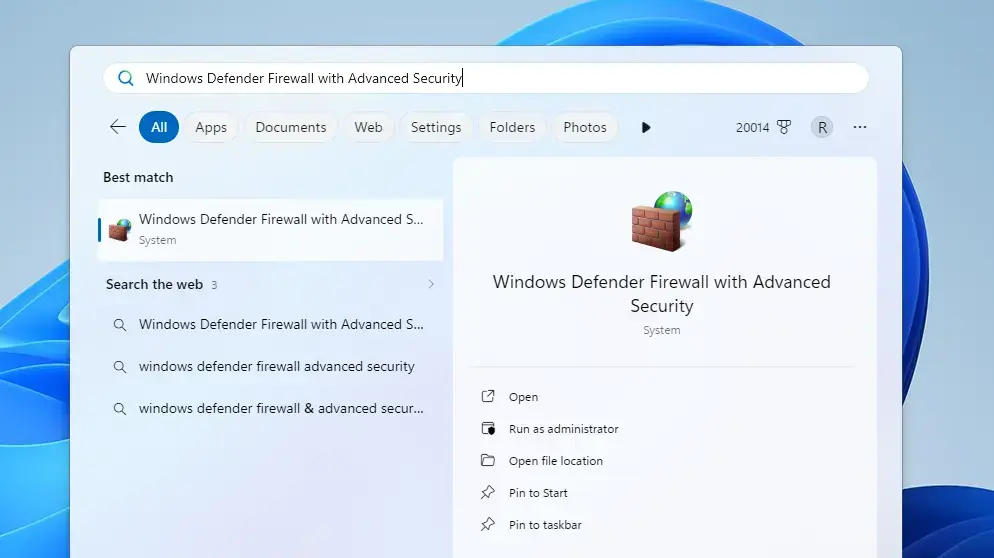
- Open Windows Defender Firewall with Advanced Security. Select Start, type “Windows Defender Firewall with Advanced Security”, and select the result. Click Yes at the User Account Control prompt. A console with three panes opens. If you do not have administrator rights, Windows asks for an administrator’s password.
Windows Security - Select Inbound Rules in the left pane. The middle pane fills with the existing inbound rules. The list is long, and that is normal.
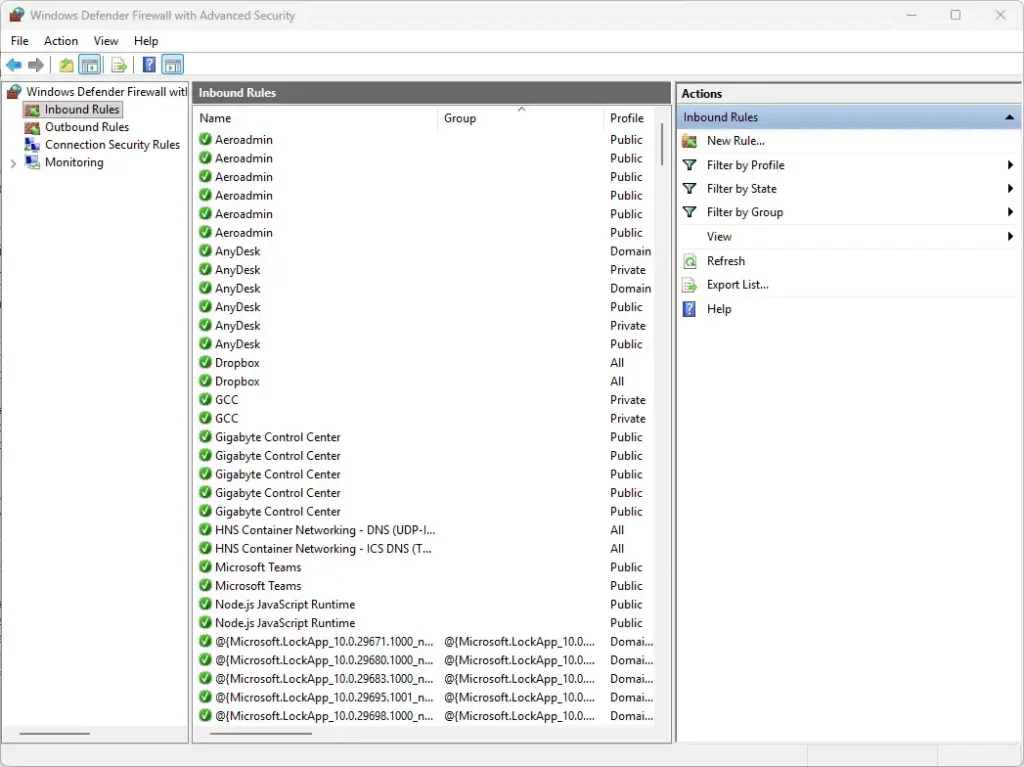
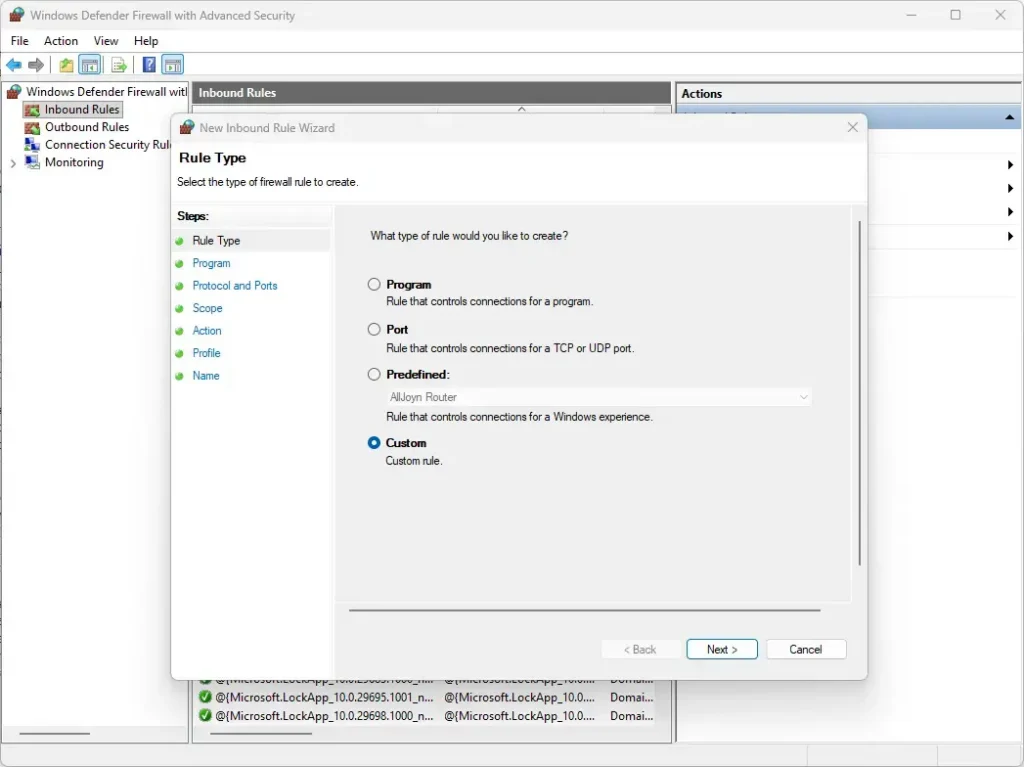
Windows Security - Click New Rule in the Actions pane on the right. The New Inbound Rule Wizard opens on the Rule Type page.
- Select Custom, then click Next. This type lets you set a program and a port in the same rule. The Program page appears.
Windows Security - Select This program path. This ties the rule to one program. Leave All programs unselected, or the port opens for everything on the PC.
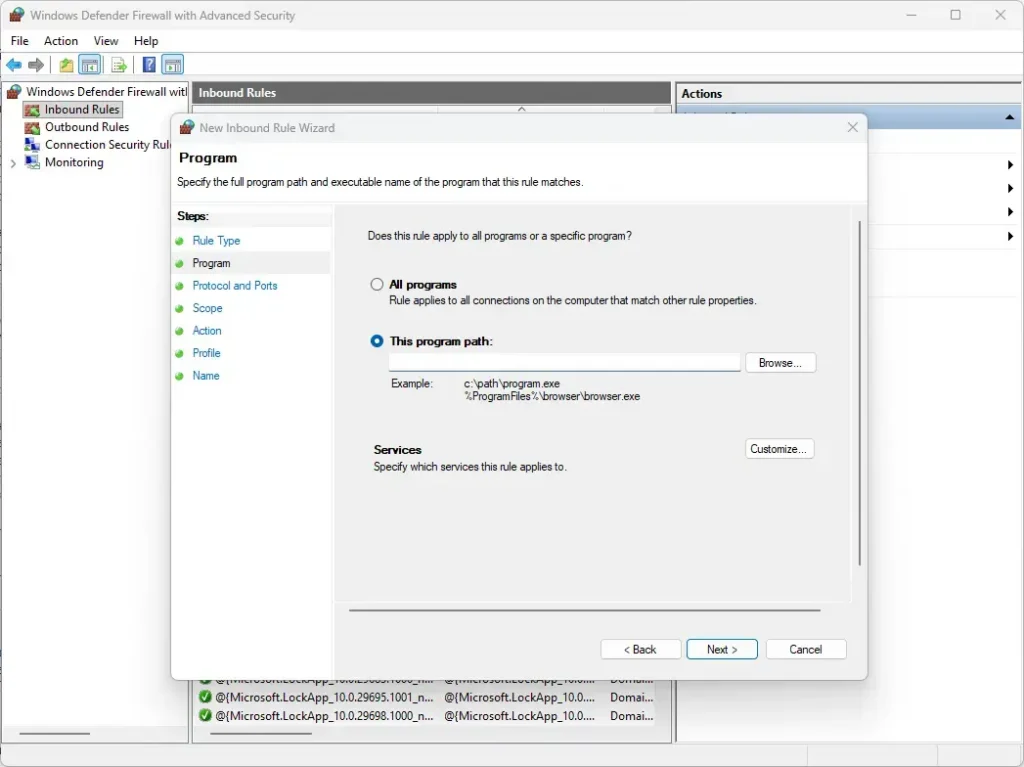
Windows Security - Click Browse and select the app’s .exe file. Click Open. The full path appears in the box. Click Next.
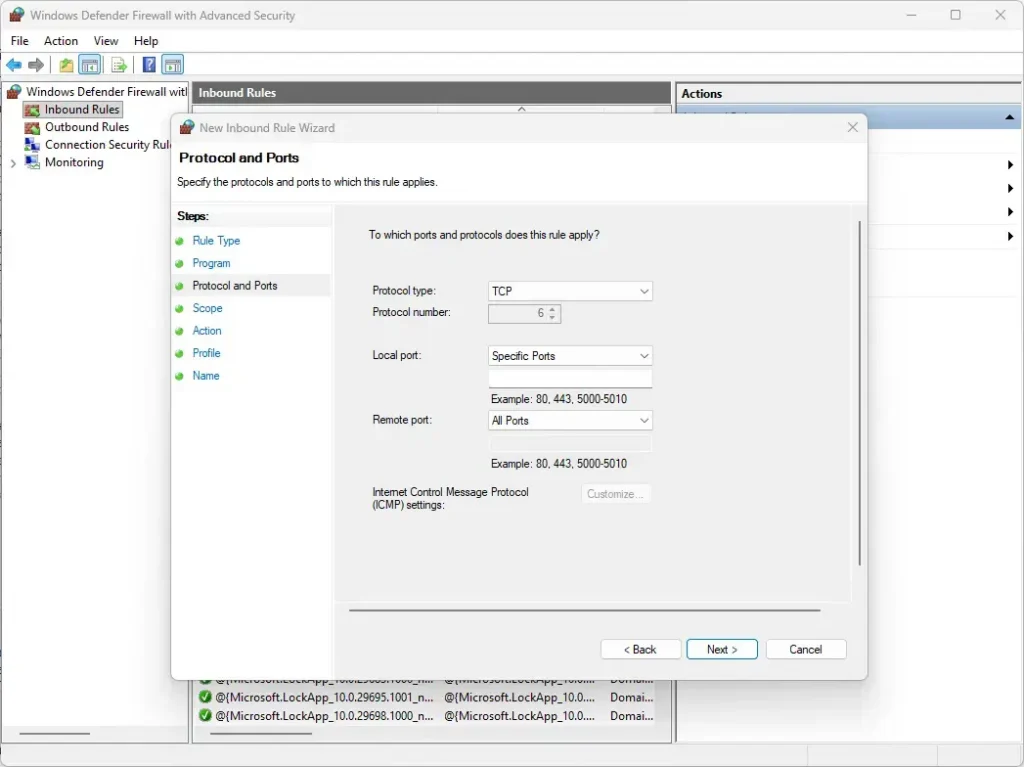
- Choose the protocol on the Protocols and Ports page. Open the Protocol type list and select TCP or UDP.
- Set Local port to Specific Ports. A text box appears below the list.
- Type the port number in the box. For several ports, separate them with commas, such as 8080, 8443. For a range, use a hyphen, such as 5000-5010.
- Leave Remote port set to All Ports. Click Next. Most apps choose a random remote port, so restricting it breaks the connection.
- Review the Scope page and click Next. The default of Any IP address for both local and remote works for most cases. To limit the rule to one computer, select These IP addresses under the remote section, click Add, and enter an address such as 192.0.2.10.
Windows Security - Select Allow the connection on the Action page. Click Next. Avoid Allow the connection if it is secure unless you have set up IPsec (a protocol suite that authenticates and encrypts traffic), because it blocks plain connections.
- Choose the network profiles. Tick Private and clear Domain and Public if you only use the app at home. Click Next. The profile that Windows assigns to your current network must be ticked here, or the rule stays inactive on that network.
- Type a name in the Name box, such as “ExampleApp TCP 8080”. Add a note in Description if you like, then click Finish. A clear name matters. You will want to recognise the rule months later.
- Find your new rule in the Inbound Rules list. A green check mark beside the name means the rule is enabled. The rule takes effect immediately and no restart is needed.
To open the port for outgoing traffic instead, select Outbound Rules in step 2 and run the same wizard.
Check which network profile you are on
A firewall profile is a set of rules that Windows applies depending on the network type. The wizard offers Domain, Private and Public. To see your current one, open Settings Network & internet, select Wi-Fi or Ethernet, and open the connection’s properties. The Network profile type setting shows Public network or Private network.
Public is the default for many new connections. If your rule is Private only and the network is Public, the port stays closed. Either change the network profile to Private on that page or add Public to the rule. Changing the network profile is the safer fix.
Open the Port with PowerShell Instead
PowerShell creates the same rule in one command. This is useful when you set up several PCs or want a record of exactly what you did. You need administrator privileges for this step. Right-click Start, select Terminal (Admin), then click Yes at the prompt.
Replace the display name, path, protocol and port with your own values, then press Enter.
New-NetFirewallRule -DisplayName "ExampleApp TCP 8080" -Direction Inbound -Program "C:\Program Files\ExampleApp\ExampleApp.exe" -Protocol TCP -LocalPort 8080 -Action Allow -Profile PrivatePowerShell prints the properties of the new rule when it succeeds. The rule then appears in the Inbound Rules list in the console, so you can inspect it with the steps above. If PowerShell reports an access error, the window is not running as administrator. Close it and open it again with Terminal (Admin).
Test That the Port Is Open
A firewall rule alone does not make a port reachable. The app must be running and listening on that port. Start the app first, then test from another computer on the same network.
On the other computer, open PowerShell and run the command below. Replace 192.0.2.10 with the IP address of the PC that has the rule, and 8080 with your port.
Test-NetConnection -ComputerName 192.0.2.10 -Port 8080The result line TcpTestSucceeded reads True when the connection works. This test checks TCP only. For UDP, test with the app itself, because a UDP port gives no reply to confirm it is open.
To confirm that the app is listening, open Command Prompt on the PC that runs the app and run the command below. A line with the state LISTENING means the app has opened the port.
netstat -ano | findstr :8080If the Port Still Looks Closed
Work through these causes in order. Each cause below is a common reason the port stays closed.
- The app is not listening. If netstat (a command that lists open network connections) shows nothing for the port, the app is closed or set to a different port. Fix the app first.
- The profile does not match. Compare the rule’s profiles with your network’s profile type, as described earlier.
- The program path is wrong. A rule tied to one .exe ignores traffic from any other file. Updates sometimes move an app to a new folder. Open the rule’s properties, select the Programs and Services tab, and check the path.
- A Block rule exists. In Windows Defender Firewall, a block rule overrides an allow rule. Sort the Inbound Rules list by the Action column and look for a block rule that names the same app or port.
- Your router blocks the traffic. Devices outside your home network need port forwarding (a router setting that sends incoming traffic on a port to one PC) on the router. The Windows rule does not create it.
- Another firewall is active. Security suites from other vendors often replace the Windows firewall. If your console shows a message that settings are managed by another program, create the rule in that program instead.
- The settings are managed by your organisation. On a work or school PC, Group Policy (settings an organisation pushes to its PCs) or device management may block new rules. The New Rule button works, but the rule is ignored or removed. Ask your IT administrator.
Follow the steps to turn Microsoft Defender Firewall back on rather than leaving it off. Turning it off to test a connection hides the real cause and carries risk. The guide on disabling Windows Firewall on Windows 11 explains when that is acceptable.
Disable, Edit or Delete the Rule
- Open Windows Defender Firewall with Advanced Security as an administrator.
- Select Inbound Rules in the left pane.
- Find your rule by name. Click the Name column heading to sort the list alphabetically.
- Right-click the rule and select Disable Rule. The green check mark disappears. To switch it back on, right-click and select Enable Rule.
- Select Delete to remove the rule permanently. Windows asks you to confirm.
To change the port, protocol or profiles, right-click the rule and select Properties. The tabs include General, Programs and Services, Protocols and Ports, Scope and Advanced. Changes apply when you click OK.
In PowerShell, delete the rule from the earlier example with this command in an administrator window.
Remove-NetFirewallRule -DisplayName "ExampleApp TCP 8080"Keep the Open Port Safe
Every open port is a place where an attacker can probe your PC. A few habits limit the risk.
- Open only the ports the app documents, and only for the protocol it uses.
- Use the Private profile unless you need access on public networks.
- Restrict the remote IP address on the Scope page when you know which computers connect.
- Disable or delete the rule when you stop using the app.
- Keep the app updated, because an open port exposes any flaw in the app itself.
To see how the rest of the firewall fits together, read how to set up and configure Windows Defender Firewall for maximum security. If you want malware protection on the same PC, check that Microsoft Defender is enabled. You can also scan for malware with Defender before you open a port for software you downloaded from an unfamiliar source.
What to Do Next
Before you add more rules, export your current firewall setup so you can return to it if something breaks. The guide to backing up and restoring Microsoft Defender Firewall in Windows 11 covers that. If the app later stops accepting connections after an update or a move to a new folder, open the rule’s Properties. Check that the program path still points to the right .exe file. A Custom rule tied to the old path stops matching until you correct it.
Have a question about this guide?
Answered by AI from this guide. Good questions may be added to this page — please don't include personal details.
Did this guide fix your problem?

About the Author
Richard
Tech Writer, IT Professional
Richard is a writer at Geek Rewind who turns complex IT tasks into clear, step-by-step guides. He draws on years of hands-on experience in system administration and enterprise IT operations, focusing on Windows, Linux and WordPress: the problems people actually run into, and the fixes that work. His server and WordPress guides come from systems he runs himself. Richard builds and maintains the platform behind Geek Rewind, from its Ubuntu servers and Nginx configuration to its custom WordPress plugins. Many new tutorials start with readers' questions, and he's always glad to answer them in the comments.
No comments yet — be the first to share your thoughts!