List Every Firewall Rule with PowerShell in Windows 11

- 9 steps
- Needs administrator rights
Get-NetFirewallRule lists every rule in Windows Defender Firewall with Advanced Security (the full rule engine behind the Windows Security firewall page) from a PowerShell window. On Windows 11 version 25H2, open Terminal as administrator, run Get-NetFirewallRule, and PowerShell prints each rule with its name, direction, action and state.
A fresh Windows 11 PC already holds hundreds of rules. Most belong to Windows features, Microsoft Store apps and networking components, so the raw output is long. This post shows the full list, a compact table, the ports and programs behind each rule, and a CSV export you can open in a spreadsheet.
Listing rules only reads data. It changes nothing, needs no restart, and works the same on Windows 11 Home and Pro.
To list every firewall rule with PowerShell in Windows 11, open Terminal (Admin), type Get-NetFirewallRule, and press Enter. PowerShell prints each rule in Windows Defender Firewall with Advanced Security with its DisplayName, Enabled state, Direction, Action and Profile. For a compact table, run Get-NetFirewallRule with Format-Table, or export the list to a CSV file on your desktop.
Before You Start
The commands in this post come from the NetSecurity module (a built-in set of firewall cmdlets that ships with Windows 11). You do not need to install anything.
Open the terminal as an administrator. Windows blocks some firewall data and some save locations in a standard window. An elevated window avoids those errors.
The default output shows only part of each rule. Ports and program paths live in separate “filter” objects, which the later sections cover.
How to List Every Firewall Rule with PowerShell
These steps list every firewall rule with PowerShell, show the result as a readable table, and save a copy to a CSV file. Step 2 needs administrator privileges. Select Terminal (Admin) below.
- Right-click the Start button. A short menu of system tools opens.
- Select Terminal (Admin). On some builds the entry reads Windows Terminal (Admin). Select Yes when User Account Control asks for permission.
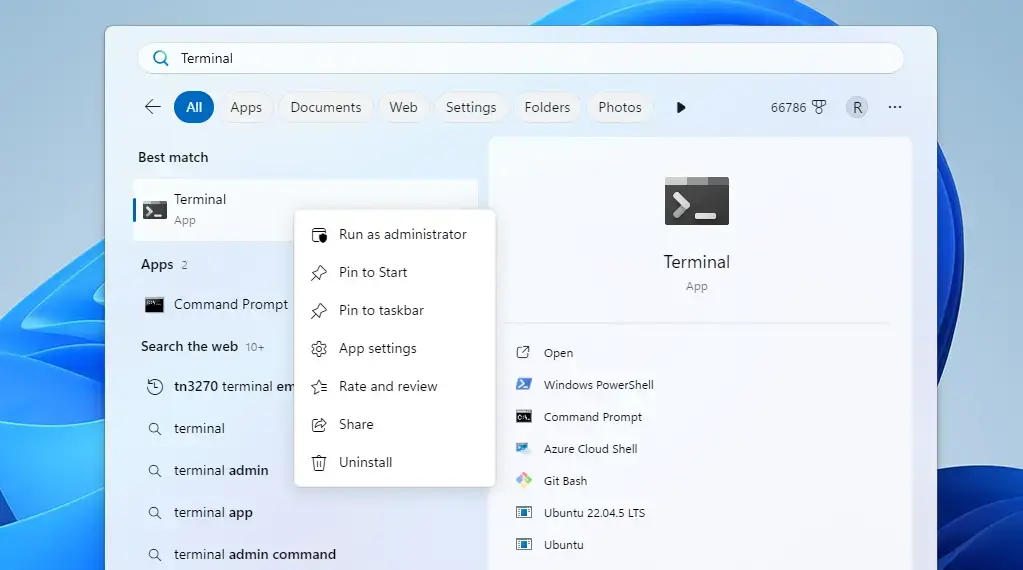
- Confirm the PowerShell tab is open. The tab title usually starts with “Administrator”, and the prompt begins with
PSfollowed by a folder path. - Type Get-NetFirewallRule and press Enter. It prints every rule, one property per line, with a blank line between rules.PowerShell
Get-NetFirewallRuleThe screen fills quickly. Each entry shows fields such as Name, DisplayName, Enabled, Direction, Action and Profile.
- Count the rules. PowerShell prints a single number, which differs from PC to PC.Code
(Get-NetFirewallRule).Count - Show the rules as a compact table. This puts one rule on each row, so the list is far easier to scan.PowerShell
Get-NetFirewallRule | Format-Table DisplayName, Enabled, Direction, Action, Profile -AutoSizeThe table has five columns. If a long name is cut off with “…”, widen the terminal window and run the command again.
- Page through the table one screen at a time. Press Space for the next page and Q to stop.PowerShell
Get-NetFirewallRule | Format-Table DisplayName, Enabled, Direction, Action, Profile -AutoSize | Out-Host -Paging - Export the list to a CSV file on your desktop. A CSV (comma-separated values) file opens in Excel and keeps the columns intact.PowerShell
Get-NetFirewallRule | Select-Object DisplayName, Enabled, Direction, Action, Profile | Export-Csv -Path "$env:USERPROFILE\Desktop\FirewallRules.csv" -NoTypeInformationPowerShell prints nothing when the export works. A file named FirewallRules.csv appears on your desktop.
- Open FirewallRules.csv in Excel or Notepad. Use the Excel filter buttons to sort by Direction or Action.
If step 4 prints a red error saying the term is not recognized, the window is probably not a PowerShell session. Close it, open Terminal again, and check that the tab is PowerShell and not Command Prompt. A Command Prompt tab does not understand cmdlets (the built-in commands PowerShell uses).
If step 8 reports access denied, the desktop path may be redirected or protected. Change the path in the command to a folder you can write to, such as Documents.
What Each Column Means
The table in step 6 uses the five properties you will read most often. Knowing them makes the list much easier to interpret.
- DisplayName is the readable name of the rule, such as the name of an app or a Windows feature. The separate Name property is an internal identifier, often a long string of characters.
- Enabled shows True or False. A rule set to False exists but does not filter any traffic.
- Direction is Inbound (traffic coming into the PC) or Outbound (traffic leaving it).
- Action is Allow or Block. When rules conflict, a Block rule normally wins over an Allow rule.
- Profile is the network type the rule applies to: Domain (a managed work network), Private (a network you trust), Public (open networks such as cafés), or Any. Windows picks the active profile from how you classify each network connection.
The Profile column helps when an app works at home but not in a coffee shop. The rule may apply only to Private networks, so it does nothing while the PC is on a Public network.
Show the Ports and Programs for Every Rule
The default list does not show which port or program a rule covers. That information sits in the port filter and the application filter. Each rule has one of each, and you read them with their own cmdlets.
To see port details for all rules, pipe (send the output of one command into the next) the rules into Get-NetFirewallPortFilter:
Get-NetFirewallRule | Get-NetFirewallPortFilterThis prints Protocol, LocalPort and RemotePort for each rule, but without the rule name. To join everything into one table, use the command below. It builds one row per rule, with the name, direction, action, protocol, local port and program.
Get-NetFirewallRule | ForEach-Object {
    $port = $_ | Get-NetFirewallPortFilter
    $app = $_ | Get-NetFirewallApplicationFilter
    [pscustomobject]@{
        Name      = $_.DisplayName
        Direction = $_.Direction
        Action    = $_.Action
        Protocol  = $port.Protocol
        LocalPort = $port.LocalPort
        Program   = $app.Program
    }
} | Format-Table -AutoSize
This command looks up two filters for every rule, so it can take a minute or more on a PC with many rules. Wait for the prompt to return. A Program value of Any means the rule is not tied to one executable. A LocalPort value of Any means it covers all ports.
To save the combined table, replace Format-Table -AutoSize at the end with Export-Csv -Path "$env:USERPROFILE\Desktop\FirewallRulesDetailed.csv" -NoTypeInformation.
Filter the List to the Rules You Care About
A full list is useful for audits. For troubleshooting, a filtered list is faster. These commands narrow the output without changing any rule.
List only the rules that are turned on:
Get-NetFirewallRule -Enabled TrueList inbound rules that block traffic:
Get-NetFirewallRule -Direction Inbound -Action BlockSearch by name with a wildcard. The asterisks match any text before and after the word:
Get-NetFirewallRule -DisplayName "*Remote Desktop*"Sort the table by direction and then by name:
Get-NetFirewallRule | Sort-Object Direction, DisplayName | Format-Table DisplayName, Enabled, Direction, Action -AutoSizeIf a filter returns nothing, PowerShell may print an error about no matching rule instead of an empty list. Check the spelling of the name and try a shorter wildcard.
Use netsh as an Alternative
The older netsh tool (a command-line utility for network settings) also lists firewall rules. It works in PowerShell and in Command Prompt:
netsh advfirewall firewall show rule name=allThe output is plain text, one block per rule, and it is harder to filter than PowerShell objects. Use it when you need a quick text dump or work on a PC where the NetSecurity cmdlets are unavailable. For anything you plan to sort, count or export, Get-NetFirewallRule is the better choice.
Why the Rule List May Differ From What You Expect
Rules come from more than one place. Windows ships its own rules, installers add rules for apps, and an administrator can push rules with Group Policy (a central settings system used on work and school networks). Get-NetFirewallRule normally reports the rules that are active on the PC, so policy-based rules appear alongside local ones.
To read from a specific source, add the source parameter -PolicyStore to the command. For example, Get-NetFirewallRule -PolicyStore ActiveStore asks for the rules in effect right now. If the count on a work PC is higher than on a home PC, Group Policy rules are the likely reason.
The Windows Security app and the Windows Defender Firewall with Advanced Security console show the same rule set in a graphical form. Expect to see the same entries in all three places. Some rules for Microsoft Store apps use long internal names, so the DisplayName column is the easier one to read.
The list also includes rules that are switched off. To see only the rules that filter traffic today, add the enabled-only filter -Enabled True from the earlier section.
Undo and Clean Up
Nothing in this post changes a firewall rule, so there is nothing to undo in Windows. To remove the export, delete FirewallRules.csv from your desktop.
Read each one before you run it. If you alter rules and something breaks, the guide to resetting the default firewall settings in Windows 11 returns the firewall to its original state. Resetting also removes rules that apps added, so export your list first as a record.
Related Firewall Tasks
A rule list shows what is configured. It does not show what the firewall did with real traffic. For that, read the log in how to read the Windows Firewall log file in Windows 11.
If the list shows a Block rule for an app you need, the guide on what to do when Windows Firewall blocks apps you need walks through allowing it. To check whether the firewall is active on each profile, see how to turn Microsoft Defender Firewall on or off in Windows 11.
What to Do Next
Keep the exported CSV as a record of your current rules. After you install new software or change network settings, run the same export under a different file name and compare the two files to see which rules were added.
To look at what the firewall actually allowed and blocked, move on to the firewall log. If a rule you found is the cause of a problem, the blocked-apps guide covers the fix.
Have a question about this guide?
Answered by AI from this guide. Good questions may be added to this page — please don't include personal details.
Did this guide fix your problem?

About the Author
Richard
Tech Writer, IT Professional
Richard is a writer at Geek Rewind who turns complex IT tasks into clear, step-by-step guides. He draws on years of hands-on experience in system administration and enterprise IT operations, focusing on Windows, Linux and WordPress: the problems people actually run into, and the fixes that work. His server and WordPress guides come from systems he runs himself. Richard builds and maintains the platform behind Geek Rewind, from its Ubuntu servers and Nginx configuration to its custom WordPress plugins. Many new tutorials start with readers' questions, and he's always glad to answer them in the comments.
No comments yet — be the first to share your thoughts!