How to Hide or Show Disabled Sound Devices in Settings on Windows 11

Hiding or showing disabled sound devices in Windows 11 lets you clean up your audio list by removing microphones and speakers that are turned off. The setting controls what appears on the Settings Sound All sound devices page.
Microsoft added quick switches to hide or show disconnected and unplugged gear starting with Windows 11 build 26340.9354 (Experimental 26H2) for Insiders. You can turn the setting on or off in a few clicks. Because this is an Insider build feature, you may not see the option on a regular release of Windows 11. If it is missing, check your build number first. This is the most likely reason.
Open Settings System Sound All sound devices, scroll to Advanced, click Show devices for this flow, and toggle the switch on to display disabled devices or off to hide them. The change applies immediately without restarting.
Option One
Hide or Show Disabled Sound Devices in Settings
The Settings app is the easiest route. The first two steps get you to the main sound settings, where the view options live.
- Press the Win and the I key together (Win+I) to open Settings. The Settings window opens.
- Click System on the left side of the screen, then click Sound on the right side. You should now see your output and input devices and the volume controls.
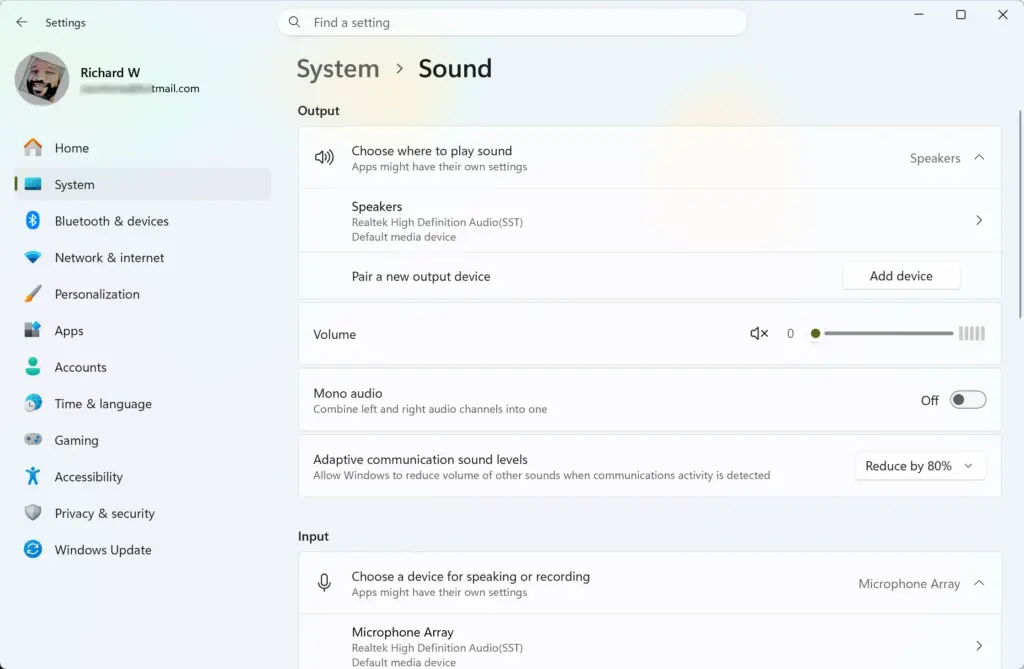
- Scroll down to the Advanced section and click All sound devices. A page opens listing every output and input device Windows knows about.
Open “All sound devices” Settings
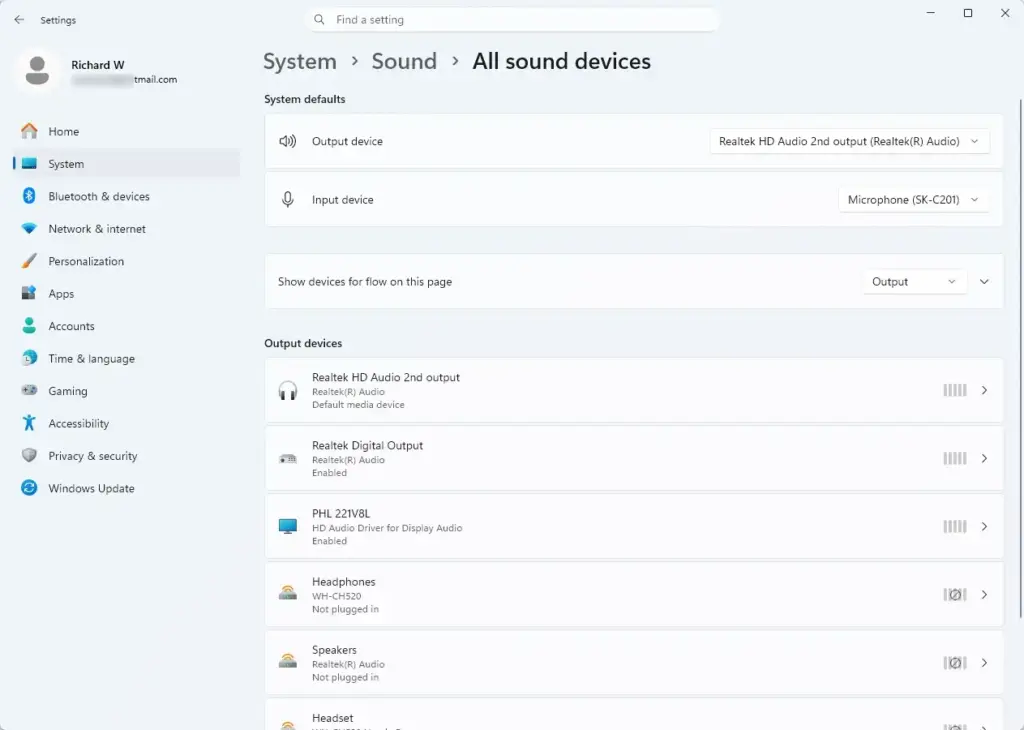
- Look under System defaults and click Show devices for flow on this page to open the menu. If you don’t see this option, your build probably doesn’t include the feature yet.
- Turn the switch on to show disabled audio devices, or turn it off to hide them. Showing them is the default setting.
When it is off, they disappear from the list. The devices are not removed from your system either way. They are only hidden from view, so you can flip the switch back at any time to undo the change.
- Close the Settings window when you finish. The change applies right away, so you don't need to restart.
Option Two
Hide or Show Disabled Sound Devices in Settings using Registry Editor
This works on both Home and Pro. It is mainly useful if you prefer editing values directly or want to apply the same change on several PCs. The registry change will probably only have an effect on builds that include the feature described above.
- Back up the registry or create a restore point before you edit anything. A wrong change in the registry can cause problems.
- Search for Registry Editor in the Start menu and open it. Approve the User Account Control prompt if it appears.
- Go to the HKEY_CURRENT_USER\Software\Microsoft\Multimedia\Audio\DeviceCpl path. You can paste the path into the address bar at the top of the window.
- Find the ShowDisabledDevices value and double-click it.
- Set the value data to 1 to show disabled audio devices, or to 0 to hide disabled sound devices from your main list. Click OK.
- Close Registry Editor and reopen Settings Sound All sound devices to check the result. If nothing changes, sign out and back in.
To undo the change, set the value back to the number you started with. This path is under HKEY_CURRENT_USER, so it affects only your own user account.
Summary
This tutorial showed you how to hide or show disabled sound devices in Windows 11 using either the Settings app or the Windows Registry Editor. Use Settings if your build has the option. Use the registry method only if you are comfortable editing it.
Have a question about this guide?
Answered by AI from this guide. Good questions may be added to this page — please don't include personal details.
Did this guide fix your problem?

About the Author
Richard
Tech Writer, IT Professional
Richard is a writer at Geek Rewind who turns complex IT tasks into clear, step-by-step guides. He draws on years of hands-on experience in system administration and enterprise IT operations, focusing on Windows, Linux and WordPress: the problems people actually run into, and the fixes that work. His server and WordPress guides come from systems he runs himself. Richard builds and maintains the platform behind Geek Rewind, from its Ubuntu servers and Nginx configuration to its custom WordPress plugins. Many new tutorials start with readers' questions, and he's always glad to answer them in the comments.
No comments yet — be the first to share your thoughts!