How to Open the OpenSSH Client in Windows 11 Settings


The OpenSSH client in Windows 11 lets you connect to remote servers and run secure command-line sessions without extra tools such as PuTTY. SSH (Secure Shell) is a protocol that encrypts the connection between your PC and another machine. The client ships as an optional feature, and it is usually installed by default.
On some installs it is missing. If you type the ssh command in a terminal and see an error that the command is not recognized, you need to add the feature. This tutorial shows how in Settings and in PowerShell, and checks first whether you already have it.
To open the OpenSSH client in Windows 11, go to Settings System Optional features, select View features next to Add an optional feature, search for OpenSSH Client, tick it, and click Install. Alternatively, run Add-WindowsCapability -Online -Name OpenSSH.Client~~~~0.0.1.0 in an administrator terminal. No restart is normally needed.
Check if OpenSSH Client is Already Installed
Before you install anything, check whether the OpenSSH client is already on your PC. On many PCs it is, and this check takes under a minute. If the client is present, the terminal prints usage instructions and a list of options. If it is missing, you get an error saying the command is not recognized.
- Press the Win, type Terminal, and press Enter to open Windows Terminal. A prompt appears in a PowerShell tab.
- Type
sshand press Enter. - Read the output. It is either a list of command-line switches and usage instructions, or an error stating the command is not recognized.
If the output shows usage instructions starting with usage: ssh [-46AaCfGgKkMNnqsTtVvXxYy], the client is already installed and ready to use. Skip ahead to connecting to a server. If the terminal says ssh is not recognized as an internal or external command, continue with one of the two install methods below.
Install OpenSSH Client via Settings App
The Settings app is the graphical way to install the OpenSSH client. The path is Settings System Optional features, and no command line is involved. You need administrator rights on the PC. On a standard account, Windows asks for approval or an admin password.
- Open Settings by pressing Win+I. The Settings window opens.

- Click System in the left sidebar.
- Scroll down the main pane and click Optional features. A list of the features already installed appears.
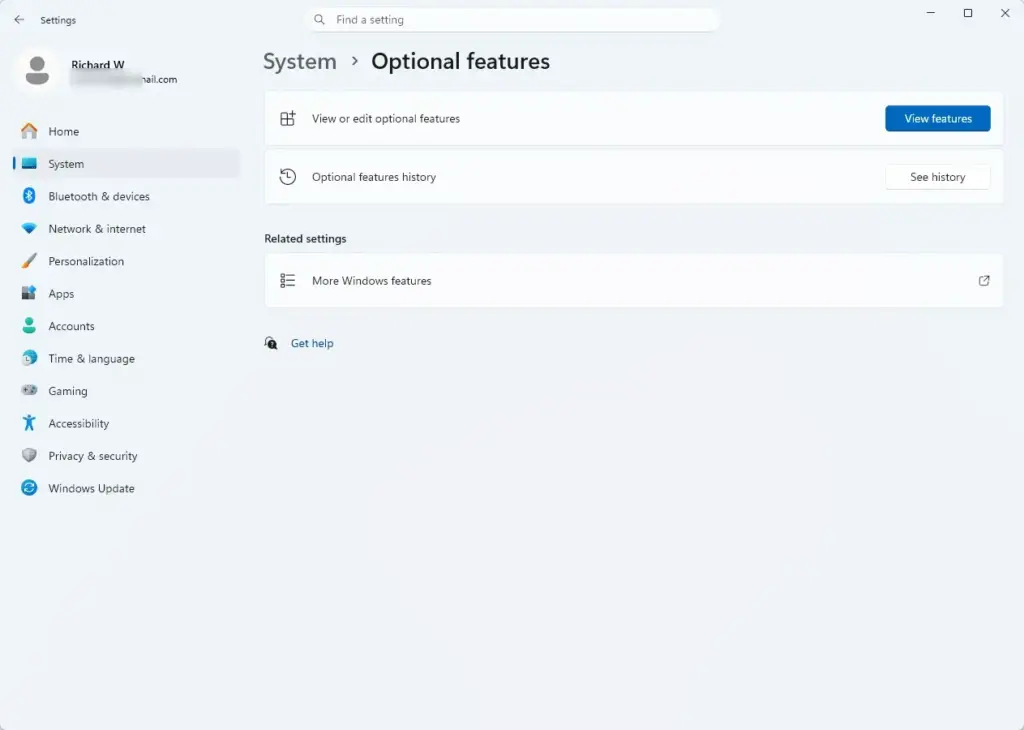
- Click the View features button next to Add an optional feature. A flyout window opens with a list of available features.
- Type
OpenSSH Clientinto the search box in the flyout. The list narrows to matching results.
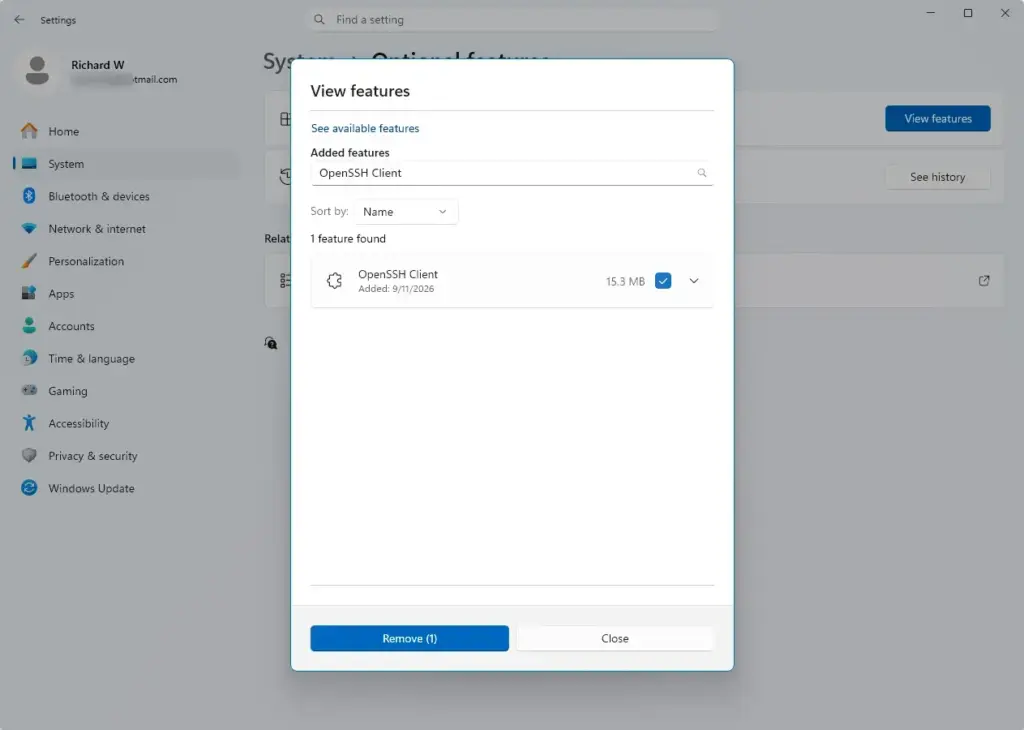
- Check the box next to OpenSSH Client in the search results.
- Click Next, then click Install.
- Wait for the progress bar to finish. This means Windows has downloaded and registered the files. You can close Settings while it runs, because progress also shows on the Optional features page.
Once the install finishes, OpenSSH Client appears in your list of installed features. A restart is not normally needed. If you opened a terminal before the install, close it and open a new one so it picks up the change.
To undo the install, go back to Optional features, find OpenSSH Client in the installed list, and remove it.
If the search finds nothing or the install fails, make sure the PC is online and Windows Update is working. Windows downloads the optional feature files from Microsoft. The troubleshooting section below covers repair steps.
Install OpenSSH Client via PowerShell
You can also install the OpenSSH client from an administrative terminal. This is faster than clicking through Settings, and it suits setting up several PCs or running the steps from a script. It needs the same administrator rights as the Settings method.
- Right-click the Start button and select Terminal (Admin) or PowerShell (Admin).
- Click Yes if the User Account Control prompt asks for permission to make changes to your device. The terminal opens with administrator rights.
- Type the following command and press Enter:
Add-WindowsCapability -Online -Name OpenSSH.Client~~~~0.0.1.0- Wait for the command to finish. The output should show the deployment state as
Installedand the restart requirement asFalse.
If the command fails, the usual causes are a terminal that is not running as administrator, no internet connection, or a damaged Windows Update component. For the last one, see the troubleshooting section below.
Open and Use the OpenSSH Client
Once the client is installed, run it from Windows Terminal, PowerShell, or Command Prompt. Type the ssh command, followed by your username and the address of the remote server. There is no separate app to launch.
- Open Windows Terminal, PowerShell, or Command Prompt. A normal (non-admin) window is fine.
- Connect to a remote server by typing the ssh command followed by your username and the server’s IP address or domain name:
ssh username@192.0.2.10- On your first connection to a server, SSH shows the server’s fingerprint and asks whether you trust it. A fingerprint is a short identifier that proves which server you reached. Type
yesto add the remote host to your known hosts file. SSH does not ask again for that server unless its fingerprint changes. - Enter your remote password or your SSH key passphrase when prompted. The characters do not show as you type, and that is normal. After you log in, the prompt changes to the remote machine’s shell.
If the connection times out or is refused, check the address and make sure the server is running an SSH service. Also confirm that no firewall is blocking the connection.
Configure OpenSSH Client Configuration File
If you connect to the same servers often, save their details in an SSH config file. The file is named config and lives in a folder inside your user profile. It stores server addresses, usernames, and private key paths, so you do not have to type a long command each time.
- Open Notepad or your preferred text editor.
- Create a new file and paste your connection rules using this format:
Host myserver
    HostName 192.0.2.10
    User USERNAME
    Port 22
IdentityFile ~/.ssh/id_ed25519- Click File and select Save As.
- In the address bar of the save dialog, type
%USERPROFILE%to go to your user profile directory, then open the.sshfolder. If the folder does not exist, create it. - Name the file
config. Notepad may add a .txt extension, which breaks the file. To prevent that, set Save as type to All files before you save. Then save the file. - Open your terminal and connect by typing:
ssh myserverTo confirm the file has no hidden .txt extension, turn on file name extensions in File Explorer under View and Show. If you see config.txt, rename the file and delete the .txt part. To undo this setup, delete the file or remove the entries you added.
Troubleshooting OpenSSH Installation Failures
If the OpenSSH client will not install, the cause is often damaged Windows system files or update components. The built-in DISM and System File Checker tools can repair these. Run both in an administrative terminal, one after the other.
- Open Terminal (Admin) or PowerShell (Admin).
- Run the Deployment Image Servicing and Management tool to repair the system image by typing:
DISM /Online /Cleanup-Image /RestoreHealthThis can take several minutes. It may seem stuck at a fixed percentage for a while, so let it finish.
- Run the System File Checker to replace any missing or corrupted operating system files by typing:
sfc /scannow- Restart your computer when both scans finish. Then try the OpenSSH Client installation again through the Settings app or PowerShell.
If it still fails, check that Windows Update is not paused and that you have a working internet connection. Windows downloads the optional feature files when you install.
What to do next
After the client works, the next step is to use SSH keys instead of passwords. The ssh-keygen tool, which comes with the OpenSSH client, generates a key pair. You keep the private key on your PC and put the public key on the server. This is safer than typing a password each time.
To avoid typing your key passphrase on every connection, set up the OpenSSH Authentication Agent service. It keeps your loaded keys available across terminal sessions. It is usually disabled by default on Windows 11, so you must change its startup type before you can start it. You need administrator rights to do this.
- Press the Windows Key, type Services, and press Enter. The Services app opens.
- Find OpenSSH Authentication Agent in the list and double-click it. Its Properties window opens.
- Set Startup type to Automatic or Manual, then click Apply.
- Click Start to run the service now. To undo this, set Startup type back to Disabled.
This tutorial covers the client, which lets your PC connect out to other machines. The OpenSSH Server is a separate optional feature that lets other machines connect in to your PC. You add it the same way as the client: search for it under Settings System Optional features View features
Use a strong, unique password for every account that can log in, or better, use SSH keys. Check the firewall rule before you expose the PC to the internet, because opening port 22 to the public invites constant automated login attempts.
After the server installs, open the Services app and find OpenSSH SSH Server. Set its Startup type to Automatic, click Apply, then click Start. Without this, the service does not run and does not come back after a restart.
The installer normally adds a Windows Defender Firewall rule that allows incoming connections on port 22. Open Windows Defender Firewall with Advanced Security and look under Inbound Rules to confirm it exists and applies only to the network profiles you want. If you do not need the server, leave it uninstalled.
Frequently asked questions
What's the difference between SSH and OpenSSH?
SSH is the protocol that lets you connect securely to remote computers. OpenSSH is the specific software that runs SSH. Windows 11 includes OpenSSH built in, so you don't need to download it separately like you would with third-party tools.
How do I install OpenSSH on my Windows computer?
Windows 11 version 22H2 and later has OpenSSH Client already included. Open Settings, go to System Optional features, click View features, search for OpenSSH Client, and select Install. If it's already listed under installed features, it is ready to use.
Does 🪟 Windows 11 have a built-in SSH server?
Windows 11 includes OpenSSH Server, but it's turned off by default. Open Settings, go to System Optional features, click View features, search for OpenSSH Server, and select Install. Then enable the SSH service in Services.msc to allow incoming connections.
How to SSH into a 🪟 Windows 11 computer?
Enable OpenSSH Server on the Windows 11 computer you want to connect to. On your remote machine, open Terminal and type ssh username@computername or ssh username@ipaddress, replacing the details with the target computer's login information.
Still have a question?
Answered by AI from this guide. Good questions may be added to this page — please don't include personal details.
Did this guide fix your problem?

About the Author
Richard
Tech Writer, IT Professional
Richard is a writer at Geek Rewind who turns complex IT tasks into clear, step-by-step guides. He draws on years of hands-on experience in system administration and enterprise IT operations, focusing on Windows, Linux and WordPress: the problems people actually run into, and the fixes that work. His server and WordPress guides come from systems he runs himself. Richard builds and maintains the platform behind Geek Rewind, from its Ubuntu servers and Nginx configuration to its custom WordPress plugins. Many new tutorials start with readers' questions, and he's always glad to answer them in the comments.
No comments yet — be the first to share your thoughts!