How to Turn On SMB Client Encryption in Windows 11


SMB client encryption in Windows 11 scrambles your shared files so no one can spy on or tamper with them as they move across a network. When it is required, your PC encrypts the traffic every time it connects to a file server.
SMB encryption has been part of Windows for years, and Windows 11 22H2 and newer support it. The setting that makes the client require encryption is newer. It is built into recent builds, such as Windows 11 24H2, so on an older build you may not find the option. This guide covers PowerShell, the Registry Editor and the Group Policy Editor, so you can pick whichever suits your PC. All three need an administrator account.
You can enable SMB client encryption in Windows 11 using PowerShell, Registry Editor, or Local Group Policy Editor. These methods require administrative privileges and may necessitate a system restart to apply the changes. This setting ensures all SMB client communications are encrypted for enhanced network security.
What is SMB Client Encryption?
SMB client encryption is a built-in security feature that scrambles data sent across your network, so other people on that network cannot read your shared files or printer traffic. SMB (Server Message Block) is the protocol Windows uses to talk to file shares and shared printers.
When the requirement is on, your PC encrypts everything it sends to another computer. It also refuses to talk to a server that cannot encrypt. That protects your files from anyone snooping on the network, and from anyone trying to alter data in transit.
If the other computer does not support secure encryption, your PC will not connect to it. This helps keep your information safe.
Be ready for one side effect. Encryption needs SMB 3.0 or later, so older NAS boxes, old Windows servers and some printers or scanners that only speak SMB 1 or SMB 2 will stop working with your PC once you require it. You will usually see a “cannot access” or “unspecified error” message when you try to open the share. If that happens, turn the setting off again (the steps are below) or update the device’s firmware.
Why Should You Turn On SMB Client Encryption?
- It protects your data from being intercepted or snooped on by others. This matters most on shared or untrusted networks such as an office, a hotel or a campus.
- It helps prevent hackers from stealing sensitive information, and it makes it harder for them to change files in transit.
- It makes your network safer overall.
Encryption adds a small amount of processing work. On a modern PC you are unlikely to notice it, but very fast transfers over a 10 Gb link or on older hardware can be slightly slower.
How to Check and Turn On SMB Client Encryption Using PowerShell
PowerShell lets you turn on SMB client encryption in Windows 11 by running a quick command as an administrator. It is the fastest method and works on both Home and Pro. It also lets you check the current state before and after you change anything.
- [ADMIN REQUIRED] Open Windows Terminal as Administrator. You can do this by searching “Windows Terminal” in the Start menu , right-clicking it, and choosing Run as administrator. If a User Account Control prompt appears, click Yes.
- Click the Windows PowerShell tab (if it’s not already selected). You should see a prompt that starts with PS.
- Type this command and press Enter to check if encryption is required:
Get-SmbClientConfiguration | FL RequireEncryption - If you see
RequireEncryption : False, it means encryption is OFF. - To turn ON SMB client encryption, type this command and press Enter. If PowerShell asks you to confirm, type Y and press Enter. If you get an error that the parameter is not recognized, your Windows 11 build is too old for this setting, so run Windows Update first.
Set-SmbClientConfiguration -RequireEncryption $true -Confirm:$false - Run the check command from step 3 again. The result should now show that encryption is required. A restart is normally not needed, but connections that are already open may stay unencrypted until you disconnect and reconnect, or sign out and back in.
- If you want to turn OFF encryption later, use:
Set-SmbClientConfiguration -RequireEncryption $false -Confirm:$false
How to Turn On SMB Client Encryption Using Windows Registry Editor
Windows Registry Editor lets you turn on SMB client encryption in Windows 11 by creating or changing a specific registry key value. Use this method if you prefer editing system settings directly, or if PowerShell is not working on your PC. It works on both Home and Pro.
A wrong change in the registry can cause problems, so make a restore point or export the key before you edit it. In the Registry Editor, right-click the key and choose Export to save a backup you can double-click later to restore.
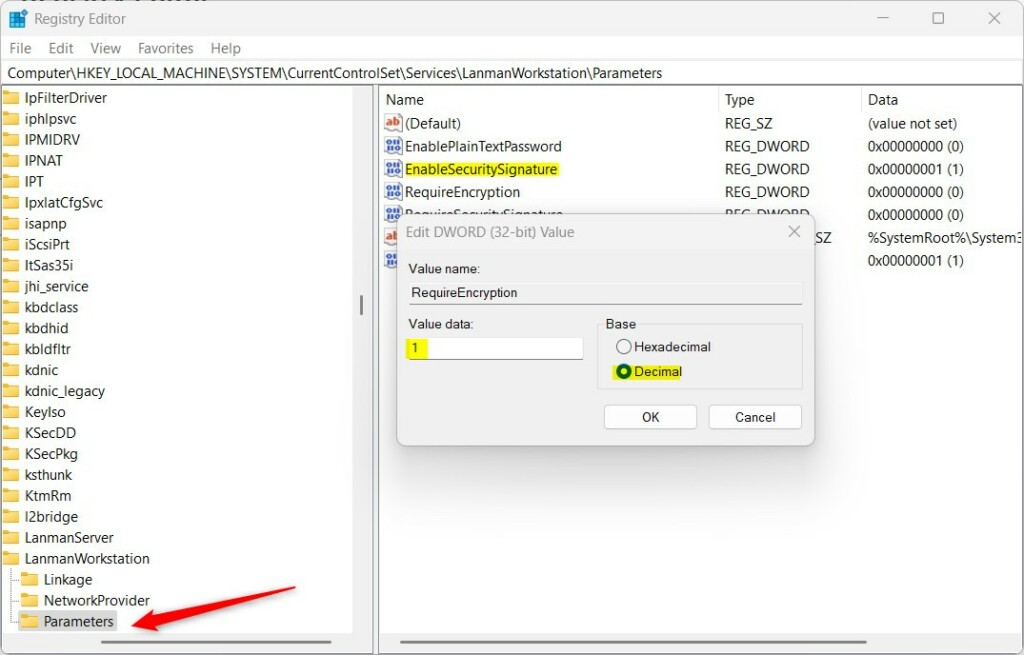
- [ADMIN REQUIRED] Open the Registry Editor by typing
regeditin the Start menu and pressing Enter. Click Yes if User Account Control asks for permission. The Registry Editor window opens with a folder tree on the left. - Navigate to this location. You can click through the folders in the left pane, or paste the path into the address bar at the top of the window:
Computer\HKEY_LOCAL_MACHINE\SYSTEM\CurrentControlSet\Services\LanmanWorkstation\Parameters - Look for an entry called
RequireEncryptionin the right pane. - If it’s there, double-click it and change the value to
1to turn encryption ON, or0to turn it OFF. Click OK to save it. - If it’s not there, right-click on a blank space in the right pane, choose New DWORD (32-bit) Value, name it
RequireEncryption, and set its value to1to enable encryption. Double-click the new entry to set the value. The new entry should now appear in the list with the value you chose. - Close the Registry Editor and restart your computer to apply the changes. To undo the change later, set the value back to the OFF value from the earlier step, or restore the backup you exported, and restart again.
How to Turn On SMB Client Encryption Using Local Group Policy Editor
Local Group Policy Editor lets you turn on SMB client encryption in Windows 11 through a graphical menu meant for managing advanced security rules. Use this option if you want an interface instead of typing commands.
The Local Group Policy Editor is only included in Windows 11 Pro, Enterprise and Education. Windows 11 Home does not have it, so Home users should use PowerShell or the Registry Editor instead. If the policy is missing even on Pro, your build probably predates this setting, so install the latest Windows updates.
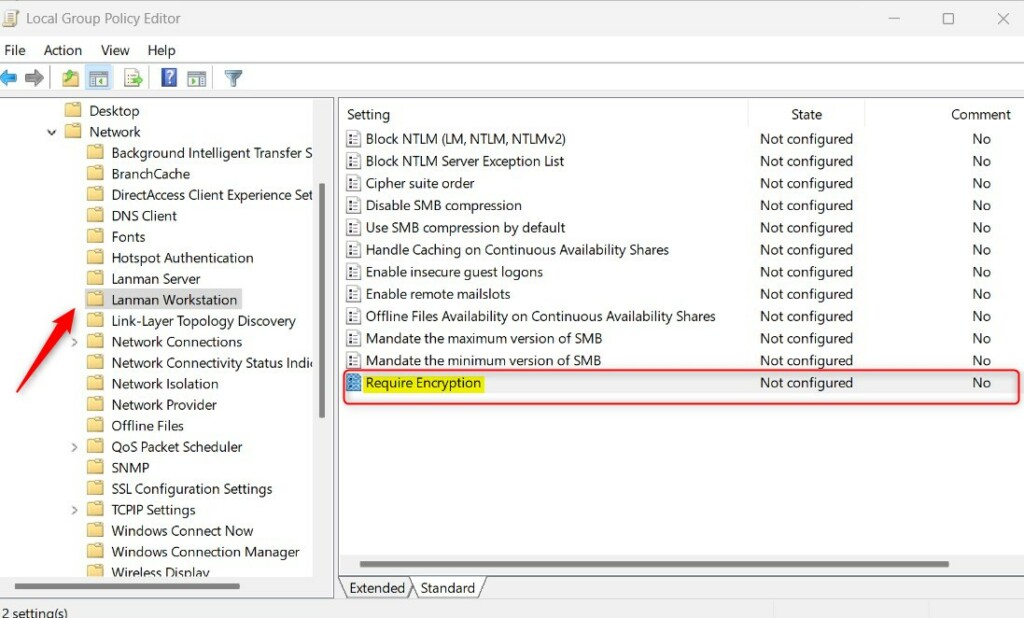
- [ADMIN REQUIRED] Open Local Group Policy Editor by searching Edit group policy in the Start menu and clicking it. The editor opens with a folder tree on the left.
- Go to this folder:
Computer Configuration > Administrative Templates > Network > Lanman Workstation - On the right side, find and double-click
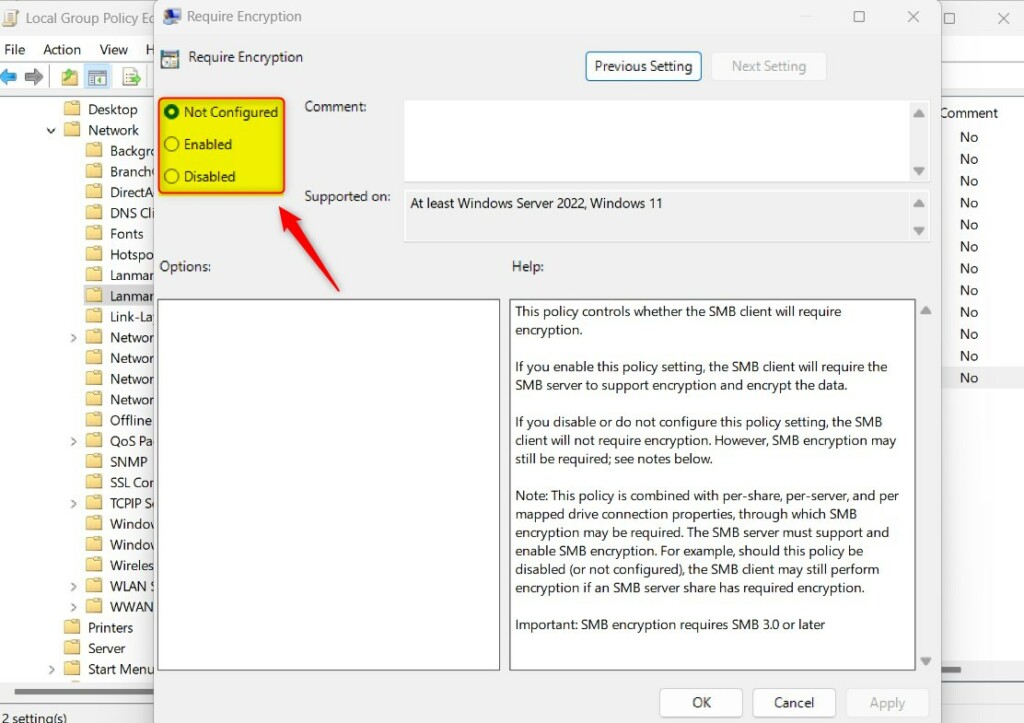
Require Encryption. A settings window for that policy opens. - Choose one of the options:
- Not Configured – Default setting (encryption not required)
- Enabled – SMB client will require encryption to connect
- Disabled – Same as not configured (encryption not required)
- Click OK and restart your PC for the changes to take effect. To undo it later, return to the same policy, choose Not Configured or Disabled, click OK, and restart.
Summary
SMB client encryption in Windows 11 keeps your shared files and printers safe by scrambling the data, and you can turn it on using PowerShell, Registry Editor, or Group Policy. If a share stops working afterward, the other device most likely does not support SMB 3 encryption. Turn the setting off or update that device.
Have a question about this guide?
Answered by AI from this guide. Good questions may be added to this page — please don't include personal details.
Did this guide fix your problem?

About the Author
Richard
Tech Writer, IT Professional
Richard is a writer at Geek Rewind who turns complex IT tasks into clear, step-by-step guides. He draws on years of hands-on experience in system administration and enterprise IT operations, focusing on Windows, Linux and WordPress: the problems people actually run into, and the fixes that work. His server and WordPress guides come from systems he runs himself. Richard builds and maintains the platform behind Geek Rewind, from its Ubuntu servers and Nginx configuration to its custom WordPress plugins. Many new tutorials start with readers' questions, and he's always glad to answer them in the comments.
No comments yet — be the first to share your thoughts!