Why Does Windows 11 Sound Keep Switching to the Monitor

Windows 11 switches your sound to the monitor because HDMI and DisplayPort cables carry both video and audio over a single connection. Each monitor on those cables shows up in Windows as its own playback device. When you wake your PC from sleep, plug in a new display, or unplug a headset, Windows often picks the monitor as your main playback device.
Background audio driver restarts and media apps can also change your output device without warning. If an app asks for a specific audio channel, Windows sometimes shifts all system sound to match it. The fixes below deal with each of these causes in turn.
Windows 11 switches sound to the monitor because HDMI and DisplayPort cables carry both video and audio, making the monitor appear as a playback device in Windows. When you wake your PC, plug in a display, or restart, Windows often sets the monitor as the default output.
How to Stop 🪟 Windows 11 From Changing Your Audio Output
Fixing this takes a few changes in your Windows 11 settings. You tell Windows which device to use, and you stop the monitor from taking over. Work through the sections in order. The first two fixes solve the problem for most people, and you only need the driver and advanced fixes if the sound still jumps.
Step 1Set Your Preferred Audio Device as the Default
Start by setting your speakers or headphones as the default device. This tells Windows where to send sound, so it has less reason to fall back to the monitor. You set two defaults: one for general sound and one for calls and communication apps. You do not need to restart, and you can undo the change by setting a different device as the default.
- Click the Start button and open the Settings app.
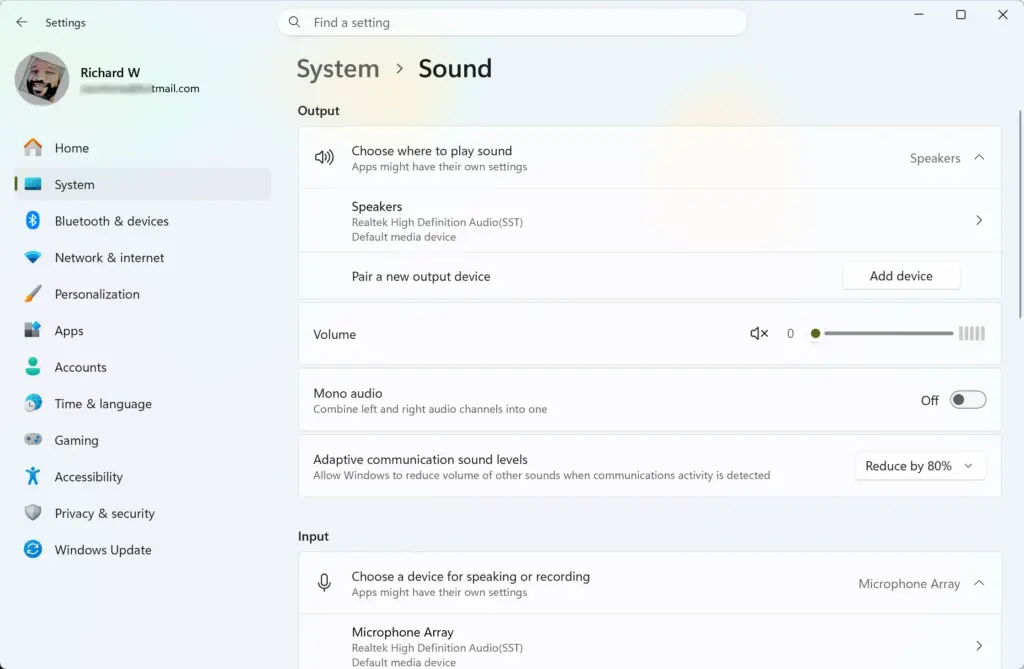
- Select System on the left, then click Sound. You should see the Output and Input sections.
- Scroll down to the Advanced section and click More sound settings. The classic Sound window opens in front of Settings.
- Click the Playback tab at the top. You should see a list of every output device Windows knows about, including your monitor.
- Find your preferred speakers or headphones in the list. If the device is not listed, make sure it is plugged in and powered on.
- Right-click the device and select Set as Default Device. A green check mark appears on its icon.
- Right-click the same device again and select Set as Default Communication Device. The icon now shows a green phone symbol as well.
- Click Apply and then click OK.
If both marks sit on the same device, you are set. If your headset only appears while it is connected, repeat these steps each time you plug it in, or move on to the next section so the monitor cannot take over.
Step 2Disable the Monitor Audio Device Entirely
Disabling the monitor in your sound settings removes it as an available choice, so Windows has to stay with your main speakers. This works well if you never use the monitor’s built-in speakers. You do not need a restart, and it works the same on Home and Pro.
- Open the Settings app and go to System Sound The list of output devices appears.

- Scroll down and click More sound settings to open the classic sound window.
- Stay on the Playback tab.
- Find your monitor in the list of playback devices. It is usually named after the monitor model or shows as a generic "Digital Output" or "HDMI" device.
- Right-click the monitor and select Disable. The entry greys out or disappears from the list.
- Click Apply and then click OK.
If Disable is missing from the menu, the device is probably already disabled, or it is the current default device. Set your speakers as the default first, then try again.
Step 3Check Your Sound Settings After Restarts
Sometimes Windows updates or quick reboots reset your audio priorities. If your sound switches again after the computer turns back on, check your sound settings right away. Open the Playback tab and see whether an update re-enabled your monitor or moved the default check mark. If it did, repeat the steps above. It takes about a minute.
Advanced Fixes for Persistent Audio Switching
If changing these settings does not help, outdated or corrupted audio drivers might be the cause. Faulty drivers can lose track of your hardware settings every time the computer goes to sleep or wakes up. Windows then falls back to whatever device it finds first, which is often the monitor.
Updating or Rolling Back Audio Drivers
Updating or rolling back your audio drivers fixes switching caused by corrupted software that forces Windows to jump to the monitor as a backup. A stable driver lets your sound card communicate properly with Windows without dropping your preferred settings. Try the update first. If the trouble began right after a Windows update, try the roll back instead.
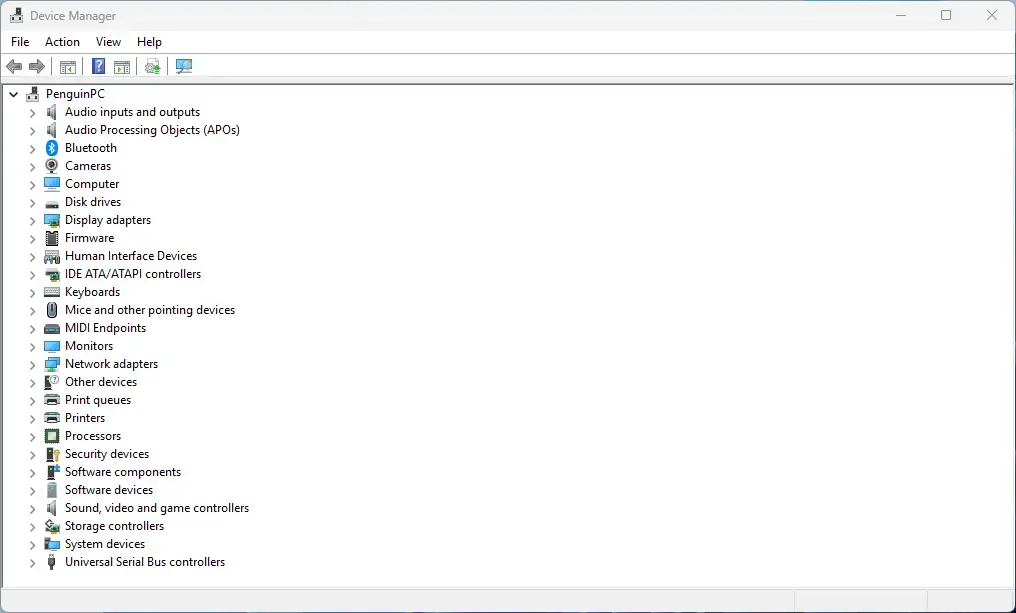
- Right-click the Start button and select Device Manager. (Requires administrator privileges) If you are not signed in as an administrator, Windows asks for an admin password.
- Click the arrow next to Sound, video and game controllers to expand the list.
- Look for your main audio device, such as Realtek Audio or High Definition Audio Device. Do not pick the NVIDIA, AMD or Intel display audio entries here. Those belong to the graphics card.
- Right-click your audio device and select Update driver.
- Choose Search automatically for drivers and follow the on-screen instructions. Windows tells you either that it installed a new driver or that the best driver is already installed.
If Windows says the best driver is already installed, the manufacturer's website for your PC or motherboard may still offer a newer one. Download it from there and run the installer.
If the problem started right after a Windows update, you might need to roll back the driver to an older, stable version.
- Right-click your audio device in Device Manager and select Properties. (Requires administrator privileges) The Properties window opens.
- Click the Driver tab at the top of the window.
- Click the Roll Back Driver button if it is available. If the button is greyed out, Windows has no earlier driver saved for this device, so a roll back is not possible.
- Follow the prompts to finish the process and restart your computer.
After the restart, check the Playback tab again and confirm your default device is still correct.
Unique Troubleshooting Steps Most Guides Miss
Most online guides stop at changing default sound devices or disabling hardware. However, two common hidden causes often trigger this issue on modern computers. Try these if the earlier fixes did not hold.
1Graphics Card Audio Conflicts
Graphics card audio conflicts happen when the HDMI and DisplayPort connections on your video card override your main sound settings and send audio to the monitor. The graphics card installs its own audio driver, and display cables carry both picture and sound. That combination often tricks Windows into changing outputs.
To fix this, you can disable the graphics card audio driver if you only use your motherboard or USB audio port. Do not do this if you rely on the monitor or a TV for sound, because you will lose that output. The video signal is not affected.
- Right-click the Start button and select Device Manager. (Requires administrator privileges)
- Expand the Sound, video and game controllers section.
- Look for devices named NVIDIA High Definition Audio or AMD Function Driver for High Definition Audio. Intel graphics may show a similar display audio entry.
- Right-click the graphics audio device and select Disable device. (Requires administrator privileges) Confirm if Windows asks you to.
- Restart your computer to apply the changes.
To undo this, return to Device Manager, right-click the same device and select Enable device.
2Background App Audio Hijacking
Background app audio hijacking occurs when video call programs or media players take exclusive control of your sound hardware. Windows can then switch the output to your monitor. Stopping applications from taking over your sound device keeps your preferred speakers locked in place.
- Open the Settings app and go to System Sound, then click More sound settings.
- On the Playback tab, right-click your preferred playback device and select Properties.
- Go to the Advanced tab at the top.
- Look under the Exclusive Mode section.
- Uncheck the box that says Allow applications to take exclusive control of this device. The option below it, which gives exclusive mode applications priority, becomes unavailable.
- Click Apply and then click OK.
Some audio production or music apps need exclusive mode for low-latency playback. If one of them stops working properly, go back and tick the box again.
Summary
What to do next
Once you finish these steps, your audio output should stay on your chosen device through reboots and sleep cycles. If sound still switches unexpectedly, check for manufacturer-specific audio control software, such as Realtek or Dolby, that might override Windows settings. Open that app, look for any automatic device switching or "when a device is plugged in" options, and turn them off. Also check your sound settings after each major Windows update.
Have a question about this guide?
Answered by AI from this guide. Good questions may be added to this page — please don't include personal details.
Did this guide fix your problem?

About the Author
Richard
Tech Writer, IT Professional
Richard is a writer at Geek Rewind who turns complex IT tasks into clear, step-by-step guides. He draws on years of hands-on experience in system administration and enterprise IT operations, focusing on Windows, Linux and WordPress: the problems people actually run into, and the fixes that work. His server and WordPress guides come from systems he runs himself. Richard builds and maintains the platform behind Geek Rewind, from its Ubuntu servers and Nginx configuration to its custom WordPress plugins. Many new tutorials start with readers' questions, and he's always glad to answer them in the comments.
No comments yet — be the first to share your thoughts!