How to Set Up a Microphone in Windows 11 Bluetooth and Devices Mobile Devices

Setting up a Bluetooth microphone in Windows 11 takes two main steps: pair it through Settings Bluetooth & devices, then set it as your default recording device in Sound settings. Windows won’t use it automatically until you do both.
Bluetooth audio can be tricky, though. Profile switching (when your microphone switches between different connection modes), privacy permissions, and apps running in the background can all stop your mic from working the way you expect. This guide walks through each of these issues so your microphone stays connected and actually records when you need it to.
Open Settings with Win+I, select Bluetooth & devices, and turn on Bluetooth, then select Add device Bluetooth and choose your microphone to pair it. Next, go to System Sound, open the dropdown under Input labeled Choose a device for speaking or recording, and select your Bluetooth device. Windows will not use it until both steps are done.
Before You Start
Make sure your Bluetooth microphone or headset is charged and sitting in pairing mode. Most devices show a blinking light (often blue or alternating blue/red) when they’re ready to pair. If you’re not sure how to enter pairing mode, check the manual. The button combination varies by manufacturer, and it’s usually a hold or long-press, not a single click.
Confirm your PC has Bluetooth hardware. Laptops usually have it built in, but desktops often don’t. If you’re on a desktop, you’ll need a USB Bluetooth adapter (a small dongle that plugs into a USB port). Windows won’t show a Bluetooth toggle at all without one. If you plug in an adapter and the toggle still doesn’t appear, give Windows a minute to install the driver, then check Windows Update for a pending driver.
If you want to use your phone as a microphone, plain Bluetooth pairing is usually not the right tool. A phone paired over Bluetooth generally works for calls through Phone Link (the Windows app that links your phone to your PC), not as a general recording input for apps like Voice Recorder or OBS. Two better options are:
- Phone Link calling. Link your phone to Phone Link, and you can make and take calls on the PC using your PC’s microphone and speakers (or a paired headset). Your phone handles the call, and the PC acts as the audio device.
- Using your phone as a webcam and mic. Recent Windows 11 builds include a feature that lets a linked Android phone act as a camera for the PC, and its microphone can come along with it. This depends on your Windows version, your phone and which apps you use, so check that it’s available in your Phone Link and Settings. Use it when you want the phone as a camera or mic in video calls.
Everything below is about pairing a dedicated Bluetooth microphone or headset.
Step 1Turn on Bluetooth and Pair the Microphone
You can start from Settings, as in the steps below. There are also two quicker routes worth knowing:
- Quick Settings. Select the network, speaker and battery icons at the right end of the taskbar (or press Win+A). Then select the Bluetooth tile to turn Bluetooth on or off. If the tile is missing, select the pencil (Edit quick settings) icon, choose Add, and pick Bluetooth . If Bluetooth is not on this list at all, Windows doesn’t see any Bluetooth hardware.
- Swift Pair. With Bluetooth turned on and a compatible device in pairing mode close to the PC, Windows can show a notification offering to connect it. Select Connect in the notification and Windows pairs it without opening Settings. Not every device supports Swift Pair. If no notification appears, use the manual steps below. If you never see these notifications, check Settings Bluetooth & devices Devices, where you can turn on the option to show notifications for Swift Pair.
To pair manually:
- Open Settings by pressing Win+I. The Settings app opens to the Home page.

Windows 11 Start menu with Settings gear icon highlighted. - Select Bluetooth & devices in the left sidebar. You’ll see a toggle for Bluetooth near the top.
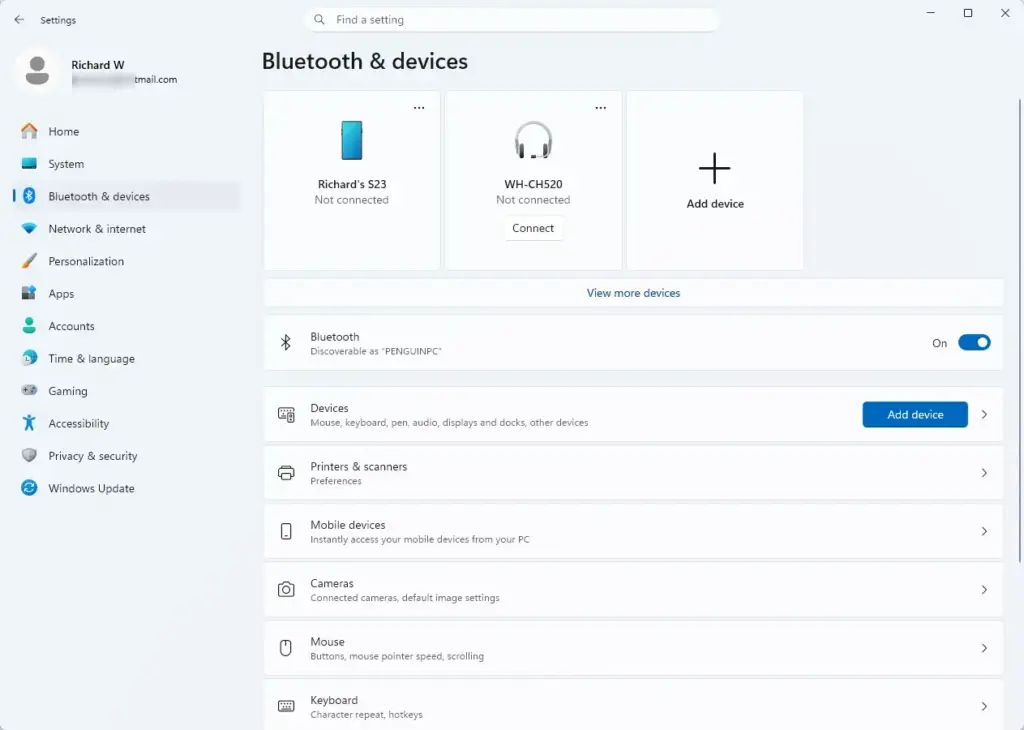
Windows Settings menu highlighting the Bluetooth and devices option for printers - Turn on the Bluetooth toggle if it isn’t already on. Windows starts scanning for nearby devices automatically.
- Select Add device near the top of the page. A window opens asking what type of device you’re adding.
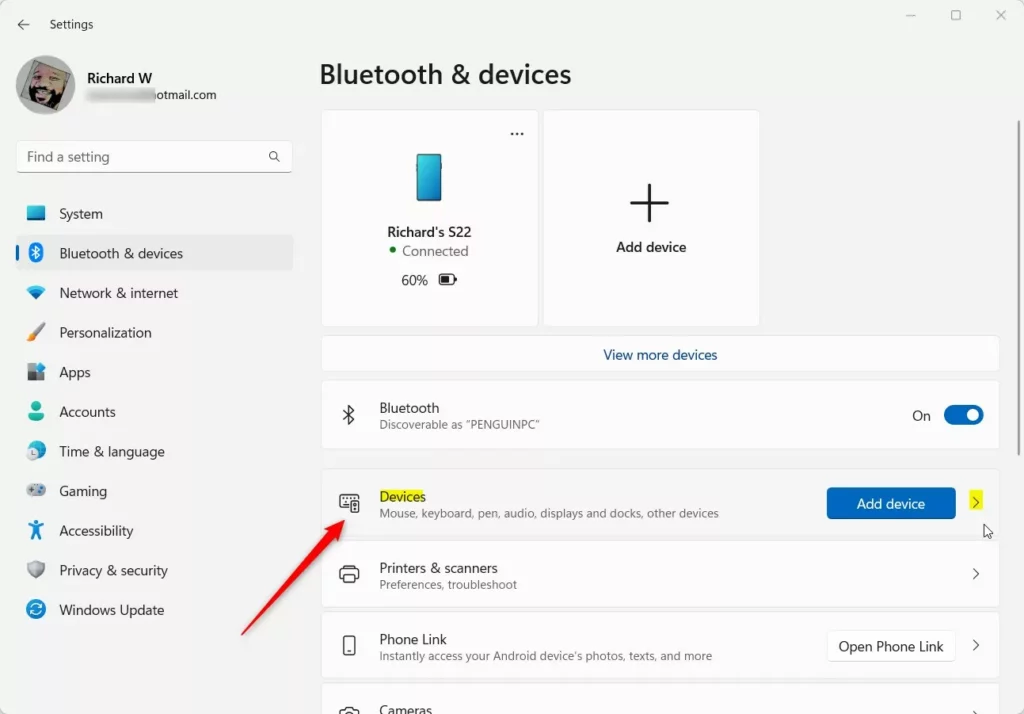
Windows 11 Bluetooth and devices settings with add device option. - Select Bluetooth from the list of options. Windows lists any discoverable devices it finds nearby.
- Select your microphone or headset from the list once it appears. If it doesn’t show up within 30 seconds or so, double-check it’s still in pairing mode. Most devices exit pairing mode automatically after a minute and need to be reset.
- Follow any on-screen prompt to confirm a passcode or PIN, if one appears. Not all devices need this, and many audio accessories pair without any code at all.
- Wait for the status to change to Connected. This appears under the device name back on the Bluetooth & devices page.
If pairing fails or the device disappears from the list mid-process, turn the microphone off and back on, then repeat from step 4. Bluetooth pairing failures are almost always a timing issue on the device side, not a Windows setting. If the device was previously paired to another PC or phone, switch it off there or remove it from that device first, because many headsets try to reconnect to the last device they knew.
Step 2Set the Microphone as the Default Recording Device
You have to set it manually.
- Open Settings and select System in the left sidebar.
- Select Sound. This opens a page listing your output and input devices.
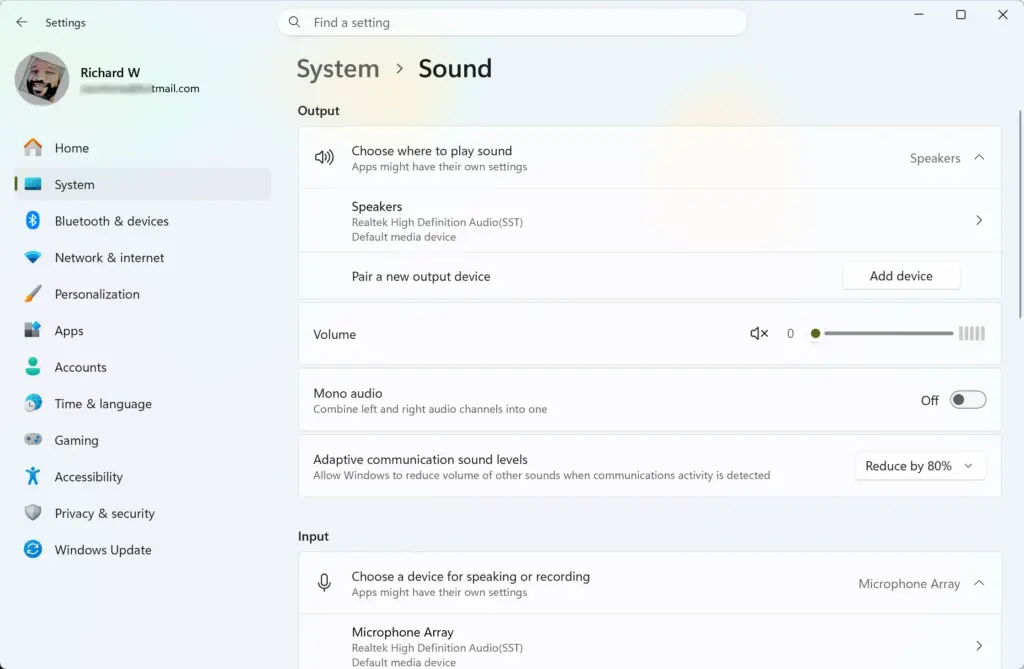
Settings › System › Sound - Look under Input for your Bluetooth device name. If it appears, select it from the dropdown labeled Choose a device for speaking or recording.
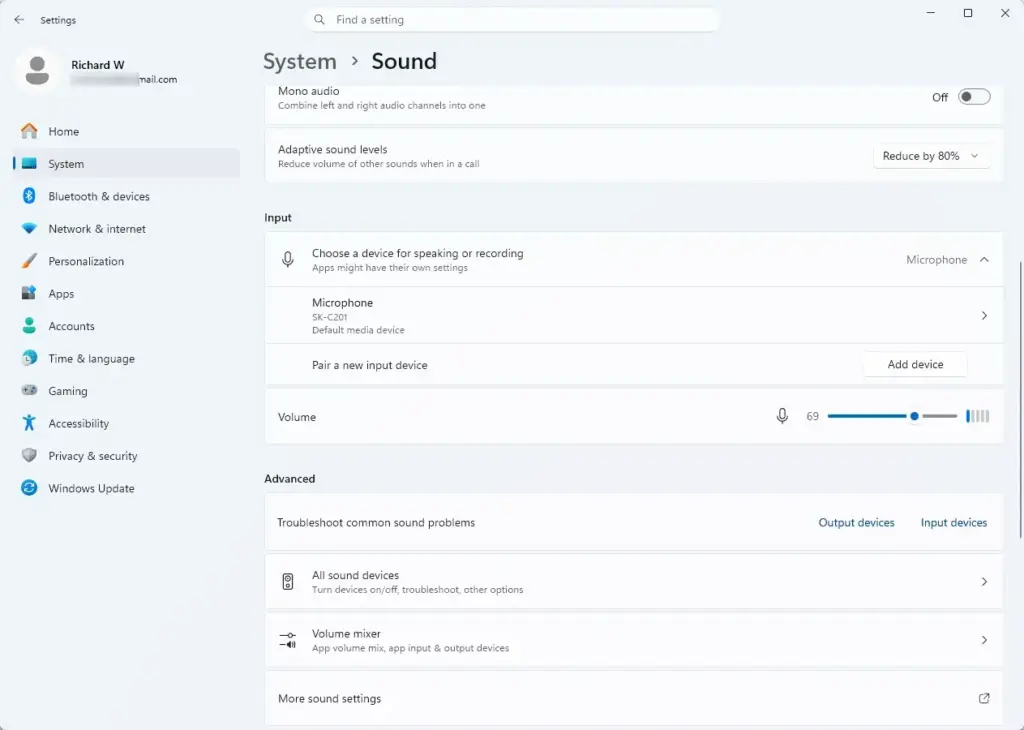
Settings › Sound › Input - Confirm the input level meter moves when you speak. Windows shows a small blue bar under the device name that reacts to sound in real time.
If your Bluetooth headset doesn’t show up under Input at all, scroll down on the same Sound page to All sound devices. Some Bluetooth microphones list separately here rather than in the main input dropdown, especially on headsets that expose both a stereo audio profile and a separate calling profile. If you find it there, select it and turn on its input options from that page.
Some apps, such as Teams, Zoom and Discord, have their own microphone setting that overrides the Windows default. If the app still uses the wrong mic, open its audio settings and pick the Bluetooth device there too.
Why the Microphone Might Be Missing or Greyed Out
A few common causes account for most cases where a paired Bluetooth device won’t show up as a microphone option:
- Audio-only profile connected, not the hands-free profile. Many Bluetooth headphones support high-quality stereo audio (A2DP) for music but only expose a microphone when they switch to a lower-quality calling profile (HFP). If Windows is only using the audio profile, the mic won’t register as an input device. Opening an app that requests microphone access (like Voice Recorder or a video call) sometimes forces the switch.
- The device is a speaker-only Bluetooth accessory. Not every Bluetooth speaker or headphone has a built-in microphone. Check the product specs if you’re unsure.
- Driver or firmware mismatch. Older Bluetooth adapters or outdated headset firmware sometimes don’t advertise the microphone correctly. Check Windows Update for pending driver updates, or check the manufacturer’s site for a firmware update tool.
- Another app has exclusive control of the device. If a call or recording app is already using the microphone, Windows may not let you select it elsewhere until you close that app.
If none of these explains it, run the built-in audio troubleshooter. It can diagnose a microphone that Windows doesn’t detect. In current Windows 11 builds, the troubleshooter runs through the Get Help app, so Get Help opens when you start it.
- Open Settings System Sound
- Scroll to the troubleshooting area and select Troubleshoot common sound problems, or the Input devices troubleshooter if your build lists it separately. On some builds the option is labeled Troubleshoot near the device list. Get Help opens and starts the check.
- Choose the microphone you’re having trouble with if Get Help asks which device, then answer the prompts and apply any fix it suggests.
The troubleshooter can’t fix a headset that has no microphone or is switched off, so confirm the device shows as Connected first. If Get Help doesn’t open, make sure the app is installed and you’re signed in to Windows normally. Wording and layout vary slightly between Windows 11 versions.
Step 3Check Microphone Privacy Permissions
This is easy to miss because there’s no error message. The app just doesn’t hear anything.
- Open Settings and select Privacy & security in the left sidebar.

- Select Microphone under the App permissions section. This page controls which apps and system features can use any connected microphone, Bluetooth or otherwise.
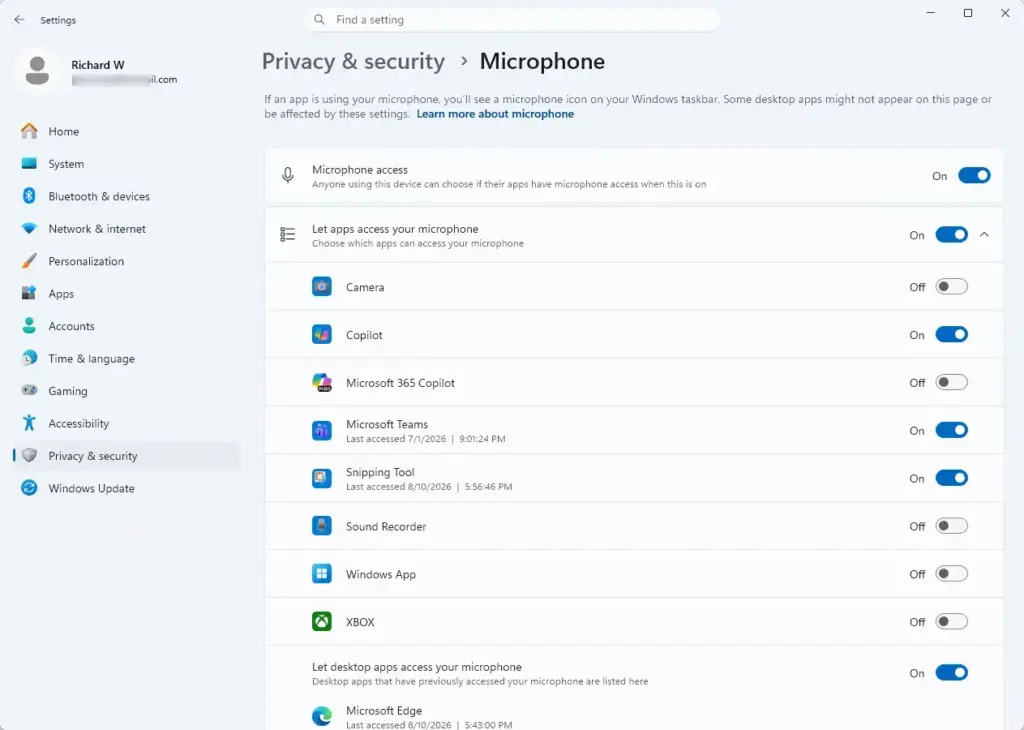
Settings › Privacy & security › Microphone - Turn on Microphone access at the top if it’s off. This is the master switch. If it’s off, no app on the PC can use any microphone, no matter which input you select in Sound settings.
- Scroll down and turn on access for the specific app you’re trying to use, such as Teams, Zoom, or Discord. If the app doesn’t appear in the list, it may be a desktop app, which is covered by a separate switch on the same page.
This setting is stored under HKEY_CURRENT_USER\Software\Microsoft\Windows\CurrentVersion\CapabilityAccessManager\ConsentStore\microphone for per-app permissions used by Store apps, and a separate NonPackaged subkey handles traditional desktop apps. You don’t need to touch the registry directly. The Settings page above controls the same values, but it’s worth knowing this is where the permission actually lives if you’re troubleshooting a managed or locked-down PC where the toggle is greyed out. On a work or school-managed device, an administrator may have disabled microphone access entirely through policy, in which case the toggle stays off and you can’t change it yourself. Ask your IT team to change it.
Step 4Test the Microphone
- Return to Settings System Sound
- Select your Bluetooth device under Input, then select Test your microphone. This appears as a small link or button just below the device selector, depending on your Windows 11 version. On some builds it sits on the device’s own properties page, which opens when you select the device name.
- Speak normally and watch the volume meter. It should rise and fall with your voice.
If the meter doesn’t move at all, confirm the correct input device is selected (it’s easy to accidentally test your laptop’s built-in mic instead of the Bluetooth one), and check that the headset isn’t muted at the hardware level. Most have a physical mute button or a mute LED. If the meter moves but the level is very low, raise the input volume on the same page.
Sound Quality Drops When the Microphone Is Active
It’s normal for Bluetooth audio quality to noticeably drop (thinner, lower-fidelity sound) as soon as the microphone is in use. This happens because Bluetooth switches from a high-quality stereo audio profile to a combined voice profile that handles both playback and recording at once, using much less bandwidth. This isn’t a bug or a misconfiguration. It’s a limitation of standard Bluetooth audio profiles. Wired headsets and USB microphones don’t have this problem because they don’t need to share bandwidth between input and output.
If sound quality matters for a recording, a USB microphone is the more reliable choice. Or you can use the Bluetooth headset for listening only and record with a separate microphone.
How to Remove or Reset the Bluetooth Pairing
If the microphone keeps disconnecting, cutting out, or behaving inconsistently, removing the device and pairing it again from scratch often fixes it.
- Open Settings Bluetooth & devices
- Select the three-dot menu next to the device name, or select the device itself to expand its details.
- Select Remove device, then confirm when prompted. This unpairs the device completely. You'll need to repeat the full pairing process in Step 1 to use it again.
Put the headset back into pairing mode before you pair it again, since it will have forgotten the PC too on many models. Removing the device doesn't delete any Windows settings tied to it, such as your app permissions. Those stay as they were, so you won't need to redo Step 3 after re-pairing. You may need to select it as your input device again in Sound settings.
What to Do Next
Once your Bluetooth microphone is set as the default input and passes the test, it's ready for calls, recordings, and voice chat in any app. If audio still cuts out or lags during calls specifically, check for interference from other 2.4GHz devices nearby, like Wi-Fi routers or USB 3.0 hubs, which are a common cause of Bluetooth stutter. For a deeper look at fixing microphone problems that aren't specific to Bluetooth, see our guide on troubleshooting microphone issues in Windows 11, or check our post on managing app permissions if you're setting this up on a managed work PC where toggles keep resetting.
Frequently asked questions
How do I set up my microphone in 🪟 Windows 11?
Open Settings, go to Bluetooth & devices, then Bluetooth. Turn on Bluetooth and put your microphone in pairing mode. Select it from the list. Next, go to System Sound, and under Input select your microphone as the device for speaking or recording.
How to use mobile as microphone via Bluetooth?
Put your phone in Bluetooth pairing mode. On your PC, open Settings Bluetooth & devices Bluetooth and select your phone. Then go to System Sound, and under Input select your phone as the device for speaking or recording.
Can I connect my phone to my PC and use it as a mic?
Yes. Pair your phone to your PC via Bluetooth first. Then open Sound settings on your PC, scroll to Advanced, and choose your phone from the Input devices list. Your phone will now act as a microphone for your PC.
How do I get my PC to recognize my microphone?
Make sure your microphone is paired and turned on. Open System Sound and check the Input section (and All sound devices). If it doesn't appear, restart your microphone and PC. If still missing, update your audio drivers through Device Manager.
Still have a question?
Answered by AI from this guide. Good questions may be added to this page — please don't include personal details.
Did this guide fix your problem?

About the Author
Richard
Tech Writer, IT Professional
Richard is a writer at Geek Rewind who turns complex IT tasks into clear, step-by-step guides. He draws on years of hands-on experience in system administration and enterprise IT operations, focusing on Windows, Linux and WordPress: the problems people actually run into, and the fixes that work. His server and WordPress guides come from systems he runs himself. Richard builds and maintains the platform behind Geek Rewind, from its Ubuntu servers and Nginx configuration to its custom WordPress plugins. Many new tutorials start with readers' questions, and he's always glad to answer them in the comments.
No comments yet — be the first to share your thoughts!