How to Manage Live Captions Language Models in Windows 11 Accessibility Captions Settings

Live Captions in Windows 11 turns the audio on your PC into on-screen text, and it uses language models that run locally on the device. Basic captions in a supported language work on most current PCs. Real-time translation and some languages need a processor with a Neural Processing Unit (NPU), which means a Copilot+ PC. If your hardware doesn’t have one, those languages or translation options appear greyed out or missing, and nothing in Settings will change that.
You need an internet connection to download new language packages the first time, because these files don’t come pre-installed with every regional version of Windows 11. Check that your system drive has enough free space before you start. Individual language models can take up several gigabytes, depending on the language and the features included.
Open Settings , select Accessibility Captions, and toggle Live Captions on. Click the Settings icon in the floating captions window, select Add language, choose your language, then click Download. Language models download locally to your PC; you need internet for the initial download and an NPU-equipped Copilot+ PC for real-time translation.
Navigating to Accessibility Captions Settings
You can reach the Live Captions settings in a few clicks. Everything else in this tutorial starts from this page, so it’s worth knowing the route.
- Press the Win+I to open Settings.

Windows 11 Start menu with Settings gear icon highlighted. - Select Accessibility from the left-hand sidebar.
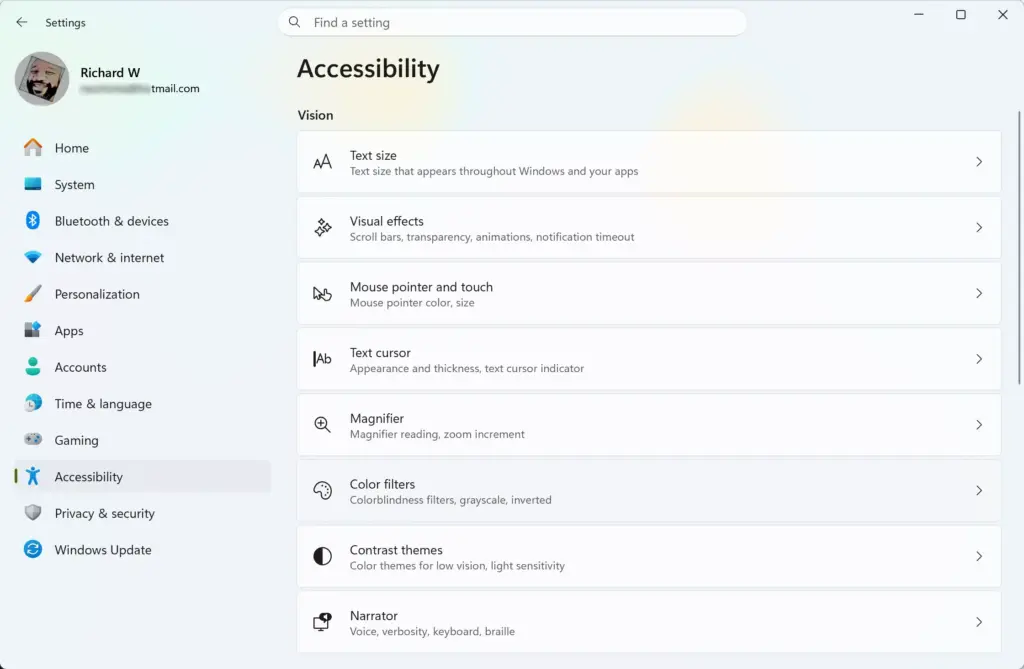
Settings › Accessibility - Scroll down the right-hand panel and click Captions under the Hearing section. You should now see the Live Captions configuration page.
If you can’t find Captions, scroll further. The Hearing group sits below the vision options and can be off-screen on a small display.
How to Download and Add New Language Models
You add these packages from the captions menu. You need an internet connection for the download, and on some PCs an administrator account.
If your standard user account blocks system-level additions, Windows will ask for administrator credentials or the download will fail. Connect to an unmetered Wi-Fi or Ethernet network first, because the files are large.
- Open Settings and go to Accessibility Captions.
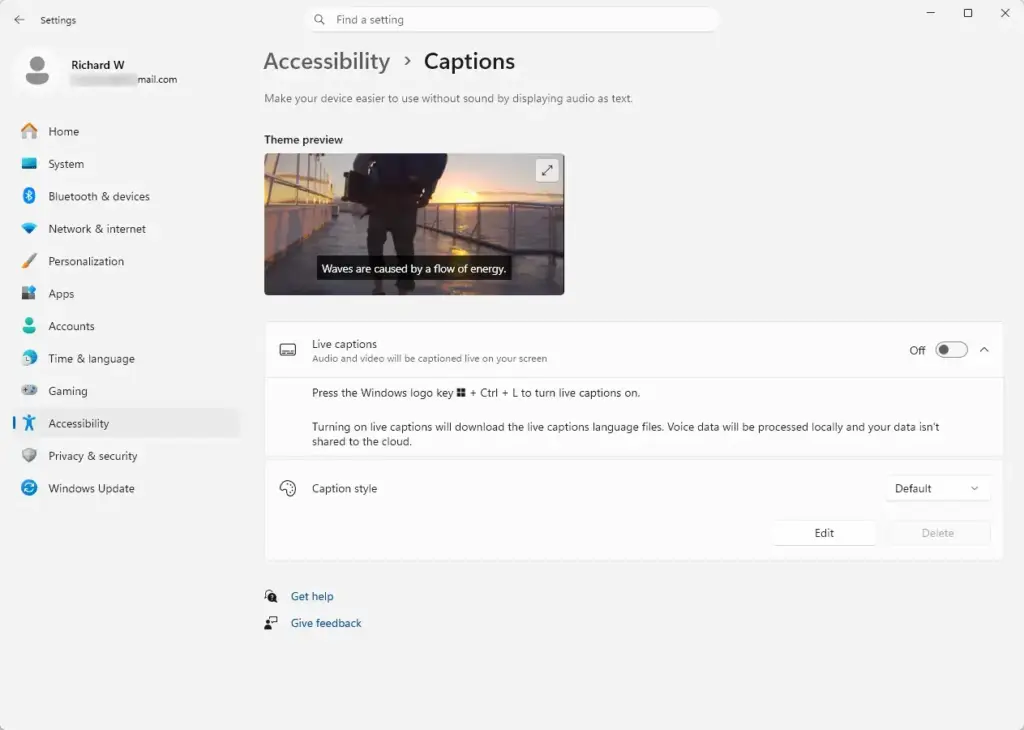
Settings › Accessibility › Captions - Turn on the Live Captions toggle at the top of the page if it is off. The floating captions bar should appear at the top of your screen.
- Open the captions settings. On most builds, click the Settings (gear or three-dot) icon in the top right corner of the Live Captions floating window. On some builds the same options are on the main Captions page instead.
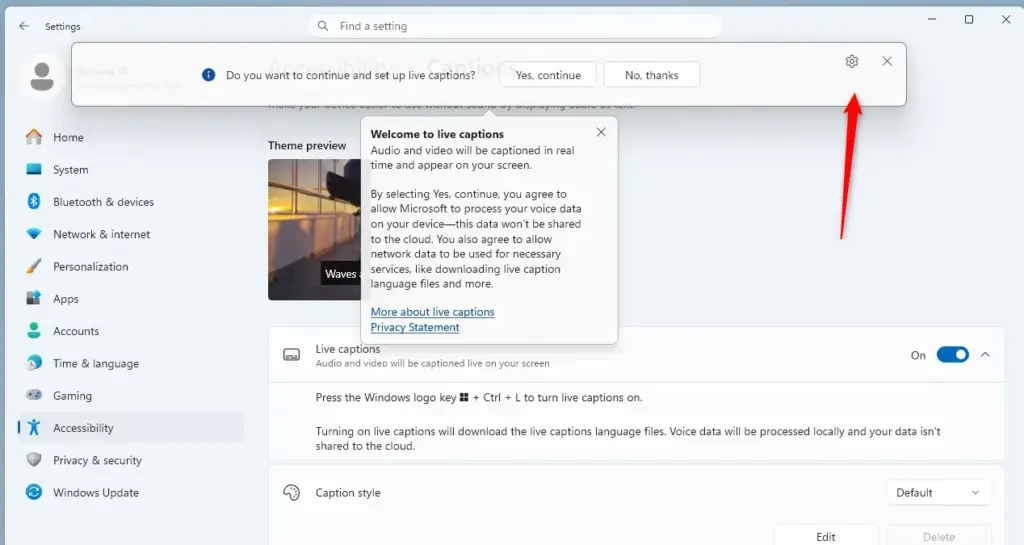
- Select Add language from the menu. The wording varies slightly between builds, so look for the language entry if you don't see this exact label.
- Browse or search the list, then click the language you want to install.
- Click Download. The model files start downloading, and you can watch progress in the captions window or settings page.
If a language you expect is missing, the likely causes are hardware that can't run it locally or a Windows 11 build that doesn't include it yet. Installing the latest Windows updates is the first thing to try. To undo the change, remove the language as described in the storage section below.
Updating Existing Language Models for Better Accuracy
Updated language models improve accuracy, including punctuation, vocabulary and speech recognition. Windows normally installs these updates automatically through Windows Update. You can also check for them manually, which is useful if captions are misreading words or a new language feature hasn't shown up yet.
- Open Settings and click Windows Update in the left-hand menu.
- Click Check for updates to scan for available packages. Let any updates that appear finish installing.
- Select Advanced options, then click Optional updates. If you see no entry for language model updates, nothing is waiting for you.
- Tick the box next to any language model updates and click Download & install.
Some updates ask for a restart. If one does, restart when convenient, and Live Captions will use the updated model afterwards.
Managing Storage and Removing Unused Language Models
Deleting the files is permanent. If you need that language later, you have to download the model again.
Removing system-level components may require administrator privileges.
- Open Settings and go to System Storage. Use this page to see how much space is in use.
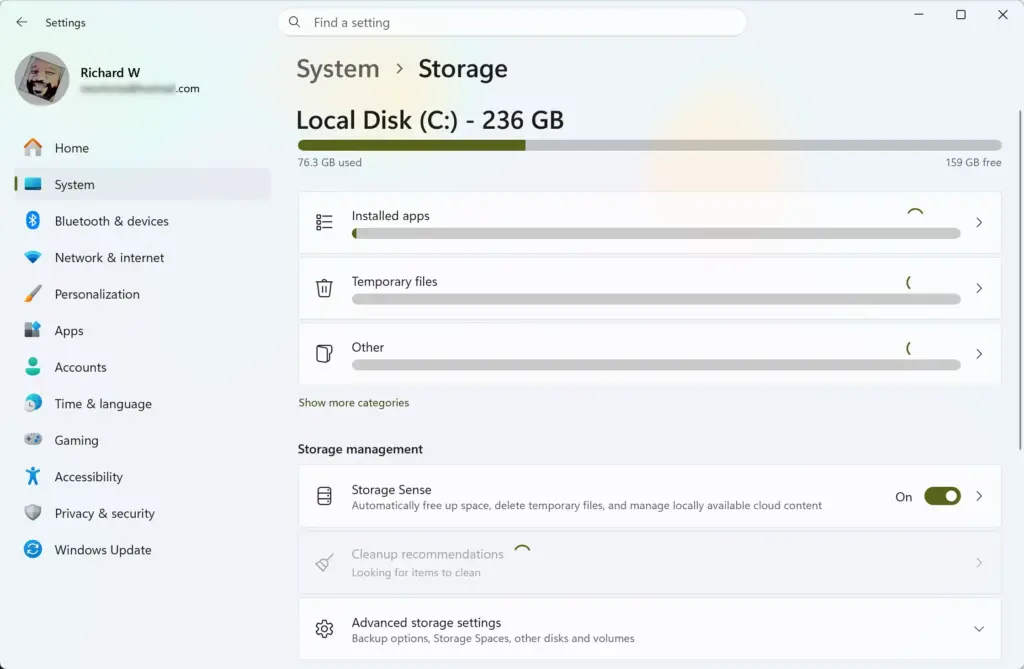
Settings › System › Storage - To manage the speech and language packs themselves, go to Time & language Language & region. Depending on your Windows 11 version, some options are also under Installed apps or advanced storage options.
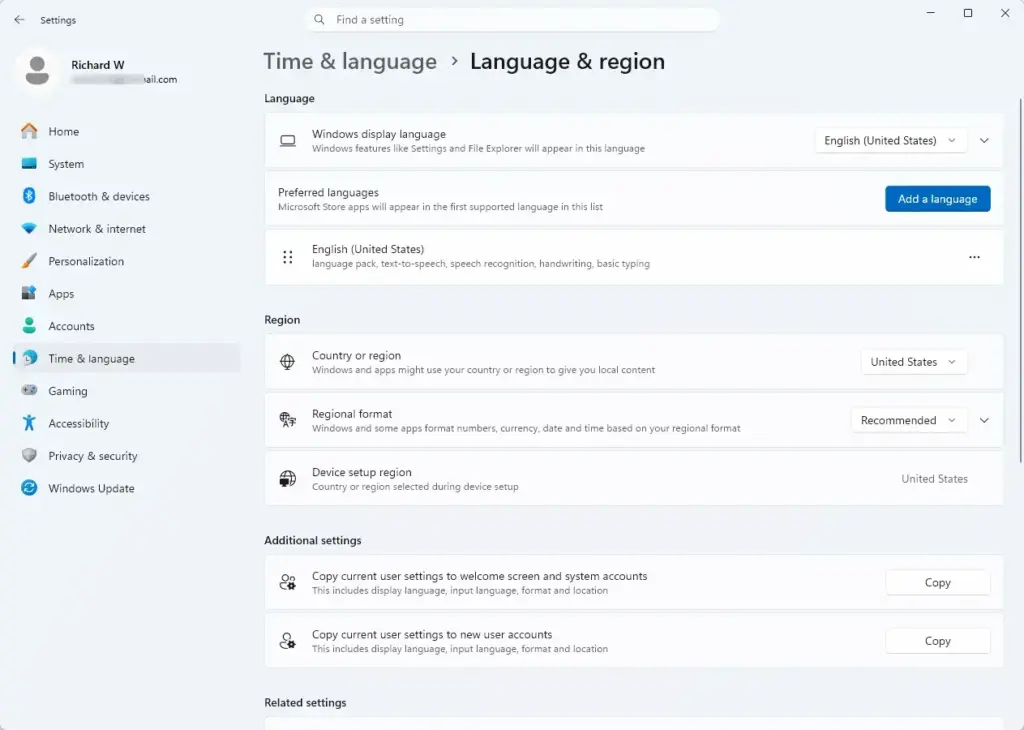
Settings › Time & language › Language & region - Find the speech or Live Captions language pack you want to remove.
- Click the three-dot menu next to it and select Remove or Uninstall. The pack should disappear from the list and the space is released.
To bring a language back, repeat the download steps from the earlier section.
Advanced Configuration: Forcing Offline Mode for Language Models
If you don't want spoken audio or transcribed text sent to the cloud, adjust your speech privacy settings. Live Captions is designed to process audio on the device, using the local models you installed. Turning off online speech recognition makes sure other speech features don't fall back on cloud services either.
Be aware that this setting is system-wide. Features such as voice typing may lose their cloud-based recognition when you turn it off.
- Open Settings and go to Privacy & security Speech.
- Turn off the Online speech recognition toggle. It should now read Off.
- Return to Accessibility Captions and confirm that the language models you installed are present and selected for your captioning sessions.
To undo this, go back to the same page and switch the toggle on again. No restart is needed.
Optimizing NPU Hardware Acceleration for Faster Transcription
On PCs with an NPU, Windows 11 hands the AI work for captions to that dedicated chip. This speeds up transcription and uses less battery than running the same work on the CPU. Windows routes these tasks automatically when it detects compatible hardware, so there is no switch to turn on.
What you can do is keep the system current. Install the latest drivers and firmware through your computer manufacturer's support utility, and keep Windows Update up to date. Outdated NPU drivers are the most common reason a capable PC runs captions slowly or can't offer a language that its hardware should support.
Was this guide helpful?

About the Author
Richard
Tech Writer, IT Professional
Richard is a writer at Geek Rewind who turns complex IT tasks into clear, step-by-step guides. He draws on years of hands-on experience in system administration and enterprise IT operations, focusing on Windows, Linux and WordPress: the problems people actually run into, and the fixes that work. His server and WordPress guides come from systems he runs himself. Richard builds and maintains the platform behind Geek Rewind, from its Ubuntu servers and Nginx configuration to its custom WordPress plugins. Many new tutorials start with readers' questions, and he's always glad to answer them in the comments.



No comments yet — be the first to share your thoughts!