How to Clear Cached Speech Model Data in Windows 11 Language Settings

Cached speech model data in Windows 11 is the set of files Windows keeps so voice features work quickly. It includes temporary audio files, pronunciation patterns, and voice recognition data. It is used by Voice Access, voice typing, speech recognition, and text-to-speech. Over time these files can grow large or get corrupted. When that happens, voice tools may stop responding, misunderstand you, or fail to download a language pack.
Clearing out the old speech data removes the broken files and makes Windows 11 download fresh ones the next time you need them. In most cases you can fix voice recognition problems and free some storage space from the Settings app. This guide covers three methods, from the simplest to the most forceful. It ends with a few habits that keep the problem from coming back.
Open Settings , select Time & language, then Language & region. Find the language you no longer use, click its three-dot menu, and select Remove. Windows deletes the cached speech model data and frees the space immediately.
Checking Your Current Storage and Language Settings
Before you delete anything, check which languages and voice features are installed and how much space they use. That tells you what is worth removing. The steps below work the same on Windows 11 Home and Pro.
Follow these steps to view your language and voice settings:
- Click the Start button on your taskbar and open the Settings app. You can also press Win+I to open it directly. The Settings window should open with a list of categories on the left.

Taskbar - In the Settings window, click Time & language on the left-side menu.
- Click Language & region. You should now see every language installed on your computer under Preferred languages.
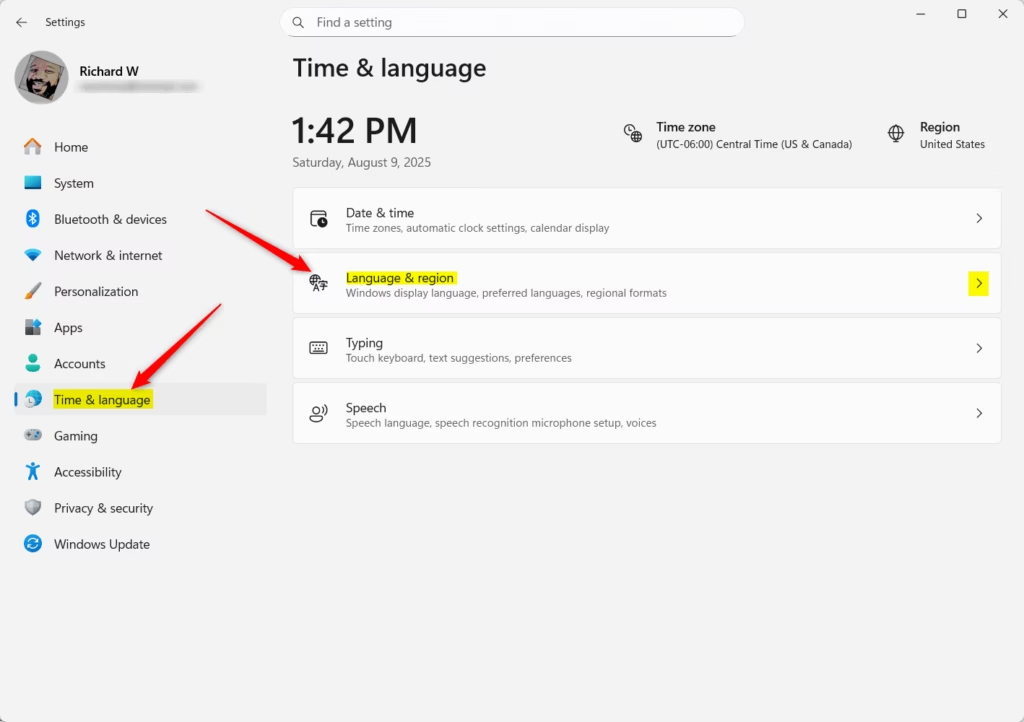
Windows 11 Settings: Time, language, and region options for taskbar customization. - Look through the installed languages. Each language lists the features it includes, such as text-to-speech, speech recognition, and handwriting. Note any language you no longer use.
- If you use Voice Access, click Accessibility in the main Settings menu, then click Voice access to check its settings, including the language it uses.
- Optionally, check how much space your system is using. Go to System, then Storage, and look at the size of your installed items and temporary files.
Take note of which languages and voice packs you actually use. If some packs are unused, or if your voice features are acting up, move on to the methods below.
Method 1Removing Unwanted Voice Access Languages via Settings
Removing a language you don’t need through Settings is the most direct way to clear its cached speech model data. When you remove a language pack from the Time & language menu, Windows also removes the speech models and cached data tied to that language, which frees disk space.
On a work or school PC, your IT department may also restrict this.
Follow these steps to remove a language pack:
- Open the Settings app by pressing Windows Key + I.

Settings - Select Time & language from the menu.
- Click Language & region.
- Find the language you want to remove in the list under Preferred languages.
- Click the three dots (the ellipsis button) next to the language name. A small menu should open.
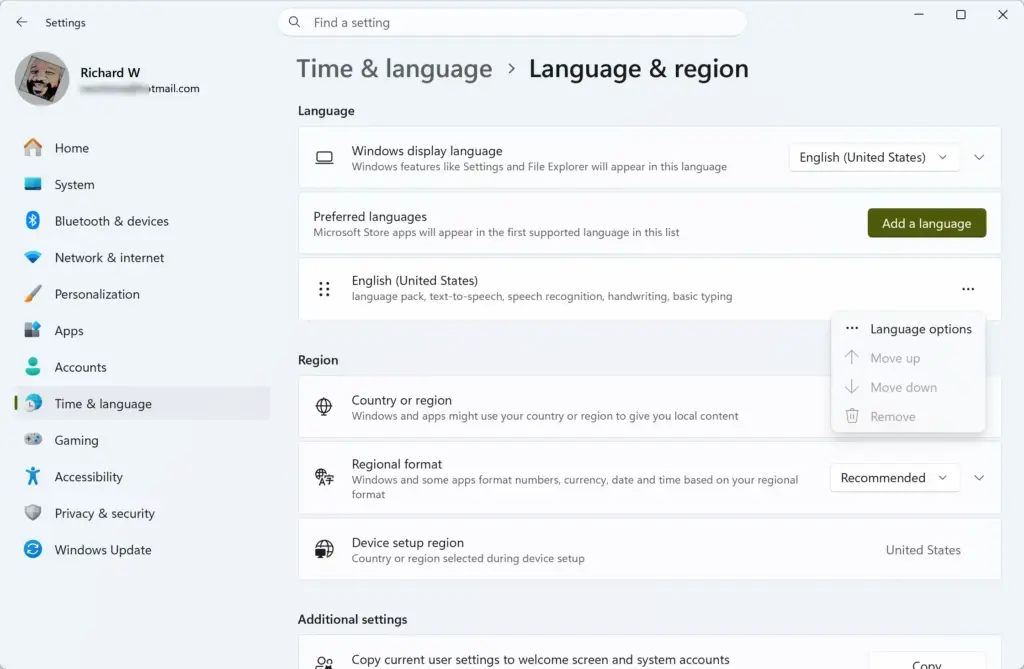
Settings › Time & language › Language & region › Preferred languages - Click Remove. If Remove is greyed out, the language is probably your current Windows display language, or you are signed in with an account that is not an administrator. For the display language, switch to another display language first, then sign out and back in before trying again. For the account problem, sign in with an administrator account.
- Confirm your choice if Windows asks you to verify the removal.
Once the language is removed, Windows deletes the speech recognition data and cached files for that language and frees the space. If you only want to reset one feature, such as speech recognition, you can open the language's three-dot menu and choose Language options. The language features listed there can be removed or reinstalled one at a time. This is useful when you want a fresh download of the speech data but still need the language.
To undo the change, click Add a language on the same page and reinstall it. Windows downloads clean copies of the files. You may need to restart the PC afterwards.
Method 2Cleaning Up System Storage and Temporary Files
Cleaning up system storage and temporary files can catch leftover data that the language menus miss. Windows has built-in tools for this: Storage settings, Storage Sense, and the older Disk Cleanup app. They clear general system cache, which sometimes includes leftover speech data.
If you prefer the classic tool, press the Windows key, type disk cleanup, and select the app. It can remove temporary files that sometimes take up to 5 gigabytes of space. The steps below use the Settings app, which does the same job in Windows 11.
- Open the Settings app by pressing Windows Key + I.
- Click System on the left-side menu.
- Click Storage to see a breakdown of what is using space on your computer.
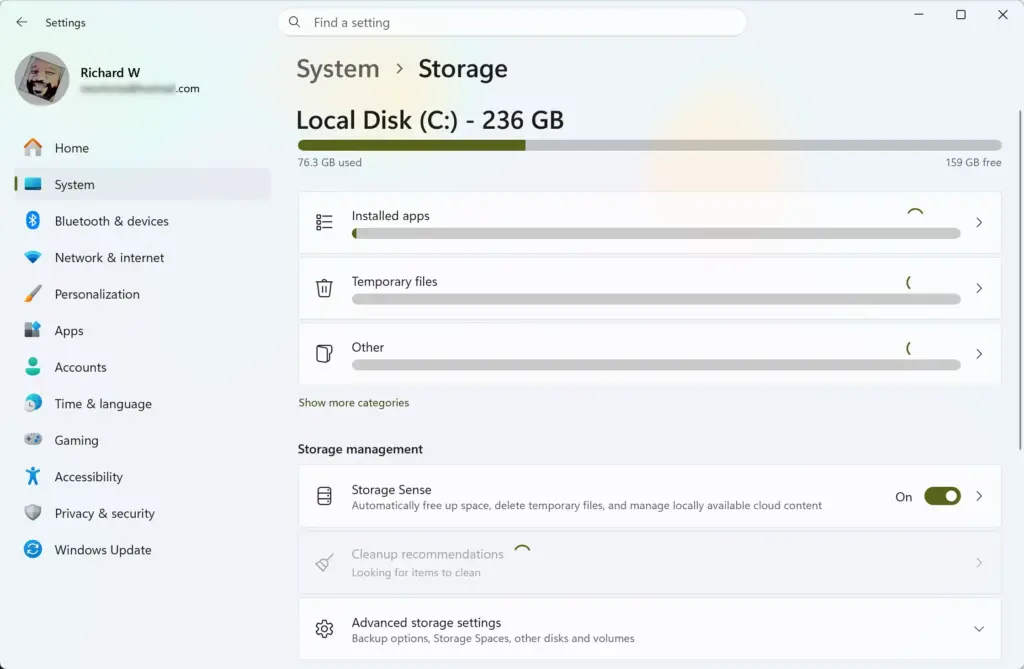
Settings › System › Storage - Click Temporary files. Windows scans your system for files it can safely delete.
- Wait for the scan to finish. When the list appears, look through the categories. Options such as "Windows Update Cleanup," "Delivery Optimization Files," and "Temporary files" are generally safe to select.
- Check the boxes carefully. Categories like Downloads and Recycle Bin may appear in the list. Leave Downloads unchecked unless you are sure you no longer need what is in that folder, because it holds your own files.
- Click the Remove files button at the top of the list, then confirm if asked. The size shown next to each item should drop once it finishes.
This step removes general system clutter that often builds up alongside speech and language caches. Deleting temporary data frees storage space and can make the PC feel a little faster. It does not touch your documents or your settings, as long as you leave the Downloads box unchecked. If you want this to happen automatically, go back to System, then Storage, and turn on Storage Sense. It clears temporary files on a schedule.
Method 3Using PowerShell to Remove Stubborn Language Packs
Use PowerShell when the normal Settings menu fails to remove a language pack, for example when a corrupted language feature or stuck speech cache refuses to uninstall. Commands run in an elevated PowerShell window can remove language data that the interface won't.
Type them exactly as shown, because a mistake in a command-line tool can damage system files and settings. Create a restore point or back up important files first. Try the Settings method before this one.
- Click the Start button and type PowerShell in the search bar.
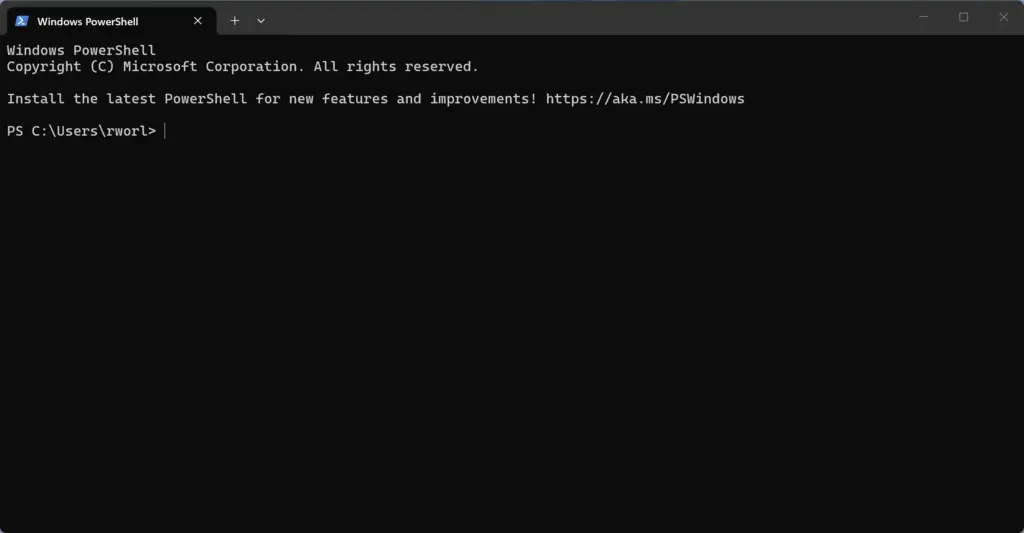
PowerShell - Right-click Windows PowerShell in the search results and choose Run as administrator. This step requires administrator privileges.
- If a window asks whether you want to allow this app to make changes to your device, click Yes. A blue (or dark) PowerShell window should open. Check that the title bar says Administrator.
- Type this command to view the installed language packs, then press Enter:A list of installed languages should appear.PowerShell
Get-WinUserLanguageList - Find the language tag (for example, en-US) for the language you want to remove.
- To remove that language and its associated speech data, enter the following commands one at a time, pressing Enter after each line. Replace en-US with your target language tag if needed:Wait for each command to finish before typing the next one.PowerShell
$LanguageList = Get-WinUserLanguageList $LanguageList = $LanguageList | Where-Object {$_.LanguageTag -ne "en-US"} Set-WinUserLanguageList $LanguageList -Force - Close the PowerShell window once the process finishes, then restart your computer.
This forces Windows to clear out stubborn language configurations and their cache files when the Settings menu does not work. If you removed the wrong language, add it back from Settings, Time & language, Language & region, then Add a language.
Expert Tips for Managing Windows Speech Models and Storage
A few habits keep speech data from piling up and breaking again. Keep only the languages you use, check for leftover voice packs now and then, and clear old update caches.
- Only install languages you actually use: Do not download extra language packs "just in case." Each pack adds speech model data that uses disk space and downloads updates in the background.
- Back up your files before major changes: If you plan to make deep changes or run PowerShell commands, first back up your important documents to an external drive or cloud storage.
- Restart your computer after cleaning: After you remove a language pack or clear system cache files, restart. This lets Windows release locked temporary files and reload its language settings.
- Check for Windows Updates: Go to Settings, then Windows Update, and install what is waiting. Microsoft regularly releases fixes for Voice Access and speech recognition.
Summary
Clearing cached speech model data in Windows 11 language settings frees storage space, fixes broken voice features, and keeps the PC running well. Start with the simplest option: remove the language you don't need in Settings, or remove and reinstall a single language feature. If that does not help, clean up temporary files through Storage. Use PowerShell only for stubborn language data that won't uninstall any other way. Restart afterwards, and Windows will download fresh speech files the next time you use a voice feature.
Have a question about this guide?
Answered by AI from this guide. Good questions may be added to this page — please don't include personal details.
Did this guide fix your problem?

About the Author
Richard
Tech Writer, IT Professional
Richard is a writer at Geek Rewind who turns complex IT tasks into clear, step-by-step guides. He draws on years of hands-on experience in system administration and enterprise IT operations, focusing on Windows, Linux and WordPress: the problems people actually run into, and the fixes that work. His server and WordPress guides come from systems he runs himself. Richard builds and maintains the platform behind Geek Rewind, from its Ubuntu servers and Nginx configuration to its custom WordPress plugins. Many new tutorials start with readers' questions, and he's always glad to answer them in the comments.
No comments yet — be the first to share your thoughts!