How to Install a Language Pack for Speech Recognition in Windows 11

Speech recognition language packs in Windows 11 download automatically from Settings when you add a new language and turn on speech recognition for it. You don’t need to find or install a separate installer. Windows handles the download itself, usually fetching a few hundred megabytes over your internet connection.
To add speech recognition, open Settings and go to Time & language Language & region. Add a new language, tick the Speech recognition box next to it, and Windows will fetch the files. Once installed, you pick which language Windows listens for on the Speech page.
This guide covers the full process: adding a new language for speech, turning on speech recognition for a language you already have, choosing which language Windows uses, and fixing the most common reasons the speech option is missing or the download stalls. It also explains how voice typing, voice access and the older Windows Speech Recognition differ, because each one picks its language in a different place.
Open Settings , go to Time & language Language & region, and select Add a language. Choose your language variant, select Next, tick Speech recognition, and select Install. Windows downloads the files itself, usually a few hundred megabytes, with no separate installer needed. Administrator rights are required.
Before You Start
Check these four things first. Most failed installs trace back to one of them.
- Administrator rights. Installing language features requires an administrator account. A standard account triggers a User Account Control prompt (the box asking for an admin password). The install fails without the admin password.
- An internet connection. Windows downloads the language files from Microsoft. If the connection is set as metered (a connection with a data limit), the download can pause. The fix is in the troubleshooting section below.
- The exact language variant. Languages are split by region, such as English (United States) and English (United Kingdom). Speech recognition support is listed per variant, so pick the one that matches how you speak.
- A working microphone. Speech recognition cannot listen without one. You test it in the last section.
Add a New Language With Speech Recognition
Use this method if the language is not on your PC yet. It installs the language pack (the files Windows needs for that language) and the speech recognition files in one pass.
- Press Win+I to open Settings.

Windows 11 Start menu with Settings gear icon highlighted. - Select Time & language in the left pane, then select Language & region. You now see a Preferred languages list showing the languages already on your PC.
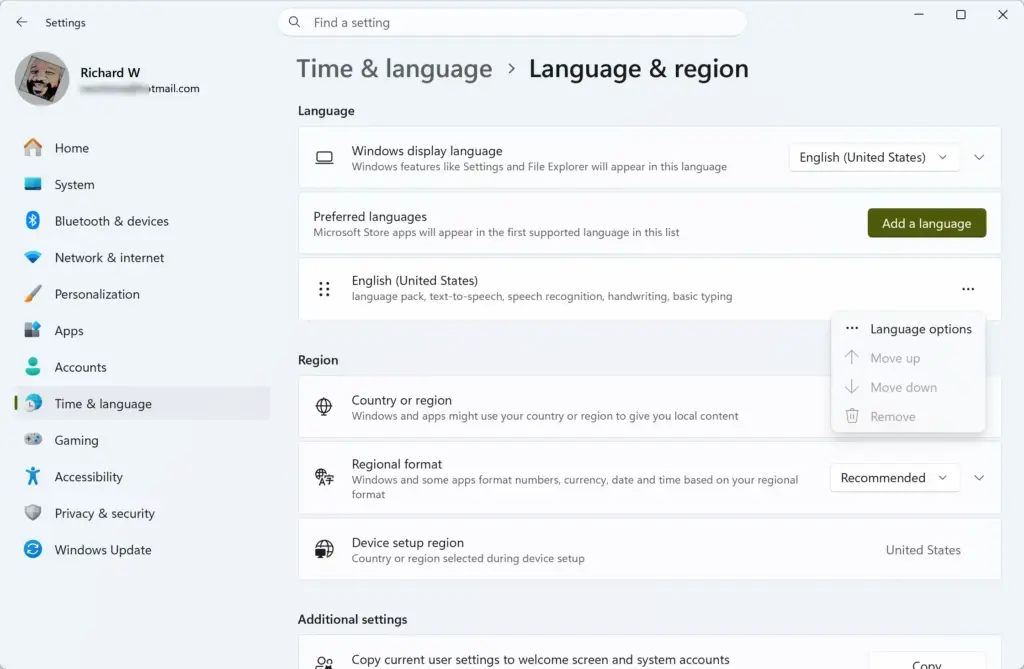
Settings › Time & language › Language & region › Preferred languages - Select Add a language next to Preferred languages. A window titled Choose a language to install opens.
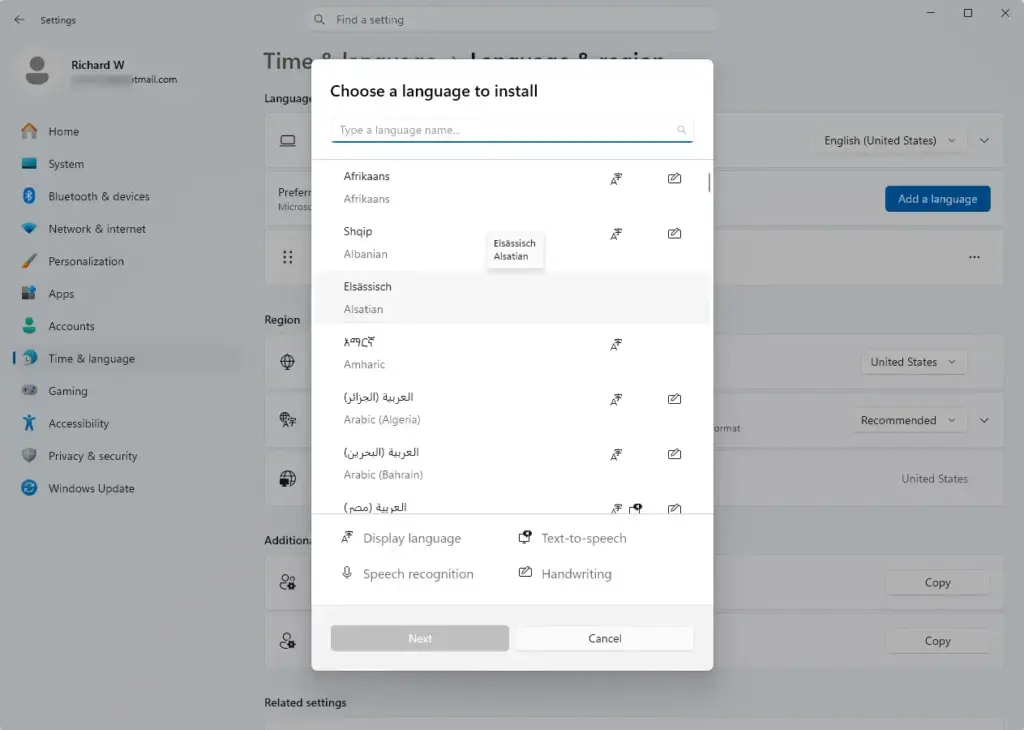
- Type the language name in the search box, such as Spanish, and select the correct regional variant from the results.
- Select Next. The Install language features page opens with a list of optional features.
- Tick Speech recognition. Leave Language pack ticked, because speech recognition depends on it.
- Clear the Set as my Windows display language box unless you want menus and buttons to switch to this language. Leave it clear if you only want to speak in the language. Changing the display language requires you to sign out and back in.
- Select Install. Administrator privileges are required for this step. Enter the admin password if the prompt appears.
You now see a progress indicator under the language in the Preferred languages list, and a message when each feature finishes. Wait until every item shows as installed before you continue. Closing Settings does not stop the download, but a restart or sleep can interrupt it. If that happens, reopen Language & region and check whether the download resumed.
If Speech recognition is missing from the list: that language variant does not support it in Windows 11. Go back, choose a different regional variant of the same language, and look again. If no variant offers it, Windows has no speech recognition for that language.
Add Speech Recognition to a Language You Already Have
Use this method if the language already appears under Preferred languages, such as the language Windows was installed in, and you only need to add speech.
- Open Settings and go to Time & language Language & region
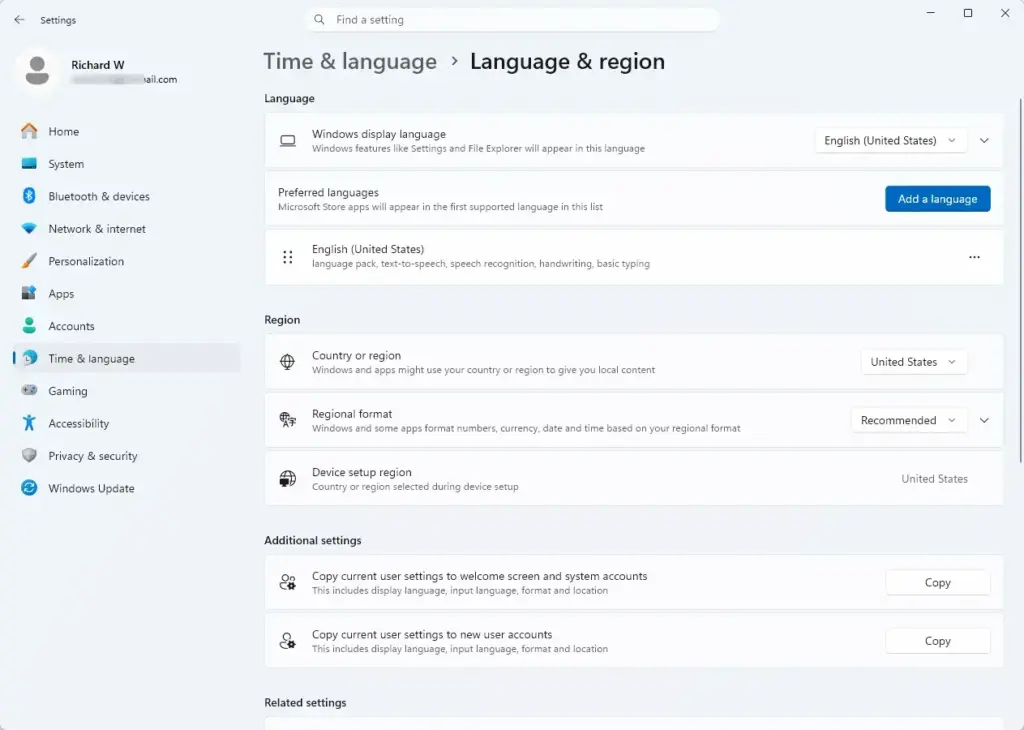
Settings › Time & language › Language & region - Select the three-dot menu (…) at the right of the language, then select Language options. A page opens listing the features for that language, such as Language pack, Text-to-speech, Speech recognition, and Handwriting.
- Find Speech recognition and select Download. Administrator privileges are required for this step.
The row shows download progress, then the button disappears or the row shows the feature as installed. If there is no Download button next to Speech recognition, the feature is either already installed or not available for that language variant.
Choose the Language Windows Listens For
Installing the files doesn’t switch the language Windows listens for automatically. You set that separately on the Speech page.
- Open Settings, select Time & language, then select Speech.
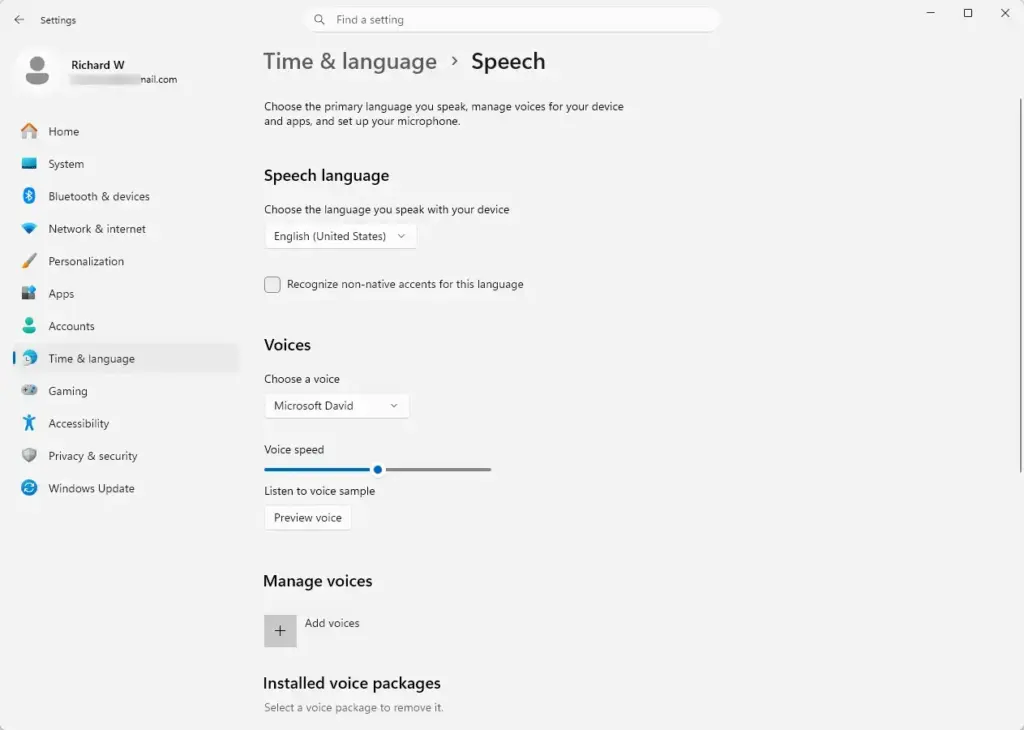
Settings › Time & language › Speech - Open the Speech language drop-down list (labelled for the language you speak with your device).
- Select the language you just installed.
The drop-down shows your new language as the selection. If the language is not in the list, the speech files have not finished installing . Go back to Language & region and check that the install completed.
You do not normally need to restart for this change. If the language still does not appear, restart the PC once and check the list again.
Test That Speech Recognition Works
Run a quick test to confirm the language works before using it for real tasks.
- On the Speech page, find the Microphone section and select Get started. Follow the prompts to set up and test the microphone. Windows asks you to read a sentence aloud.
- Open any app with a text box, such as Notepad.
- Press Win+H to start voice typing (Windows’ built-in dictation tool). A small microphone panel appears.
- Speak a sentence in the new language.
If the text comes out in the wrong language, voice typing is using a different keyboard language. Voice typing follows the keyboard language that is currently active, not only the setting on the Speech page. Press Windows key + Spacebar to cycle through your keyboard languages, or use the language switcher in the taskbar notification area , and select the language you installed.
What Speech Recognition Needs in 🪟 Windows 11
Several Windows features listen to your voice, and they do not all use the same settings. Knowing which one you want avoids hunting in the wrong place.
Voice Typing
Voice typing (Win+H) uses your active keyboard language. In Windows 11 it relies on online speech recognition, so it needs an internet connection and the privacy setting described below.
Online Speech Recognition
Online speech recognition sends your voice to Microsoft’s servers to convert it to text. If voice typing shows an error or does nothing, check this setting.
- Open Settings and select Privacy & security.

- Select Speech.
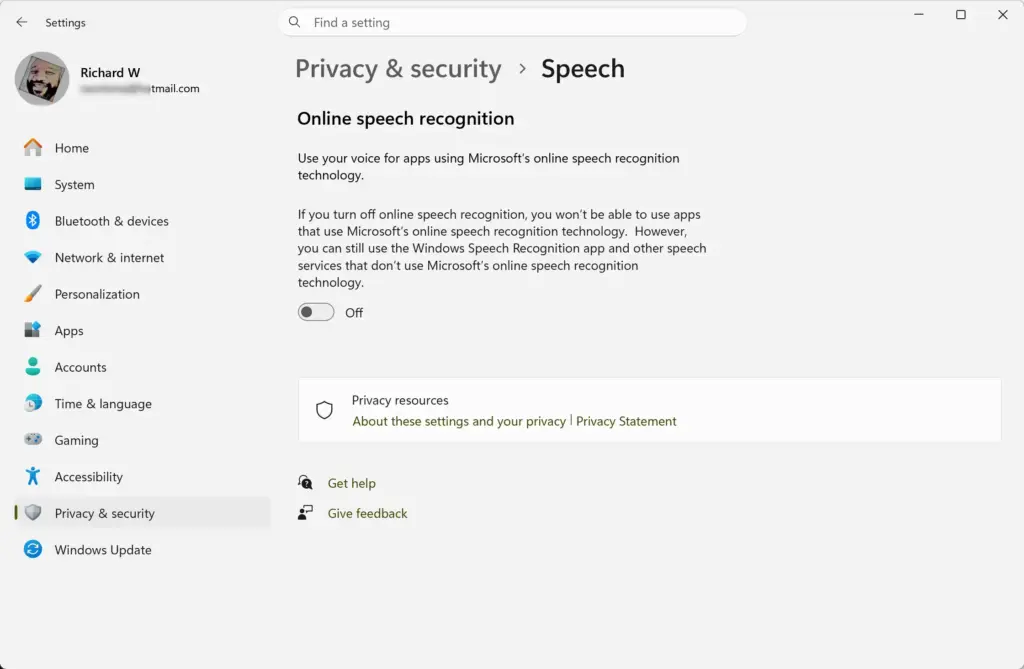
Settings › Privacy & security › Speech - Turn on Online speech recognition.
The toggle shows On. If you prefer that your voice stays on your PC, leave it off. Voice typing may then be unavailable, but locally installed speech features can still work. To undo the change, turn the toggle off again.
Voice Access
Voice access lets you control Windows by voice, not only dictate text. It is a separate feature, found under Settings Accessibility Speech
Requirement: voice access needs Windows 11 version 22H2 or later. On an older build you will not see it under Accessibility Speech. Check your version in Settings System About, and run Windows Update if you are behind.
Voice access supports fewer languages than the language list in Windows, and it manages its own language choice. English (including several regional variants), French, German and Spanish are supported, among others. Microsoft has added languages over time, so the full current list is in Microsoft's support documentation for voice access. Search for "voice access supported languages" on Microsoft Support to see it. Your language may be in the main Windows list and still be missing from voice access.
The first time you turn on voice access, or the first time you pick a language it has not used yet, it may prompt you to download its own speech model. This is separate from the speech recognition files you installed above. Accept the prompt and stay online until the download finishes. If the language you installed does not work in voice access, check the voice access settings rather than the Speech page.
Windows Speech Recognition
Windows Speech Recognition is the older tool in Control Panel (legacy, and being replaced by voice access). It has its own recognition profiles and language setting. Most people now use voice typing or voice access instead. If you need the older tool for a specific program, it reads its own language settings, and installing the files above helps but does not configure it for you.
If the Download Stalls or Fails
Here are the most common failures and how to fix them.
The Download Sits at 0% or Never Finishes
Windows pulls language files through Windows Update, so a stuck update service stalls the download too.
- Open Settings and select Windows Update.
- Select Check for updates and let any pending updates install.
- Restart the PC, then return to Language & region and check the language status.
If Windows Update itself reports errors, fix that first, because the language install cannot complete without it.
The Connection Is Metered
Windows can hold back large downloads on a metered connection. To check:
- Open Settings and select Network & internet.
- Select Wi-Fi (or Ethernet), then open the properties for your connection.
- Look at the Metered connection toggle. If it is on, switch it off while the language downloads.
Turn it back on afterward if you need the data limit.
The Install Asks for a Password You Do Not Have
Your account is a standard account. Sign in with an administrator account, or ask the administrator to run the install. There is no way around this prompt.
The Options Are Greyed Out or Blocked
On a work or school PC, an administrator can restrict language installs. A message such as "Some settings are managed by your organization" confirms it. Contact your IT department, because you cannot override this yourself.
The Language Is Installed but Does Not Recognize Your Speech
Check three things in order:
- Confirm the Speech language on the Speech page is the language you are speaking.
- Confirm the active keyboard language matches, using Windows key + Spacebar.
- Confirm the right microphone is selected in Settings System Sound, under Input, and that its level moves when you talk.
Also check that apps may use the microphone. Open Settings Privacy & security Microphone, and make sure Microphone access is on.
How to Remove a Speech Language
This removes the whole language, including its pack and speech files.
- Open Settings, select Time & language, then select Language & region.
- Select the three-dot menu (…) next to the language.
- Select Remove.
The language disappears from Preferred languages. You cannot remove a language while it is your Windows display language, so change the display language first if that is the case. If you only want to stop using the language for speech, change the Speech language back on the Speech page instead of removing it.
What to Do Next
Your installed language now appears in the Speech language list and works with voice typing when its keyboard is active. A major Windows feature update can reset the active keyboard or speech language, so check the Speech page after one. If you want hands-free control of Windows in this language, set up voice access next at Settings Accessibility Speech You need Windows 11 version 22H2 or later, and the language must be one voice access supports.
Frequently asked questions
How do I manually download a language pack for 🪟 Windows 11?
Windows 11 doesn't offer manual language pack downloads. Instead, open Settings Time & language Language & region, add a new language, then enable Speech recognition next to it. Windows automatically downloads the files from Microsoft—usually a few hundred megabytes. You can't download them separately through an installer.
I can't download a language pack for 🪟 Windows 11. How do I fix it?
Check that you have administrator rights, a stable internet connection, and at least 3 GB free storage space. Make sure your Windows 11 is up to date by running Windows Update. If the download stalls, restart Settings and try adding the language again. Disable VPNs temporarily, as they sometimes block Microsoft's download servers.
How to install speech recognition in 🪟 Windows 11?
Open Settings Time & language Language & region. Add a new language or select an existing one. Check the Speech recognition box next to it. Windows downloads the speech files automatically—this takes several minutes. Once done, go to Settings Time & language Speech to choose which language Windows listens to.
How do I install a language pack for Windows?
Open Settings Time & language Language & region and add a language. Check the Speech recognition box next to it, and Windows downloads the files automatically. For display language only (not speech), add the language, set it as default, and sign out and back in. You cannot manually download installers.
Still have a question?
Answered by AI from this guide. Good questions may be added to this page — please don't include personal details.
Did this guide fix your problem?

About the Author
Richard
Tech Writer, IT Professional
Richard is a writer at Geek Rewind who turns complex IT tasks into clear, step-by-step guides. He draws on years of hands-on experience in system administration and enterprise IT operations, focusing on Windows, Linux and WordPress: the problems people actually run into, and the fixes that work. His server and WordPress guides come from systems he runs himself. Richard builds and maintains the platform behind Geek Rewind, from its Ubuntu servers and Nginx configuration to its custom WordPress plugins. Many new tutorials start with readers' questions, and he's always glad to answer them in the comments.
No comments yet — be the first to share your thoughts!