How to Free Up Disk Space in Windows 11: 10 Ways to Clean Storage

To clean up storage in Windows 11, open Settings System Storage, then use Cleanup recommendations to remove junk files and unused apps. You can also turn on Storage Sense so Windows clears storage for you on a schedule. This post covers ten ways to free up space, from emptying the Recycle Bin to removing large apps you no longer use.
Open Settings, go to System, select Storage, and turn on Storage Sense to automatically clear temporary files and free up disk space in Windows 11. You can also use the Cleanup recommendations tool or run the classic Disk Cleanup application to remove hidden junk files and old system backups.
You do not need extra software or deep tech skills. Everything here is built into Windows 11. Start with the first three methods, since they usually recover the most space with the least effort. These are the main ways, in the order the post covers them:
- Storage Sense: Deletes temporary files and old Recycle Bin items automatically on a schedule you choose.
- Cleanup recommendations: Groups temporary files, large or unused files, cloud-synced files and unused apps on one page so you can clear them in a few clicks.
- Disk Cleanup: Removes leftover installation files, old update backups and other system clutter that the Settings page does not list.
- Empty the Recycle Bin: Permanently deletes files you already removed, which still take up space until the bin is emptied.
- Uninstall unused apps and games: Frees the most space in one go, because big games and creative tools can take tens of gigabytes each.
- OneDrive Files On-Demand: Keeps files in the cloud and only downloads them to your PC when you open them.
- Move files to an external drive: Shifts photos, videos and large documents you rarely open off your main drive.
- Clear the temp folder: Deletes cache data and broken installer files that automated tools sometimes miss.
1Turn On Storage Sense To Automate Cleaning
Storage Sense is the built-in tool that automatically deletes temporary files, system caches and old Recycle Bin items on a schedule. Once it is set up, you do not have to remember to clean anything. The setting lives in Settings System Storage, and it works the same on Windows 11 Home and Pro.
To turn on and configure Storage Sense:
- Click the Start button and open Settings.
- Select System from the menu on the left side.
- Click Storage. You should see a bar showing how much of your drive is used, with a breakdown by category.
- Find the Storage Sense toggle and click it to turn it On.
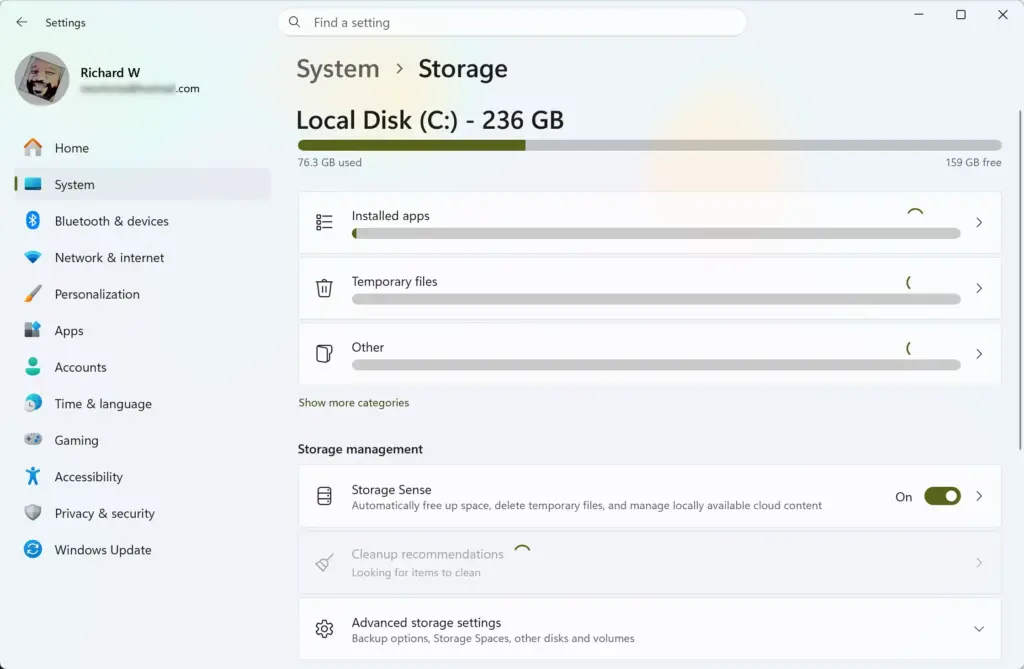
- Click the Storage Sense text itself (not the toggle) to open its detailed settings. A page with scheduling options and cleanup rules opens.
- Choose how often Storage Sense should run, and set how old files in your Recycle Bin and Downloads folder must be before it deletes them automatically.
Be careful with the Downloads setting. If you keep installers or documents there, leave it on the “never” option so nothing you still need gets removed. You do not need to restart. To undo this, switch the same toggle back to Off.
2Use Storage Recommendations To Find Hidden Space
Cleanup recommendations scan your drive and group junk files, unused apps and large documents in one place, so you can clear storage in a few clicks. It is the quickest way to see what is actually using your space.
Follow these steps to use storage recommendations:
- Open Settings from your Start menu .

- Go to System Storage
- Click Cleanup recommendations. Windows takes a moment to scan, then shows the results.
- Look at the categories: Temporary files, Large or unused files, Files synced to the cloud and Unused apps.
- Click a category to see the items inside. Check the boxes next to the files or apps you want to remove, then click the Clean up button.
Read the Large or unused files list before you tick anything. These are files Windows thinks you have not touched in a while, and it can be wrong. If a category is missing, it means Windows found nothing to suggest there. If the whole Cleanup recommendations entry is missing, your build of Windows 11 may not include it. Use Disk Cleanup in the next section instead.
3Run The Classic Disk Cleanup Tool
Disk Cleanup is the classic Windows tool. It finds leftover installation files, old update backups and temporary items buried in system folders. It is still included in Windows 11, and it reaches some system files that the Settings page does not list.
To run Disk Cleanup, follow these steps:
- Click the Windows Search bar on your taskbar , type Disk Cleanup, and press Enter.
- Choose your main drive (usually drive C:) from the drop-down menu and click OK. Wait while it calculates how much space it can free.
- Review the list of file types you can delete, such as Temporary Internet Files and Thumbnails.
- Click the Clean up system files button at the bottom of the window. Select your drive again if asked. The tool rescans and adds larger system items, such as previous Windows installation data.
- Tick the checkboxes for the files you want to remove, click OK, then click Delete Files to confirm.
You may need to approve an administrator prompt when you use Clean up system files. If you tick the previous Windows installation option, you can no longer roll back to the older version of Windows, so only do it once you are happy with your current setup. The cleanup can take several minutes. No restart is needed. Deleted files cannot be restored afterwards, so read the descriptions in the list before you tick a box.
4Empty Your Recycle Bin Properly
When you delete a file normally, Windows moves it to the Recycle Bin, and it keeps using drive space until you empty the bin. Emptying it permanently deletes those files and can free up gigabytes.
Here is how to empty your Recycle Bin:
- Find the Recycle Bin icon on your desktop and double-click it. (If it is not on your desktop, type “Recycle Bin ” into the Windows search bar .)
- Look through the contents to make sure nothing you need is there. If you find a file you want back, right-click it and choose Restore.
- In the toolbar at the top of the window, click Empty Recycle Bin . In Windows 11 this button sits directly in the toolbar. Older versions of Windows hid it under a Recycle Bin Tools tab.
- Confirm by clicking Yes. The window should now show an empty bin.
This cannot be undone with normal tools, so check the list first. As a shortcut, you can right-click the desktop icon and choose Empty Recycle Bin.
5Uninstall Apps And Games You No Longer Use
Uninstalling apps and games you no longer use is one of the fastest ways to free up large amounts of space. Big games and creative tools often take tens of gigabytes each.
To remove unwanted applications, use these steps:
- Open Settings and select Apps.
- Click Installed apps to see everything installed on your computer.
- Use the sort option on this page to order the list by Size, so the biggest apps appear first. Then find an app or game you no longer need.
- Click the three dots button next to the app name and select Uninstall.
- Follow the prompts on your screen to finish removing the program. Some apps open their own uninstaller, and a few ask for administrator approval.
Some apps do not show a size, so do not rely on the sorting alone. If you change your mind, you can reinstall the app later from its original source or the Microsoft Store. Saved game files and documents may be kept in separate folders, so uninstalling does not always delete those. No restart is usually needed, though a few programs ask for one.
6Turn On OneDrive Files On-Demand
OneDrive Files On-Demand keeps your files in the cloud and shows them in File Explorer without storing every one on your drive. A file only downloads to your PC when you open it. It needs a OneDrive account and enough cloud storage for your files.
Here is how to turn on OneDrive Files On-Demand:
- Click the white or blue cloud icon in the bottom right corner of your taskbar (in the system tray ). If you do not see it, click the up arrow to show hidden icons.
- Click the Help & Settings gear icon, then select Settings.
- Go to the Sync and backup tab and expand the advanced settings if needed, or look for the Files On-Demand section.
- Make sure the setting that saves space and downloads files as you use them is turned on. When this is active, files show up on your computer but only download when you double-click to open them.
- To clear a file you already downloaded, right-click the local file or folder in File Explorer and choose Free up space. This removes the local copy and keeps the file safe online.
If you do not see the cloud icon, OneDrive is probably not running or signed in. Files marked as online-only need an internet connection to open, so keep anything you need offline set to stay on the device. Wait for syncing to finish before you free up space, so you do not remove a copy that has not uploaded yet.
7Move Personal Files To An External Storage Device
Moving personal files such as photos, videos and large documents to an external hard drive or USB flash drive is a quick way to make room on your main drive. It works best for files you want to keep but rarely open.
Follow these steps to move your files:
- Plug your external hard drive or USB drive into an available USB port.
- Open File Explorer and go to the folder holding the files you want to move (such as Pictures or Videos).
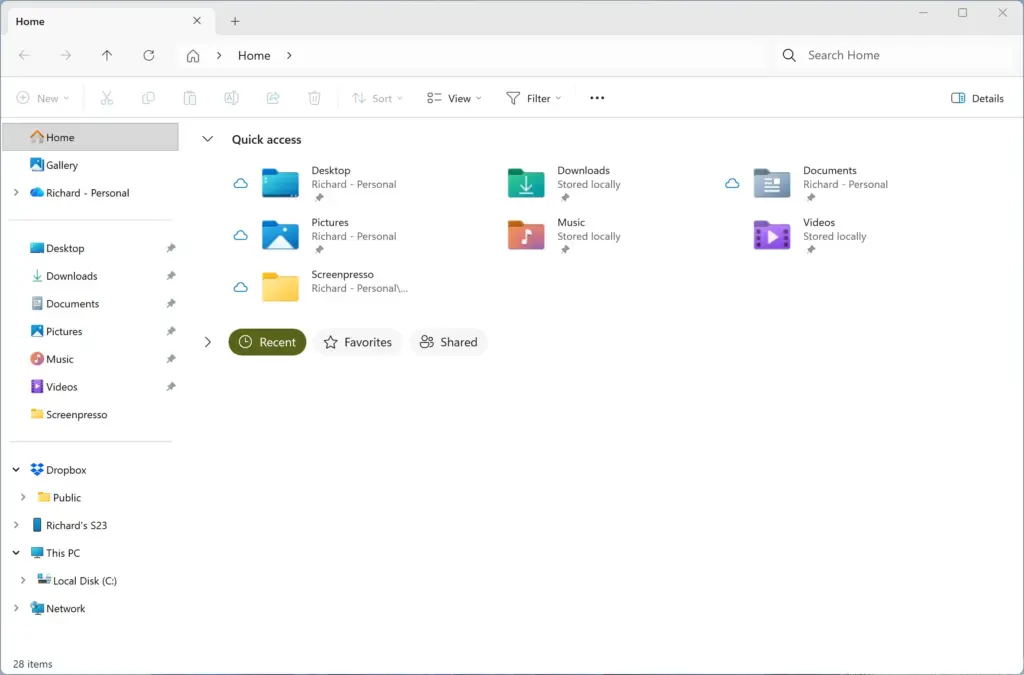
- Select the files and folders you want to relocate.
- Right-click the selected items and choose Cut (or press Ctrl+X on your keyboard).
- Open your external drive in File Explorer , right-click an empty space, and choose Paste (or press Ctrl+V). A progress window appears while the files transfer.
- Wait for the transfer to finish, open a few files on the external drive to confirm they work, and then safely disconnect the drive if you wish.
If you are nervous about losing data, use Copy instead of Cut, check the copies, and delete the originals yourself. Remember that an external drive is a single copy. Keep a second backup of anything important.
8Save New Personal Files To A Secondary Drive
You can tell Windows 11 to save new apps, documents, music and other content to a secondary, larger drive instead of your main system drive. This stops the system drive from filling up so quickly in the future. It only affects new content and does not move what you already have. It also needs a second drive or partition, because otherwise only C: is offered.
Here is how to change where new content is saved:
- Open Settings and go to System Storage
- Click Advanced storage settings to expand the menu.
- Click Where new content is saved.
- You will see categories like apps, documents, music, photos and movies, each with a drop-down menu beneath it.
- Click the drop-down menu for each item and select your secondary drive (such as drive D:) instead of your main drive.
- Click the Apply button to save your new storage choices.
If you cannot find this option, your Windows 11 version may have moved or removed it. To undo the change, set each drop-down back to your main drive and click Apply again. Content you already saved stays where it is.
9Run A Trusted Antivirus Scan
Malware can hide junk files and rogue software that quietly use up disk space. Running a scan with Windows Security, which is built into Windows 11, removes them. Be realistic here: this rarely recovers a lot of space unless your PC was actually infected. It is still a good step to take.
To run a security scan using Windows Security:
- Open your Windows Start menu , type Windows Security, and press Enter.
- Click Virus & threat protection from the dashboard options.
- Click Scan options to view the types of scans available. A Quick scan checks the usual hiding places and is much faster.
- Select Full scan to check every file and running program on your computer.
- Click the Scan now button and wait for the scan to finish. If it finds threats, follow the prompts to remove them.
A full scan can take a long time, so run it when you do not need the PC. You can keep working while it runs, but the computer may feel slower. If you use another antivirus program, Windows Security may show that program’s status instead, and the scan options may be limited.
10Clear Out Leftover Temporary Temp Folders Manually
Apps and installers leave temporary files behind that automated tools sometimes miss. Clearing your user temp folder by hand removes that clutter, including cache data and broken installer files. Close your open programs first, since this makes fewer files get skipped.
Here is how to clean out your user temporary folder:
- Press the Win+R on your keyboard to open the Run dialog box.

- Type 📂%temp% into the box and press Enter. Your personal temporary folder opens in File Explorer .
- Press Ctrl+A on your keyboard to select all the files and folders in the window.
- Right-click the selected items and click the Delete icon (trash can).
- If a message tells you a file is in use by an open program, click Skip. This is normal, because Windows and active apps protect files they need right now.
The deleted items go to the Recycle Bin, so they still take up space until you empty it as described earlier. You do not need to restart. Apps simply recreate any temporary files they need.
Summary
Freeing up disk space in Windows 11 comes down to a few habits: let Storage Sense work automatically, review Cleanup recommendations, remove old apps, empty your Recycle Bin, and move large personal files to the cloud or an external drive. Doing this regularly can reclaim gigabytes of storage and help your computer run better, especially if your drive was close to full.
Frequently asked questions
How to free up disk space 🪟 Windows 11?
Open Settings System Storage and check Cleanup recommendations. Windows lists temporary files, large unused files and apps you rarely open. Review each item, then select Clean to remove what you no longer need. Turn on Storage Sense to clear temporary files automatically on a schedule.
How to clear disk space 🪟 Windows 11?
Open Settings System Storage, then select Cleanup recommendations. Review the temporary files, unused apps and Recycle Bin items Windows finds, and remove the ones you do not need. Empty the Recycle Bin too, because deleted files stay there and keep using space until you empty it.
How to get more storage on internal disk 🪟 Windows 11?
Remove large apps and files you no longer use. Open Settings Apps Installed apps, sort by Size, and uninstall programs you do not need. Then move photos, videos and documents to an external drive or cloud storage. Check your Downloads folder for old files as well.
How to clean storage on 🪟 Windows 11?
Open Settings System Storage and select Cleanup recommendations to remove temporary files and unused apps. Next, turn on Storage Sense so Windows clears junk files on its own. Finally, empty the Recycle Bin, since deleted items there still take up space.
How to clean up disk space 🪟 Windows 11?
Go to Settings System Storage and review Cleanup recommendations for temporary files, unused apps and old downloads. Turn on Storage Sense so Windows deletes temporary files automatically. Empty the Recycle Bin to recover space from items you have already deleted.
How to deep clean PC storage?
Start with Settings System Storage and review Cleanup recommendations and Temporary files. Before you delete a system file, check it, because removing the wrong one can cause problems. Then open Disk Cleanup, select Clean up system files to remove Windows update leftovers, and uninstall large unused apps from Apps Installed apps
Still have a question?
Answered by AI from this guide. Good questions may be added to this page — please don't include personal details.
Did this guide fix your problem?

About the Author
Richard
Tech Writer, IT Professional
Richard is a writer at Geek Rewind who turns complex IT tasks into clear, step-by-step guides. He draws on years of hands-on experience in system administration and enterprise IT operations, focusing on Windows, Linux and WordPress: the problems people actually run into, and the fixes that work. His server and WordPress guides come from systems he runs himself. Richard builds and maintains the platform behind Geek Rewind, from its Ubuntu servers and Nginx configuration to its custom WordPress plugins. Many new tutorials start with readers' questions, and he's always glad to answer them in the comments.
No comments yet — be the first to share your thoughts!