How to Resize Recycle Bin on Windows 11
You can resize the Recycle Bin on Windows 11 to manage its disk space usage.
The Windows Recycle Bin temporarily stores deleted files so you can get them back. Windows 11 gives the Recycle Bin a set amount of storage space, which changes depending on your hard drive size.
For example, on a 1TB hard drive, Windows 11 might reserve approximately 5% of that space for the Recycle Bin. Adjusting this size is useful if you frequently delete large files or need to free up more storage space on your PC.
Right-click the Recycle Bin icon on your desktop and select Properties. Choose a drive, select Custom size, and enter your desired size in MB. Click OK to save.
Why resize the Recycle Bin?
What happens when done?
How to change your Recycle Bin size
Changing your Recycle Bin size on Windows 11 is simple and helps you manage disk space better by controlling how much room deleted files use.
- Find the Recycle Bin icon on your desktop.
- Right-click the icon and choose Properties.
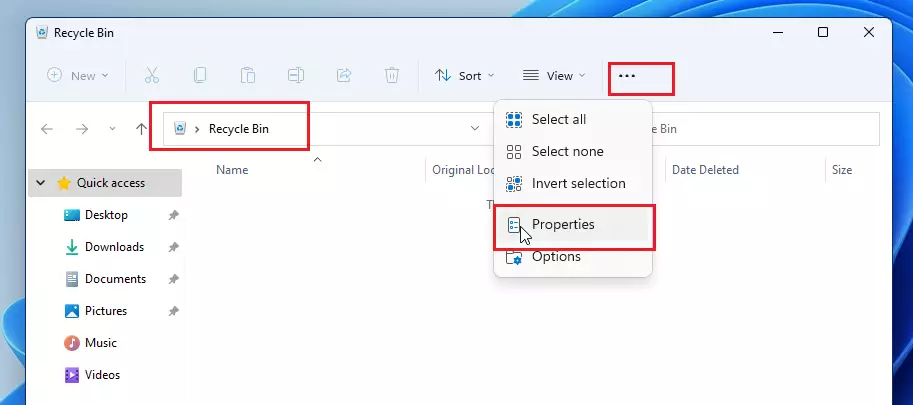
Alternatively, you can open the Recycle Bin folder, click the three dots (…) in the top menu, and select Properties.
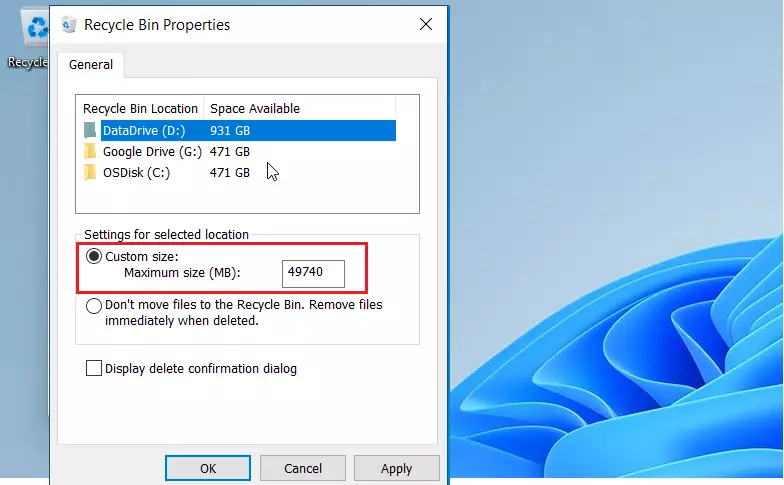
- In the Properties window, you will see a list of your hard drive volumes.
- Select the drive you want to change.
- Under the “Settings for selected location” section, click the Custom size bubble.
- Type in your preferred size in Megabytes (MB).
- Click OK to save your changes.
Pro Tip: Bypassing the Recycle Bin
Using the Shift+Del keyboard shortcut permanently deletes a file, bypassing the Recycle Bin. This method is ideal for sensitive files requiring immediate removal. Files deleted using Shift+Del cannot be recovered from the Recycle Bin.
Managing Storage Space
If your computer is running low on space, your Recycle Bin might be using up more room than you’d like.
Important Security Note
Important Note: Most people can change these settings, but if you’re on a restricted network or a shared computer, you might need administrator privileges to change system-wide storage settings. If you encounter an access denied error, check your user account permissions in the Control Panel.
Summary
Resizing your Recycle Bin helps you control how long deleted files are kept, giving you more command over your computer’s storage.
Does changing the Recycle Bin size affect all drives?
No, changing the Recycle Bin size on one drive, like your C: drive, doesn’t change it for other drives like your D: drive or external ones.
How do I recover files after bypassing the Recycle Bin?
If you bypass the Recycle Bin using Shift+Del, your files aren’t saved there and you’ll need special software to try and get them back.
Why is my Recycle Bin icon not updating after changing settings?
If your Recycle Bin icon doesn’t look right after changing settings, try right-clicking your desktop and picking ‘Refresh’ to make it update.
Was this guide helpful?

About the Author
Richard
Tech Writer, IT Professional
Richard, a writer for Geek Rewind, is a tech enthusiast who loves breaking down complex IT topics into simple, easy-to-understand ideas. With years of hands-on experience in system administration and enterprise IT operations, he’s developed a knack for offering practical tips and solutions. Richard aims to make technology more accessible and actionable. He's deeply committed to the Geek Rewind community, always ready to answer questions and engage in discussions.

You write:
“If you’re exited about Windows 11, keep reading out posts on it.”
I’m sure you mean: If you’re excited about Windows 11, keep reading our posts on it.
Thank you! Updated.
[…] a multi-drive computer, each drive or partition will have its own hidden $Recycle.Bin system folder and […]
[…] has multiple hard drives, partitions, or external hard drives, each drive will have its own hidden $Recycle.Bin system folder at the root of each volume. By default, removable drives, such […]