How to Change Voice Access Filtering Options in Windows 11
Voice Access filtering options in Windows 11 let you fine-tune how your PC hears your voice, especially in noisy places.
Voice Access allows you to use your computer and type using just your voice, making it a hands-free control tool. Windows 11 includes features like Voice Isolation that help Voice Access focus on your voice, even when there’s a lot of background chatter.
You can choose from three sound filtering levels: Voice Isolation to completely block other sounds, Remove background noise to filter out specific distractions, or No filtering to use your microphone without any changes.
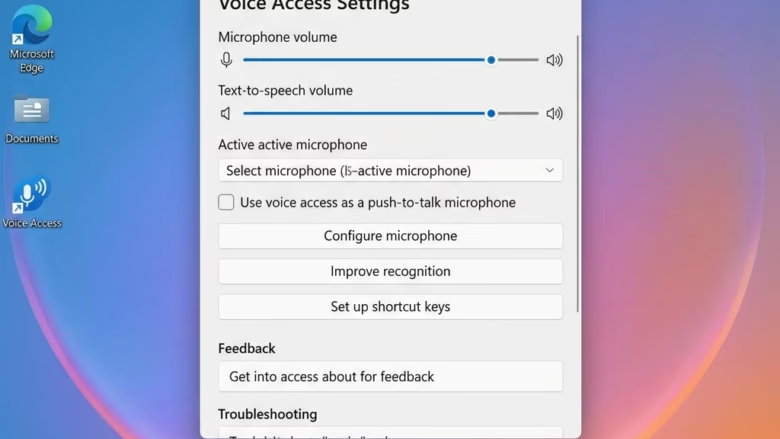
Access Voice Access settings by clicking the gear icon on its toolbar. Then, select “Improve speech recognition” and choose your desired filtering option: Voice Isolation, Remove background noise only, or No filtering. These adjustments improve how Voice Access hears you.
How to Change Voice Access Sound Settings
Method 1Using Settings
- Turn on Voice Access.
- Look for the Voice Access toolbar at the top of your screen. Click the Settings (gear) icon.
- In the menu that appears, click on Improve speech recognition.
- Now, choose the option you want: Voice Isolation, Remove background noise only, or No filtering.
You can change how Voice Access filters your microphone input directly through the Windows Settings app. This method lets you pick between Voice Isolation, removing background noise, or no filtering at all, giving you control over your audio input for Voice Access.

Method 2Using the Registry Editor (Advanced)
Advanced users can change Voice Access filtering settings by editing the Windows Registry (a core part of Windows that stores configuration settings), a process that requires administrator privileges and careful attention. You’ll navigate to a specific key within the Registry Editor to adjust these audio filtering options for Voice Access.
- Press the Windows key + R to open the Run box.
- Type
regeditand press Enter. Click Yes if prompted by User Account Control. - Navigate to the following key:
HKEY_CURRENT_USER\Software\Microsoft\Speech_OneCore\AudioProcessing\AcousticEchoCancellation - In the right-hand pane, find the value named
NoiseFilteringMode. - Double-click on
NoiseFilteringMode. - To use “Remove background noise only,” change the “Value data” to
1. - To use “No filtering” (the default), change the “Value data” to
0. - Click OK.
- Close the Registry Editor. You may need to restart your computer for the changes to take effect.
Reference:
https://learn.microsoft.com/en-us/windows-insider/release-notes/beta/preview-build-26220-8491
Summary
What is voice access in 🪟 Windows 11?
Voice Access in Windows 11 is a powerful feature enabling hands-free PC control and text dictation using only your voice. It allows you to navigate your computer, launch applications, and type without touching a keyboard or mouse, enhancing accessibility and productivity.
Why are people leaving 🪟 Windows 11?
Reasons for leaving Windows 11 can include performance issues on older hardware, compatibility problems with certain software or peripherals, a steep learning curve for new interface elements, and concerns about privacy or data collection practices.
What are some common problems with voice access?
Common issues with Voice Access include inaccurate speech recognition, especially in noisy environments, difficulty understanding commands, slow response times, and occasional conflicts with other running applications. Proper microphone setup and clear speech are crucial for optimal performance.
How to get rid of voice access on 🪟 Windows 11?
To disable Voice Access in Windows 11, open Settings, navigate to Accessibility, then Speech. Toggle the Voice Access switch to Off. You can also uninstall the Voice Access app via the Apps & features section in Settings if you wish to remove it completely.
Was this guide helpful?

About the Author
Richard
Tech Writer, IT Professional
Richard, a writer for Geek Rewind, is a tech enthusiast who loves breaking down complex IT topics into simple, easy-to-understand ideas. With years of hands-on experience in system administration and enterprise IT operations, he’s developed a knack for offering practical tips and solutions. Richard aims to make technology more accessible and actionable. He's deeply committed to the Geek Rewind community, always ready to answer questions and engage in discussions.


No comments yet — be the first to share your thoughts!