How to Bypass the Recycle Bin on Windows 11
You can bypass the Recycle Bin in Windows 11 to permanently delete files instantly, skipping the intermediate step.
Bypassing the Recycle Bin means files are removed from your system immediately after deletion, rather than being moved to the Recycle Bin for later emptying. This is useful for quickly freeing up space or ensuring sensitive data is gone for good.
A common method involves holding the Shift key while pressing the Delete key. This shortcut works for individual file deletions in Windows 11.
You can also set Windows 11 to bypass the Recycle Bin for all deletions through its settings. This is ideal if you manage your files carefully and prefer a faster deletion process.
You can bypass the Recycle Bin by holding Shift while pressing Delete to permanently remove a file. Alternatively, access Recycle Bin Properties, select your drive, and check “Don’t move files to the Recycle Bin” to delete all files immediately.
Pro Tip: The Shift+Del Shortcut
Want to delete a file instantly without changing your settings? Select your file and press Shift+Del on your keyboard. A box will ask if you’re sure. Click Yes to remove the file permanently.
Why bypass the Recycle Bin?
Skipping the Recycle Bin instantly removes files from a computer's view. This action does not securely delete the data. Data recovery software can still find these removed files unless other data overwrites them.
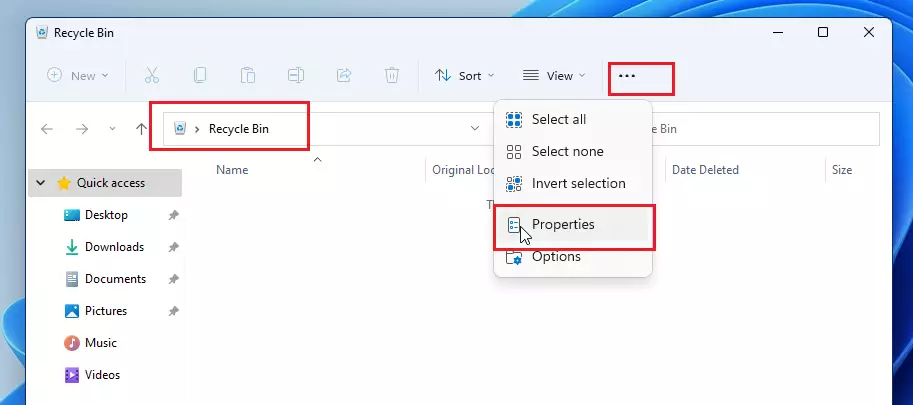
Method 1Using the Recycle Bin Properties
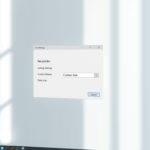
You can bypass the Recycle Bin on Windows 11 by changing Recycle Bin settings so files delete straight away, instead of going to the Recycle Bin. This means deleted files won't be saved and can't be easily recovered. To change Recycle Bin settings, find the Recycle Bin icon on your desktop and right-click the Recycle Bin icon to open Recycle Bin Properties.
- Right-click the Recycle Bin icon on your desktop.
- Select Properties.
Alternatively, open the Recycle Bin, click the three dots in the top menu, and select Properties.
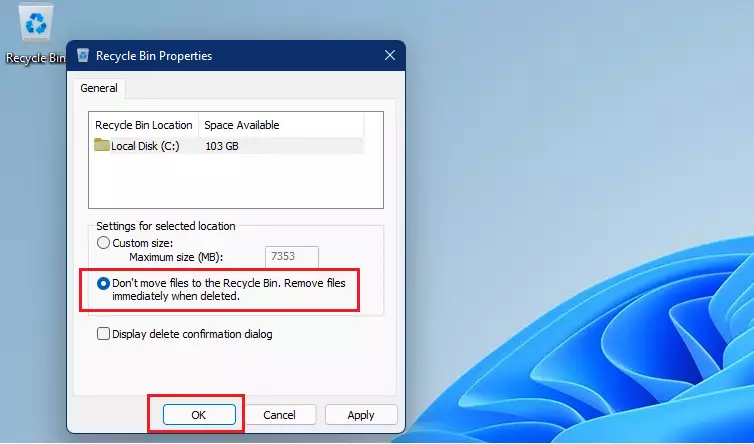
Select your drive. Check the box : “Don’t move files to the Recycle Bin. Remove files immediately when deleted”.
Automated Storage Management with Storage Sense
Windows 11 includes Storage Sense, a feature that automatically frees up disk space by clearing the Recycle Bin and temporary files, eliminating the need for manual deletion.
How to enable Storage Sense:
- Open Settings.
- Go to System > Storage.
- Toggle Storage Sense to On.
- Click Storage Sense to set how often it empties the Recycle Bin.
Important Considerations
When you bypass the Recycle Bin in Windows 11, the disk space is freed up immediately because files aren’t stored temporarily.
Summary
Bypassing the Recycle Bin in Windows 11 helps you delete files faster and free up disk space right away. You can use the Shift+Del shortcut for individual files or set up Storage Sense to clear things automatically. Just remember, when you bypass the Recycle Bin, files are gone for good, so be sure before you delete.
Can I recover files after bypassing the Recycle Bin?
Recovering files after you bypass the Recycle Bin in Windows 11 isn’t possible through normal means, as they aren’t saved anywhere.
How do I turn off the delete confirmation dialog in 🪟 Windows 11?
To stop the confirmation box, right-click your Recycle Bin and select Properties. Uncheck the box labeled “Display delete confirmation dialog.” Click Apply and OK. Now, when you press Shift+Del, the file will be removed immediately without asking for your permission, so be very careful with your selections.
Was this guide helpful?

About the Author
Richard
Tech Writer, IT Professional
Richard, a writer for Geek Rewind, is a tech enthusiast who loves breaking down complex IT topics into simple, easy-to-understand ideas. With years of hands-on experience in system administration and enterprise IT operations, he’s developed a knack for offering practical tips and solutions. Richard aims to make technology more accessible and actionable. He's deeply committed to the Geek Rewind community, always ready to answer questions and engage in discussions.
No comments yet — be the first to share your thoughts!