How to Enable Recycle Bin for USB Drives and Other Removable Drives in Windows 11

Recycle Bin for removable drives is a Windows 11 feature that keeps deleted files from thumb drives and memory cards so you can restore them instead of losing them for good. By default, Windows deletes files on external storage straight away. It does not move them to a recoverable folder the way it does on your main drive.
You can turn this safety net on for any flash drive or external hard drive plugged into your PC. The change takes less than two minutes and works on both Windows 11 Home and Pro. You do not need Group Policy Editor, which is Pro only, because everything is done in the Registry.
Open Registry Editor (Win+R, type regedit), navigate to 🗝️HKEY_CURRENT_USER\
Step-by-Step: How to Enable Recycle Bin for USB and Other Removable Drives
Changes here take effect on the whole system, so follow the steps exactly and check each name before you click OK. If you want a safety copy first, use File Export in the Registry Editor to save a backup before you change anything.
Step 1Open the Registry Editor
- Press Win+R on your keyboard. The Run box opens in the bottom-left corner of the screen.
- Type
regeditand press Enter. - [Admin Privileges Required] If Windows asks “Do you want to allow this app to make changes?”, click Yes. If you are signed in with a standard account, Windows asks for an administrator password instead. Without admin rights you cannot save the changes below.
The Registry Editor window should now be open, with a tree of folders (keys) on the left and values on the right. This is where you will make the recycle bin work on removable drives like USB sticks.
Step 2Go to the First Folder Path
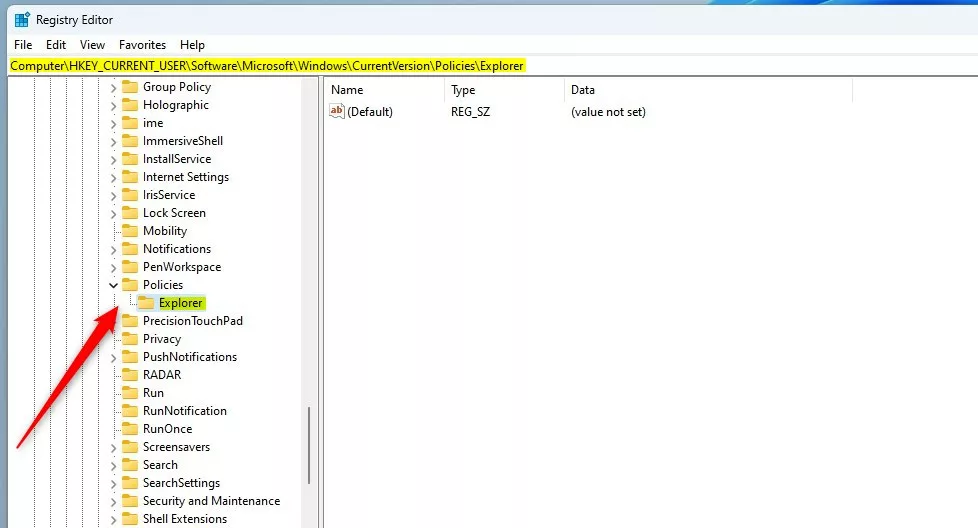
In the Registry Editor, use the left sidebar to expand the folders and navigate to the path below. You can also paste the path into the address bar at the top of the window and press Enter.
HKEY_CURRENT_USER\Software\Microsoft\Windows\CurrentVersion\Policies\ExplorerStep 3Check for the Explorer Folder
Right-click Policies, select New Key, and name it Explorer. The new key appears under Policies. Check the spelling, because Windows ignores a key with the wrong name.
Step 4Create a New Value
- Click the Explorer folder in the left sidebar.
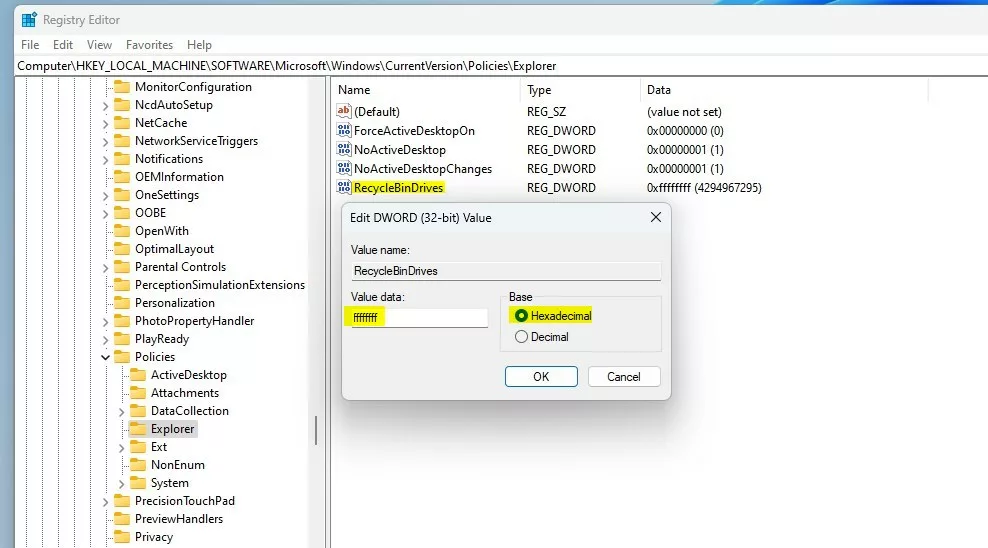
- On the right side, right-click on empty space and select New DWORD (32-bit) Value. A new entry appears with its name highlighted for editing.
- Type RecycleBinDrives as the name and press Enter. Use this exact spelling. On 64-bit Windows 11 you still choose the 32-bit DWORD here.
Step 5Set the Value to Enable Recycle Bin
- Double-click the new RecycleBinDrives entry. An Edit DWORD (32-bit) Value window opens.
- Under Base, select Hexadecimal.
- Type
ffffffffin the Value data box. - Click OK. The entry now shows your value in the right-hand list.
Step 6Repeat for the Second Folder Path
Now go to the second location. Navigate to the path below in the left sidebar, or paste it into the address bar.
HKEY_LOCAL_MACHINE\SOFTWARE\Microsoft\Windows\CurrentVersion\Policies\ExplorerRepeat the same steps here. Create the Explorer key if it is missing, add the RecycleBinDrives DWORD (32-bit) value, and set its Value data the same way, with Hexadecimal selected under Base.
Step 7Close the Registry Editor
Close the Registry Editor when you are done. Changes are saved as soon as you click OK, so there is no separate save step.
Step 8Restart Your Computer
Restart your computer to apply the changes. Signing out and back in is sometimes enough, but a full restart is the reliable way.
To undo the change later, open the Registry Editor again, delete the RecycleBinDrives value from both locations, and restart.
What to Expect Now
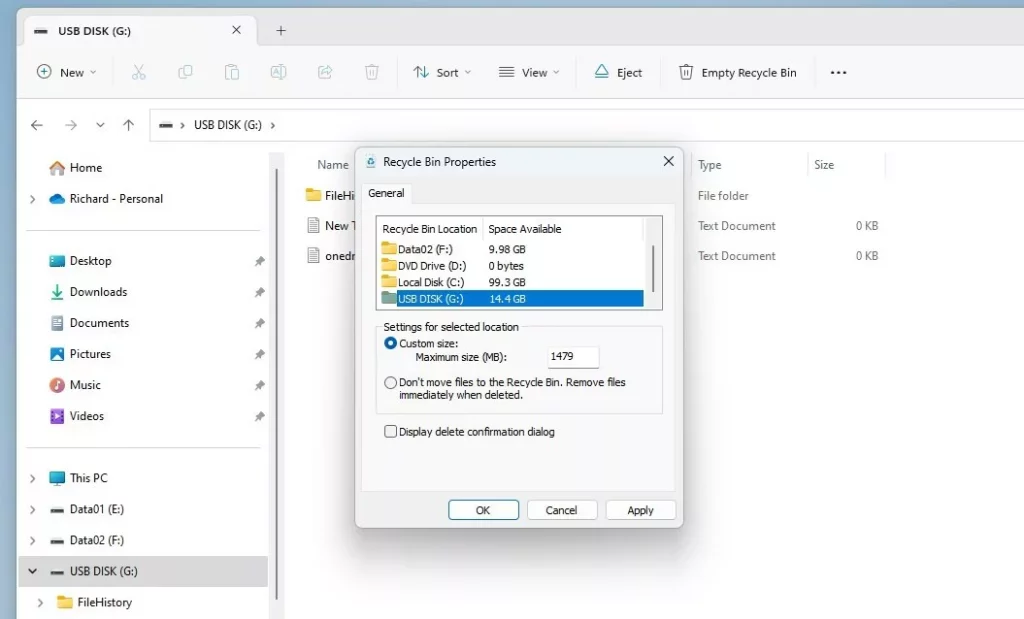
With the setting enabled, deleted files go to a hidden folder on the USB drive itself instead of vanishing immediately. You can then restore accidentally deleted items from flash drives just as you do on your main computer storage. Files you delete with Shift + Delete still skip the recycle bin, so they are not recoverable this way.
This folder is named $Recycle.Bin and is hidden by default.
If you want to see the folder, you need to show hidden files first. In File Explorer, open View Show and turn on Hidden items. Because it is also a protected system folder, you may need to clear the Hide protected operating system files option in Folder Options. For the full walkthrough, see our guide titled "Show Hidden Files in Windows 11." It is also useful for finding other system files, or for recovering data that was hidden on your computer.
Summary
Turning on the recycle bin for removable drives gives you an extra layer of safety for files on USB sticks and memory cards. The process involves editing the Windows Registry, but it is straightforward if you follow the steps carefully and restart afterwards.
Have a question about this guide?
Answered by AI from this guide. Good questions may be added to this page — please don't include personal details.
Did this guide fix your problem?

About the Author
Richard
Tech Writer, IT Professional
Richard is a writer at Geek Rewind who turns complex IT tasks into clear, step-by-step guides. He draws on years of hands-on experience in system administration and enterprise IT operations, focusing on Windows, Linux and WordPress: the problems people actually run into, and the fixes that work. His server and WordPress guides come from systems he runs himself. Richard builds and maintains the platform behind Geek Rewind, from its Ubuntu servers and Nginx configuration to its custom WordPress plugins. Many new tutorials start with readers' questions, and he's always glad to answer them in the comments.
No comments yet — be the first to share your thoughts!