How to Empty the Recycle Bin in Windows 11


Emptying the Recycle Bin in Windows 11 permanently deletes the files stored in it and frees up disk space. When you delete a file normally, Windows moves it to this holding folder as a safety net in case you delete something by accident. Every drive connected to your PC has its own hidden bin folder. If your main drive runs low on space, you may need to check the other drives too.
Once the bin is emptied, you can’t restore the files with normal Windows tools. Open it and look through it first if you aren’t sure what’s inside.
Right-click the Recycle Bin icon on your desktop and select Empty Recycle Bin, then click Yes to confirm. The files are permanently deleted and cannot be recovered with normal Windows tools.
Why Should You Empty the Recycle Bin?
- Free up space: Files in the Recycle Bin still take up storage on your computer. Large videos, installers and disk images can add up to many gigabytes.
- Speed up your PC: A drive that is nearly full can slow Windows down, especially the system drive. More free space gives Windows room for updates, temporary files and the page file.
- Protect your privacy: Files you delete normally can be restored by anyone using your account. Emptying the bin removes that easy route to sensitive information.
How to Empty the Recycle Bin in 🪟 Windows 11
Pick whichever of the following methods suits you. All of them do the same job. They differ only in where you start.
1From Your Desktop
This is the quickest method. You can empty the Recycle Bin straight from the desktop with a right-click.
- Find the Recycle Bin icon on your desktop.
- Right-click the icon. A context menu appears.
- Click Empty Recycle Bin . A message asks whether you want to permanently delete the items.
- Click Yes. The icon changes from a full bin to an empty one.
If Empty Recycle Bin is greyed out, the bin is already empty. If you don’t see it at all, the menu may be hiding it. Choose Show more options at the bottom of the menu to see the full list.
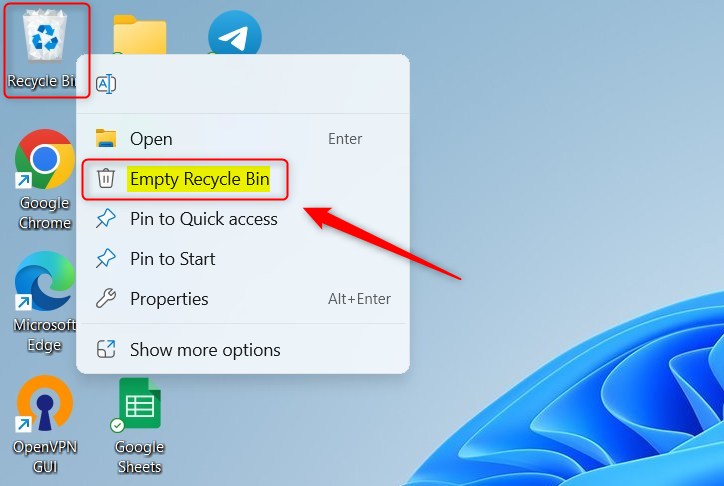
After you click Yes, the files are gone for good.
2From File Explorer
Use this method if the desktop icon is missing or you want to look through the contents before deleting anything.
- Double-click the Recycle Bin on your desktop to open it. If it isn't there, open File Explorer (press the Windows key + E), click the address bar at the top, type Recycle Bin and press Enter. The window now lists everything you've deleted.
- Look at the command bar at the top of the window and click Empty Recycle Bin.
- Click Yes when Windows asks you to confirm. The list clears.
If you only want to remove some items, select them first, right-click and choose Delete. Windows asks you to confirm, and the other items stay in the bin. The same right-click menu has Restore if you find something you still need.
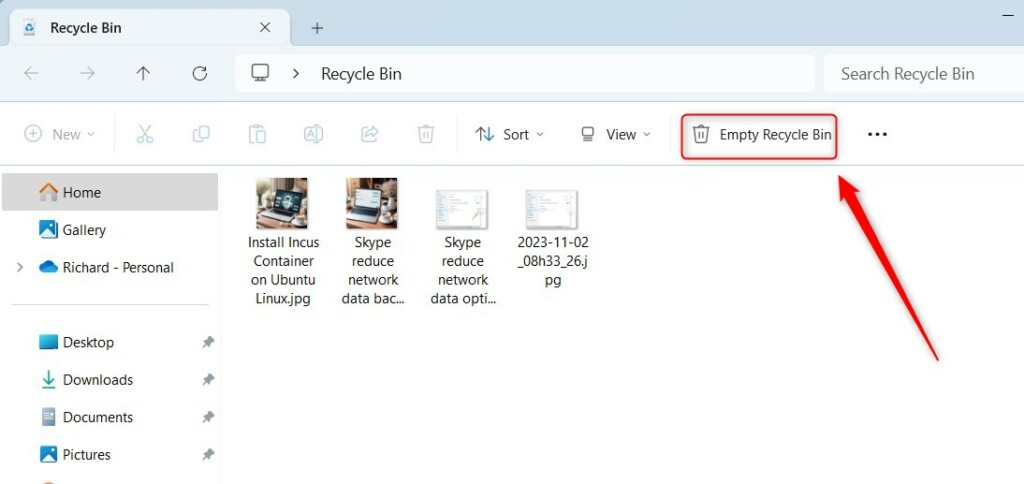
The Empty Recycle Bin button only appears while the Recycle Bin window is open. If you don't see it, check that the address bar says Recycle Bin and not another folder.
3Using Storage Settings
The Settings app gives you another route. It's useful when you're already hunting for space and want to see what else is taking it up.
- Click the Start button (the Windows icon) and select Settings.
- Go to System Storage. Windows shows how much space each category uses.
- Click Cleanup recommendations. Windows lists items it thinks you can safely remove.
- Find the Recycle Bin section and click the Clean up button.
The layout of this page changes between Windows 11 versions. On some builds the Recycle Bin is listed as an item under Temporary files instead. If you don't see a Recycle Bin section, check there. Also, if the bin is already empty, Windows may not list it at all.
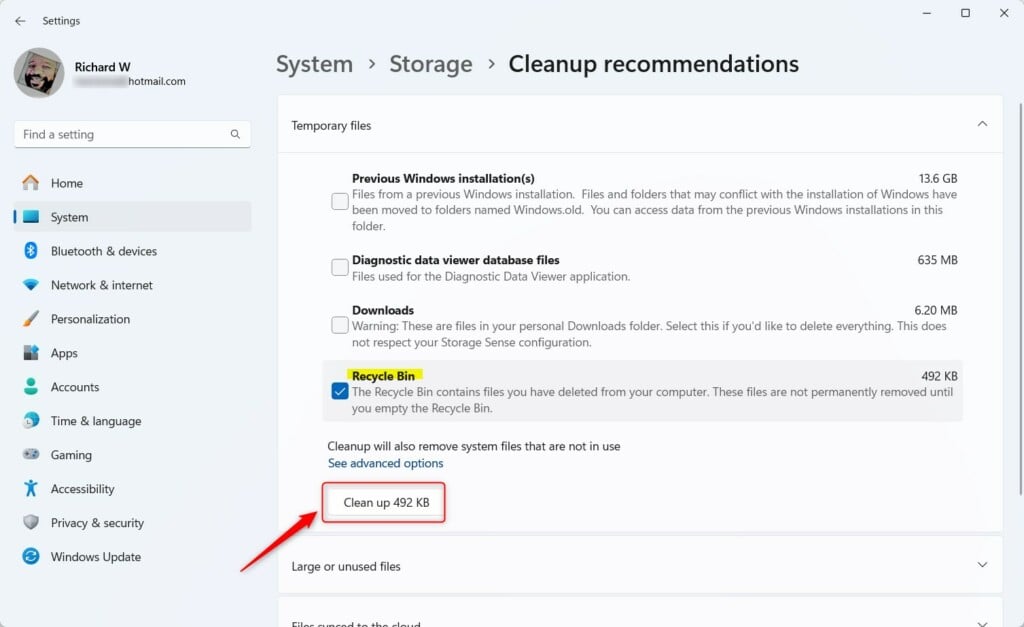
Before you confirm, read the size shown next to each item. Windows shows how much space you'll recover, so you can see whether it's worth doing.
4Using PowerShell (Advanced)
The command used here deletes everything without asking for confirmation, so be sure you don't need any of the files. It also clears the bin on every attached drive.
- FLAG: Admin privileges required. Open Open Windows PowerShell. Type "PowerShell" in the Start menu search, then right-click the result and select Run as administrator. Click Yes if User Account Control asks for permission. A window with a prompt opens.
- Copy and paste this command, then press Enter:
Clear-RecycleBin -force -ErrorAction:Ignore
The command skips the confirmation prompt and clears deleted files across all attached storage volumes. It runs quietly, so you usually see no message when it finishes. Open the Recycle Bin afterwards to check that it's empty.
If you only want to clear one drive, you need a modified version of the command that names that volume. This purges data only from the drive you specify and leaves the other drives' bins untouched.
Clear-RecycleBin -DriveLetter C -force -ErrorAction:IgnoreSummary
Emptying the Recycle Bin in Windows 11 regularly helps free up valuable storage space on your hard drive and protects your personal privacy by permanently erasing deleted files. You can easily clear out these unwanted items using the desktop icon, File Explorer, or PowerShell depending on which method you prefer.- Emptying the Recycle Bin helps free up space on your Windows 11 PC.
- It makes your computer run better and protects your privacy.
- You can empty it from the Desktop, File Explorer, Storage settings, or using PowerShell commands.
- By making it a habit to empty your Recycle Bin, you'll keep your computer tidy and running smoothly!
Have a question about this guide?
Answered by AI from this guide. Good questions may be added to this page — please don't include personal details.
Did this guide fix your problem?

About the Author
Richard
Tech Writer, IT Professional
Richard is a writer at Geek Rewind who turns complex IT tasks into clear, step-by-step guides. He draws on years of hands-on experience in system administration and enterprise IT operations, focusing on Windows, Linux and WordPress: the problems people actually run into, and the fixes that work. His server and WordPress guides come from systems he runs himself. Richard builds and maintains the platform behind Geek Rewind, from its Ubuntu servers and Nginx configuration to its custom WordPress plugins. Many new tutorials start with readers' questions, and he's always glad to answer them in the comments.
No comments yet — be the first to share your thoughts!