How to Enable or Disable Delete to Recycle Bin Confirmation Dialog in Windows 11

- 10 steps
- Needs administrator rights
- Group Policy needs Windows 11 Pro, Enterprise or Education
- Includes a restart or sign-out
The delete confirmation dialog in Windows 11 is a pop-up that asks “Are you sure you want to move this file to the Recycle Bin?” every time you send an item to the bin. Windows leaves it off or on depending on your setup, but the point of it is a safety net so you do not delete things by accident.
If you delete files all day, turning the prompt off saves a lot of clicks. It takes only a few steps in the Recycle Bin properties, and you can turn it back on the same way whenever you want the prompt returned. This guide covers three methods, from the simplest (one account) to the broadest (every user on the PC).
Right-click the Recycle Bin icon on your desktop, select Properties, and check or uncheck the box next to Display delete confirmation dialog. Check it to turn the prompt on, uncheck it to turn it off, then click OK. The change applies immediately.
What Happens
When the dialog is on, it gives you a last chance to cancel before a file goes to the bin. A few things are worth knowing before you change anything:
- Files too large for the Recycle Bin’s size limit bypass the bin entirely. Windows shows a separate permanent deletion warning for these items, whatever your confirmation setting is.
- Each user account on a computer has its own Recycle Bin. Individual hard drives and partitions also keep their own Recycle Bin settings.
- Files deleted from USB flash drives and memory cards are gone for good, because those devices have no Recycle Bin. The confirmation dialog does not change that. To avoid permanent deletion there, you need to turn on the Recycle Bin feature for those specific drives.
- Option Three edits the registry, which is a database of low-level system settings. You make that change in a terminal window, so be careful and follow the steps exactly.
Option 1Use Recycle Bin Properties
Recycle Bin Properties is the quickest method. It turns the prompt on or off for your user account only, and it works on every edition of Windows 11, Home included. Other people who sign in to the PC are not affected.
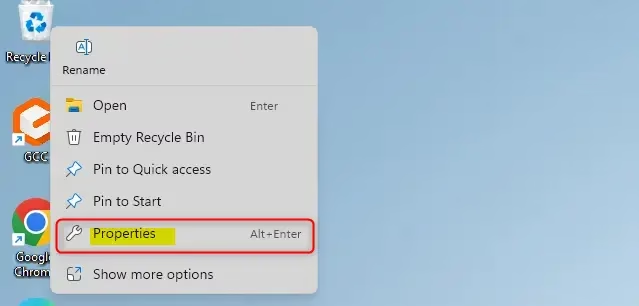
- Right-click the Recycle Bin icon on your desktop. A context menu appears.
- Click Properties. The Recycle Bin Properties window opens (see screenshot below).
If the Recycle Bin icon is not on your desktop, you can bring it back in Settings Personalization Themes Desktop icon settings. Tick Recycle Bin there.
- Check the box next to Display delete confirmation dialog to turn the prompt on. Uncheck it to turn the prompt off.
- Click OK to save. The change applies right away, so delete a test file to confirm.
If the checkbox is greyed out or keeps reverting, a Group Policy or registry setting (Option Two or Three) is probably controlling it. Change it there instead. To undo this option, open the same window and reverse the checkbox.
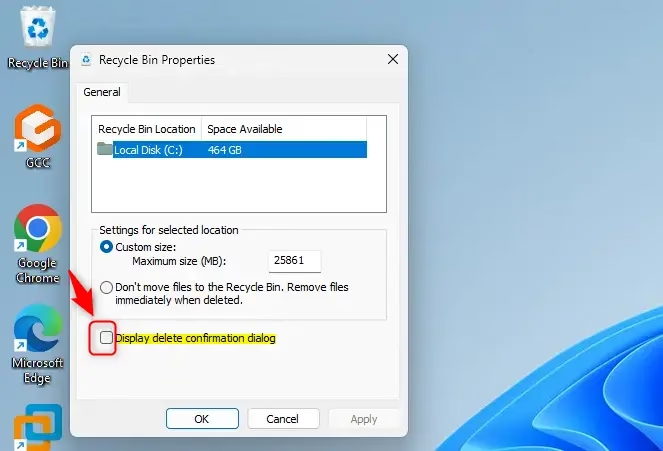
Check the result by deleting a file. With the box ticked, you should see the confirmation pop-up. With it cleared, the file goes straight to the bin.
Option 2Use Group Policy Editor
The Local Group Policy Editor controls the setting for every user account on the computer at once, across all hard drives and partitions. You need administrator rights. This approach suits a machine with several user accounts, and it can also target specific users or groups.
On Home, it is not available, so use Option Three instead.
- Open the Group Policy Editor. You can search for it from the Start menu and approve the admin prompt. Use the standard editor to apply the policy to all users. If you want it to apply only to specific users, or to everyone except administrators, use the per-user policy version of the editor.
- In the left pane, navigate to:
User Configuration > Administrative Templates > Windows Components > File Explorer
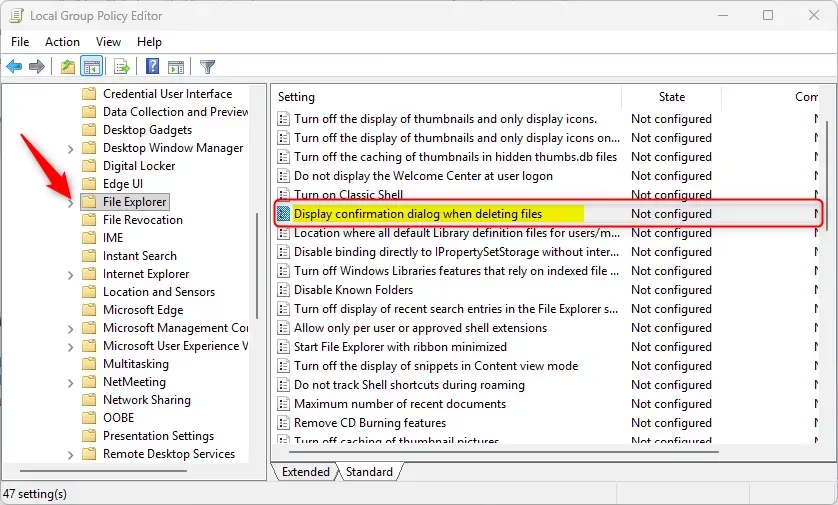
- In the right pane, find the policy called Display confirmation dialog when deleting files and double-click it. Its settings window opens.
To Always Show the Delete Confirmation Dialog
To force the prompt on, select Enabled and click OK.
Users can no longer turn the dialog off locally, and the checkbox may appear greyed out for them. The policy’s Disabled setting does the opposite: it keeps the prompt off and also locks the checkbox.
To Use the Default Setting (No Confirmation Dialog)
To hand control back to users, select Not Configured and click OK. Each user can then choose their own confirmation setting in Recycle Bin Properties again. This is the way to undo the policy.
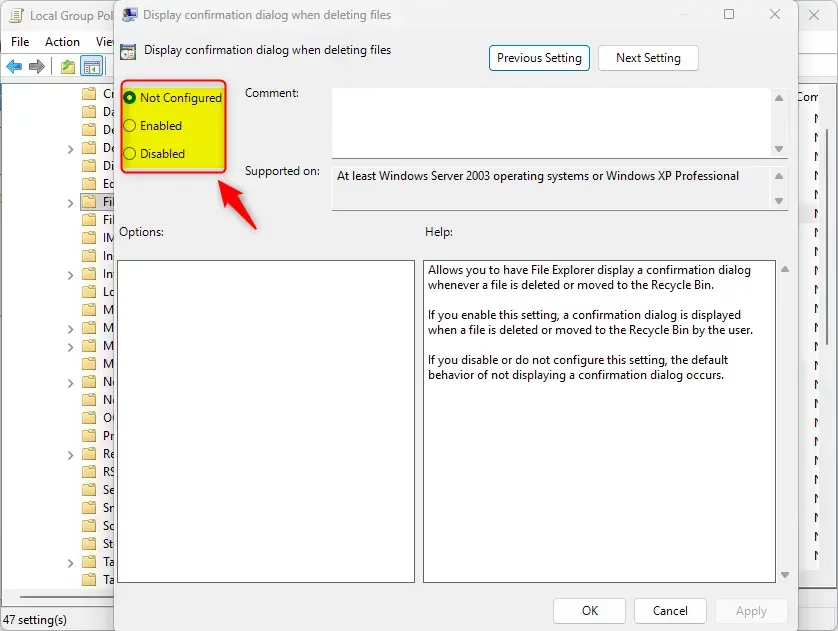
- Close the Group Policy Editor.
Policy changes normally apply quickly, but if you do not see the new behavior, sign out and back in, or restart the PC.
Option 3Use Registry Editor
The registry method changes the setting for all user accounts and all drives on the computer. It is the right choice for Windows 11 Home, which has no Group Policy Editor, but it works on every edition. You need administrator permission. Back up your registry or create a restore point before you make changes, so you can recover from any mistake.
- Open Windows Terminal as an administrator. Right-click it and select Run as administrator. Approve the User Account Control prompt if it appears.
- Run one of the commands below, depending on what you want. Each one sits under its own heading, so pick the one that matches your goal.
To Always Show the Delete Confirmation Dialog
Copy and paste this command:
reg add "HKCU\Software\Microsoft\Windows\CurrentVersion\Policies\Explorer" /v ConfirmFileDelete /t REG_DWORD /d 1 /f
reg add "HKLM\SOFTWARE\Microsoft\Windows\CurrentVersion\Policies\Explorer" /v ConfirmFileDelete /t REG_DWORD /d 1 /f
To Use the Default Setting (No Confirmation Dialog)
Copy and paste this command:
reg delete "HKCU\Software\Microsoft\Windows\CurrentVersion\Policies\Explorer" /v ConfirmFileDelete /f
reg delete "HKLM\SOFTWARE\Microsoft\Windows\CurrentVersion\Policies\Explorer" /v ConfirmFileDelete /f
Summary
After you run a command, the terminal should report that the operation completed successfully. If the change does not show up, sign out and back in, or restart the PC. To go back, run the other command.
Windows 11 gives you three ways to control this setting. You can change it for just your account with Recycle Bin Properties, or for every user on the PC with the Group Policy Editor or the registry. Pick the method that fits your account type and comfort level.
- Option One is the simplest. Right-click the Recycle Bin icon and check or uncheck the confirmation box in Properties. It only affects your account and works on all editions.
- Option Two uses the Group Policy Editor. It works for all users or specific user groups, but only on Windows Pro, Enterprise, and Education.
- Option Three uses the registry. It works for all users on every edition, including Home. You must run Windows Terminal as an administrator.
All three methods give the same result: the confirmation prompt is either on or off. They differ in who is affected and which Windows edition you need.
Have a question about this guide?
Answered by AI from this guide. Good questions may be added to this page — please don't include personal details.
Did this guide fix your problem?

About the Author
Richard
Tech Writer, IT Professional
Richard is a writer at Geek Rewind who turns complex IT tasks into clear, step-by-step guides. He draws on years of hands-on experience in system administration and enterprise IT operations, focusing on Windows, Linux and WordPress: the problems people actually run into, and the fixes that work. His server and WordPress guides come from systems he runs himself. Richard builds and maintains the platform behind Geek Rewind, from its Ubuntu servers and Nginx configuration to its custom WordPress plugins. Many new tutorials start with readers' questions, and he's always glad to answer them in the comments.
No comments yet — be the first to share your thoughts!