How to Delete Files in Windows 11

Deleting files in Windows 11 clears space on your drive and keeps your PC organized. Most items you send to the Recycle Bin stay there for 30 days before Windows removes them for good. That 30-day window comes from Storage Sense, and it only applies when Storage Sense is turned on. Otherwise, items stay in the Recycle Bin until you empty it or it reaches its size limit.
Files you delete from a USB drive or memory card skip the Recycle Bin and disappear right away. The same usually goes for files on network shares. You can open the Recycle Bin at any time to empty it and win back storage space. Until you empty it, those files still take up room on the drive.
Select the file in File Explorer , then press Del to send it to the Recycle Bin , or press Shift+Del to remove it permanently without using the Recycle Bin . Items in the Recycle Bin stay there for 30 days before Windows deletes them automatically if Storage Sense is on.
Permanent Deletion vs. Recycle Bin
The Recycle Bin is the safer choice because you can restore a file if you change your mind. Permanent deletion is final, so use it only when you are sure. A file that is too large for the Recycle Bin’s size limit is also deleted permanently, and Windows warns you before it does so.
Managing Disk Space and Storage
Deleting files is only part of the job, because you also need to keep an eye on disk space. Removing files you no longer need helps your PC run faster, especially when the system drive is nearly full. Windows needs free space for updates, temporary files and virtual memory. Follow the steps below and check what each one removes before you confirm.
How to Use Storage Sense
- Open Settings.
- Go to System Storage.
- Turn on Storage Sense to let Windows manage your space automatically.
Review the list of items there before you clear anything. Some categories can’t be restored once they’re gone.
Cloud and OneDrive Syncing
OneDrive Files On-Demand lets you free up space on your local hard drive without removing files from your cloud storage. When you turn this setting on, your documents stay in the cloud. They download to your computer only when you double-click to open them. That keeps your local drive from filling up while your files stay safe online.
Be careful with the wording here. Freeing up space and deleting are not the same thing. If you press Delete on a file inside your OneDrive folder, OneDrive deletes it from the cloud and from your other synced devices too. To keep a file in the cloud and remove only the local copy, right-click it in File Explorer and select Free up space. If you delete a OneDrive file by mistake, check the OneDrive recycle bin on the OneDrive website to restore it.
If the option is missing, Files On-Demand may be off. Open the OneDrive settings and look under Sync and backup > Advanced settings. You also need to be signed in to OneDrive for the option to appear.
Using Keyboard Shortcuts
Keyboard shortcuts speed up the deletion process. Select the file or files in File Explorer first, then use one of these:
- Delete: Sends the file to the Recycle Bin.
- Shift + Delete: Deletes the file permanently, skipping the Recycle Bin.
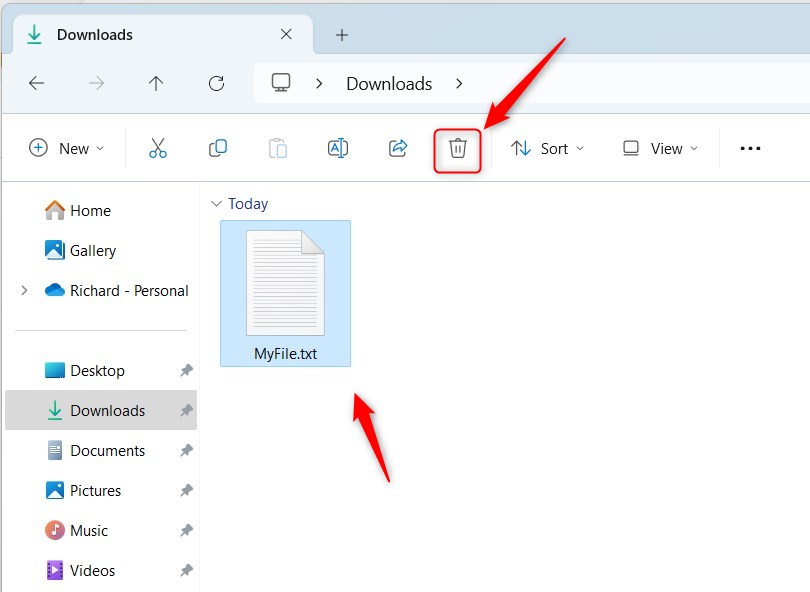
Using the File Explorer Command Bar
- Open File Explorer.
- Select the file you want to remove.
- Click the Delete button in the top menu.
- Hold the SHIFT key while clicking Delete to remove the file permanently.
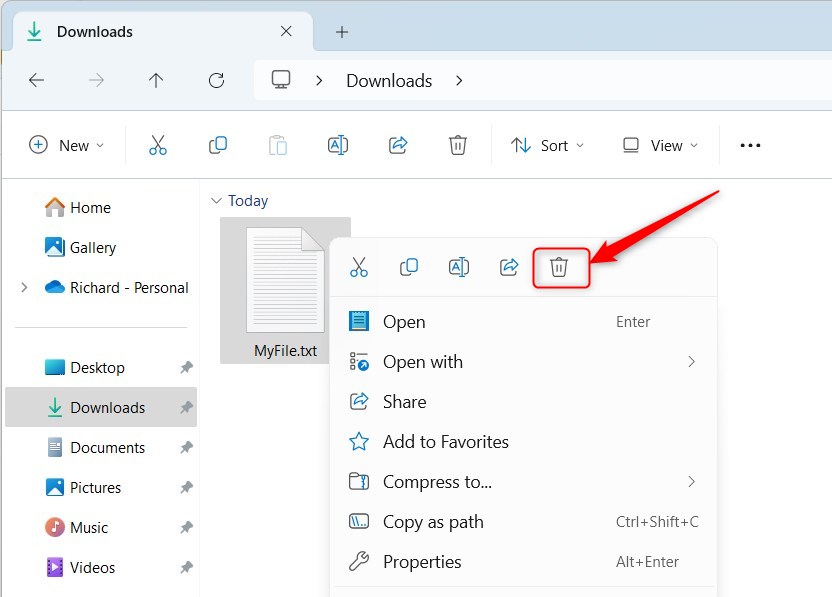
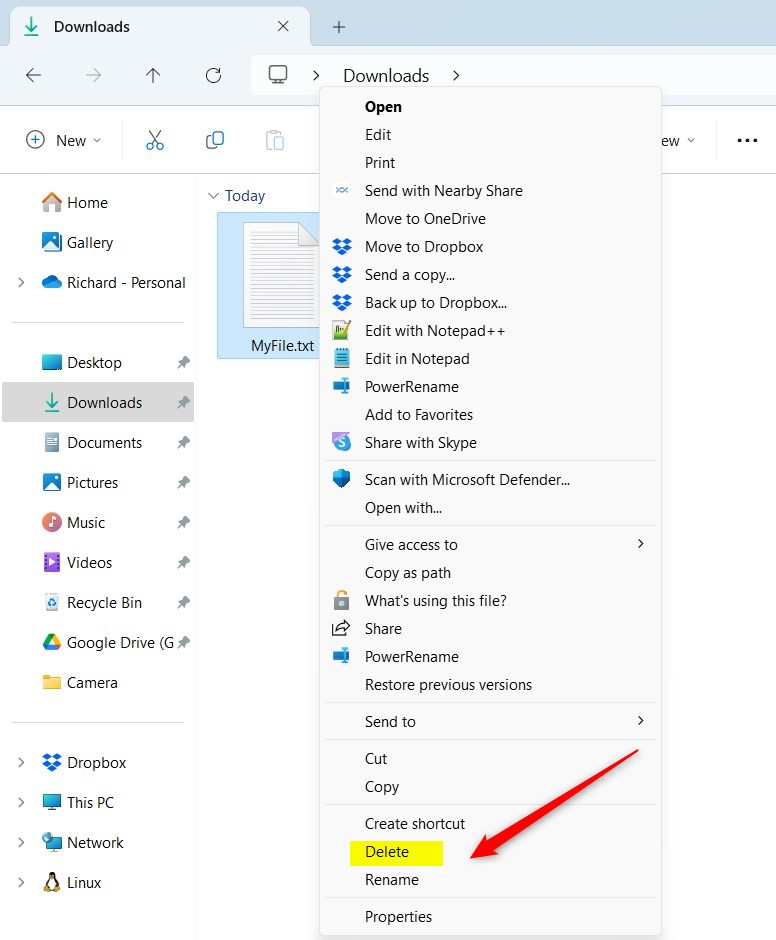
Using the File Explorer Context Menu
- Open File Explorer.
- Right-click the file.
- Select the Delete icon in the menu.
- If you don't see it, click Show more options to see the full menu.
- Tip: Hold SHIFT while right-clicking to open the full menu immediately.
Using PowerShell (Admin Privileges Required)
ADMINISTRATOR PERMISSIONS REQUIRED - You need an administrator account for this method. A standard account can't open an elevated window.
- Right-click the Start button.
- Select Terminal (Admin). Windows asks whether you want to allow the app to make changes to your device.
- Click Yes. Windows Terminal opens with administrative rights.
- To delete a file permanently without sending it to the Recycle Bin, run this command:
Remove-Item -Path "C:\Users\GenericUser\Downloads\MyFile.txt" -Force
Check the file path before you press Enter. The file does not go to the Recycle Bin, so you can't restore it from there.
Using Command Prompt (Admin Privileges Required)
ADMINISTRATOR PERMISSIONS REQUIRED - This method also needs an elevated window.
- Open Windows Terminal with administrative rights. Use the same right-click Start method as above, or search for it and choose Run as administrator.
- To wipe a file from the drive entirely, execute this command:
del /f /s /q /a "C:\Users\GenericUser\Downloads\MyFile.txt"
Take your time with this one. It is not a normal delete, and you can't undo it.
Summary
File management remains a core computer skill. Deleting files frees up disk space and keeps systems organized. The Recycle Bin provides safety, while Shift + Delete offers permanent removal. Permanent deletion requires caution since recovery demands specialized tools. If you are not sure about a file, send it to the Recycle Bin first and empty the bin once you're confident nothing in it is needed.
Have a question about this guide?
Answered by AI from this guide. Good questions may be added to this page — please don't include personal details.
Did this guide fix your problem?

About the Author
Richard
Tech Writer, IT Professional
Richard is a writer at Geek Rewind who turns complex IT tasks into clear, step-by-step guides. He draws on years of hands-on experience in system administration and enterprise IT operations, focusing on Windows, Linux and WordPress: the problems people actually run into, and the fixes that work. His server and WordPress guides come from systems he runs himself. Richard builds and maintains the platform behind Geek Rewind, from its Ubuntu servers and Nginx configuration to its custom WordPress plugins. Many new tutorials start with readers' questions, and he's always glad to answer them in the comments.
No comments yet — be the first to share your thoughts!