How to Clear the Recycle Bin Automatically in Windows 11 Storage Settings

Storage Sense is a built-in Windows 11 tool that cleans up junk files automatically. It can delete files from the Recycle Bin on a schedule you set. Left alone, deleted items stay in the Recycle Bin and keep using disk space until you empty it by hand.
You can turn this on in the Settings app so Windows empties the bin of items older than 1, 14, 30, or 60 days. This guide also covers emptying the bin manually, forcing it empty from Command Prompt or PowerShell, and what to try when the bin misbehaves.
Right-click the Recycle Bin icon on your desktop and select Empty Recycle Bin, then confirm deletion. To automate this, open Settings System Storage, turn on Storage Sense, click it to open configuration, and set Delete files in my recycle bin if they have been there for over to your preferred timeframe like 30 days.
How to Empty the Recycle Bin Manually
Emptying the Recycle Bin by hand is the fastest way to get disk space back, because you don’t have to wait for a schedule. You can do it from the desktop icon or from inside the Recycle Bin window.
Windows does not keep a second copy, so check the contents first if you are not sure what is in there.
- Find the Recycle Bin icon on your desktop. If you can’t see it, you can turn it back on under Settings Personalization Themes Desktop icon settings.
- Right-click the icon. A context menu opens. On Windows 11 you may need to pick Show more options first, depending on your build.
- Select Empty Recycle Bin .
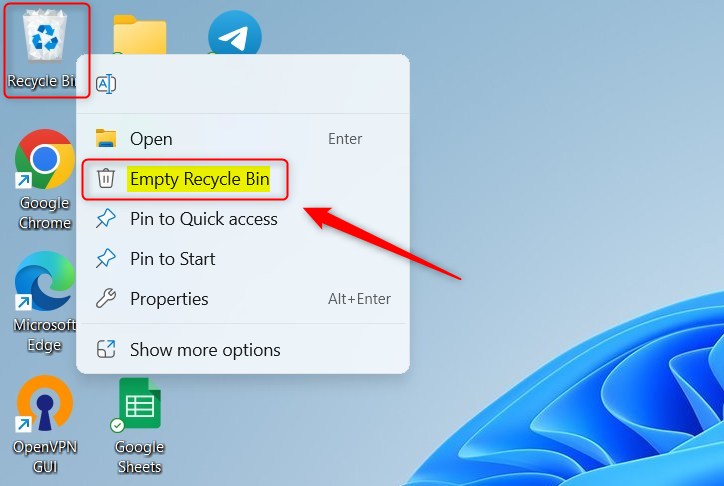
- Click Yes on the confirmation prompt. The icon changes from a full bin to an empty one, which tells you the files are gone.
You can also double-click the icon to open the Recycle Bin , click Empty Recycle Bin on the command bar at the top of the window, and confirm the deletion. This route lets you look through the files before you delete them. If the button is greyed out, the bin is already empty.
Automate Cleanup Using Storage Sense
Storage Sense can empty your Recycle Bin on a schedule so you never have to think about it. You turn it on in the Settings app, then tell Windows how long a file may sit in the bin before it is deleted. The options are Never, 1 day, 14 days, 30 days, and 60 days.
This works the same on Windows 11 Home and Pro. Exact label wording can differ slightly between builds, so match what you see on screen to the names below.
- Open Settings (press the Windows key plus I).

Windows 11 Start menu with Settings gear icon highlighted. - Select System, then click Storage. You will see a bar showing how much of your drive is used.
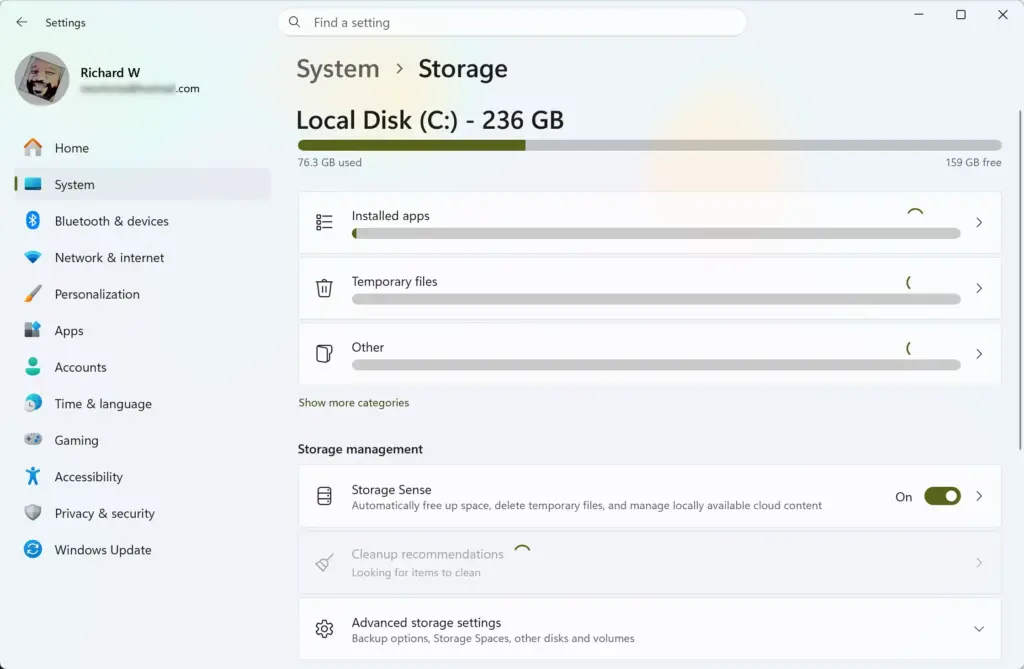
Settings › System › Storage - Switch the Storage Sense toggle to On. On some builds the toggle is labelled Automatic User content cleanup inside the Storage Sense page. The Recycle Bin setting only takes effect when it is on.
- Click Storage Sense itself, not just the toggle, to open its configuration page.
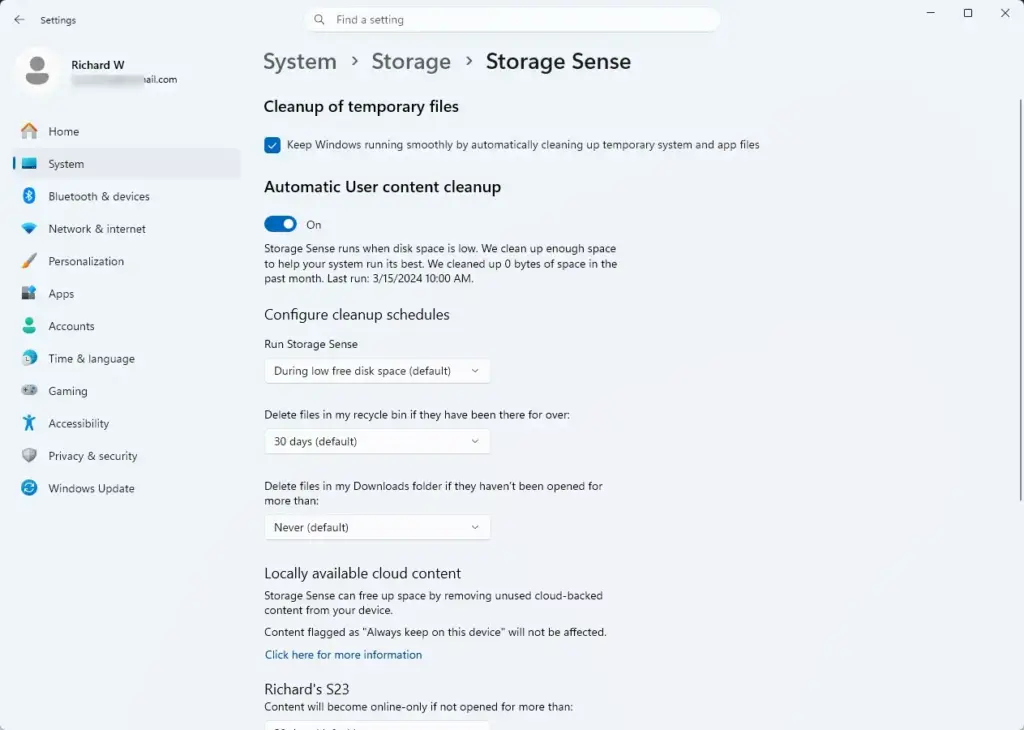
Settings › Storage › Storage Sense - Find the section for temporary files and cleanup schedules. Depending on your build it is labelled Temporary Files or Cleanup of temporary files, with the schedule options under Configure cleanup schedules.
- Open the dropdown for Delete files in my recycle bin if they have been there for over and choose a period, such as 30 days. The dropdown now shows your choice.
The Run Storage Sense dropdown on the same page controls how often Storage Sense itself runs, for example every day, week, or month, or only when disk space is low. The Recycle Bin age is a separate setting. If you want an item removed sooner than the schedule allows, empty the bin manually.
To undo this, set the Recycle Bin dropdown back to Never, or switch Storage Sense to Off. No restart is needed. Storage Sense also removes other temporary files, so check the other checkboxes on the page before you leave it running.
Use Command Prompt to Clear the Bin
You run one administrator-level command that purges the hidden system folder where deleted items are stored. This can clear files that refuse to delete normally.
As with every method here, the deletion is permanent.
- Open the Start menu and type
cmd. - Right-click Command Prompt and select Run as administrator. This requires administrator privileges. Click Yes if User Account Control asks for permission. A black window opens with a path ending in System32.
- Type the following command and press Enter:
rd /s /q C:\$Recycle.Bin - Wait for the prompt to return, which means the operation has completed, then close the Command Prompt window.
If you see an error, make sure the window was opened as administrator. Then check that the command was typed exactly as shown.
Use PowerShell to Clear the Bin
PowerShell gives you another command-line way to force the Recycle Bin empty without using the graphical interface. It is useful if you prefer PowerShell, or if the Command Prompt method gives you trouble.
- Open the Start menu and type
powershell. - Right-click Windows PowerShell and select Run as administrator. This requires administrator privileges. Click Yes on the User Account Control prompt. A blue window opens.
- Type the following cmdlet and press Enter:
Clear-RecycleBin -Force -ErrorAction SilentlyContinue - Respond to any confirmation prompt PowerShell shows. When the prompt returns, the bin is empty. Close the PowerShell window.
Troubleshooting: When the Bin Gets Stuck
A stuck Recycle Bin usually means a corrupted file index or a background process is locking the folder. Typical signs are a window that freezes, error messages during cleanup, or a bin that still shows a full icon after you empty it. Administrator tools help because they skip the stuck interface and delete the files directly.
- Open Command Prompt or PowerShell as administrator, as described in the two previous sections.
- Run the cleanup command from that section and wait for it to finish.
- Restart your computer. The restart releases any process that was still holding the folder.
- Open the Recycle Bin again and check that it is empty and that the icon shows as empty.
If a single corrupted file makes the whole window hang, the command-line purge gets around the problem. It bypasses the graphical shell entirely and deletes the underlying folder structure.
If this didn't work
If deleted files keep coming back, or the bin refills on its own, the usual causes are third-party antivirus software or corrupted system files interfering with Windows. The fix is to check your security software for aggressive file monitoring, then run system repair tools to restore normal behavior.
- Open your antivirus program and look for real-time file monitoring, quarantine, or "protect deleted files" options. Relax or turn off any that touch the Recycle Bin. Alternatively, test by temporarily pausing the protection, then turn it back on afterward.
- Run a full scan with Windows Security (under Virus & threat protection) to rule out malware.
- Run Windows' built-in system file repair tools to fix corrupted system files.
- Restart the PC, then empty the Recycle Bin again using the steps earlier in this guide.
If the problem returns right after you re-enable your security software, that software is the likely cause. Check its settings or contact its vendor.
Frequently asked questions
Should you empty the Recycle Bin on your computer?
Yes. The Recycle Bin holds deleted files and takes up disk space until you empty it. Clearing it regularly frees up storage. You can do this manually whenever you want, or use Storage Sense to empty it automatically on a schedule you choose—every 1, 14, 30, or 60 days.
Why can't I empty my Recycle Bin on 🪟 Windows 11?
Files in the Recycle Bin may be locked by open programs, or you may not have permission to delete them. Close any open files and programs first. If a file belongs to another user account, switch to that account to delete it. Restart your computer if the problem persists.
Why can't I empty the Recycle Bin?
A file might be in use by Windows or a running program. Close all open applications and try again. If it's a system file you don't recognize, leave it alone. You can also restart your computer to clear any locks on files, then empty the Recycle Bin.
Why can't I delete files from my Recycle Bin?
Files stay locked if programs are still using them. Close all applications and windows, then try again. Right-click the Recycle Bin and select Empty Recycle Bin. If one file blocks the whole bin, restart Windows and try again. Some system files can't be deleted intentionally.
Still have a question?
Answered by AI from this guide. Good questions may be added to this page — please don't include personal details.
Did this guide fix your problem?

About the Author
Richard
Tech Writer, IT Professional
Richard is a writer at Geek Rewind who turns complex IT tasks into clear, step-by-step guides. He draws on years of hands-on experience in system administration and enterprise IT operations, focusing on Windows, Linux and WordPress: the problems people actually run into, and the fixes that work. His server and WordPress guides come from systems he runs himself. Richard builds and maintains the platform behind Geek Rewind, from its Ubuntu servers and Nginx configuration to its custom WordPress plugins. Many new tutorials start with readers' questions, and he's always glad to answer them in the comments.
No comments yet — be the first to share your thoughts!