How to Clear Temporary Files Using Storage Sense in Windows 11

Storage Sense (a built-in Windows tool that deletes unneeded data to free up disk space) cleans out leftover application caches, old update logs, and error reports that clutter your primary drive. Left unchecked, these hidden temporary files build up over time and trigger low storage warnings on Windows 11 PCs.
Deleting system files by hand risks breaking your apps or removing vital operating system components. Turning on Storage Sense safely removes old temporary files, previous Windows installations, and items sitting in your Recycle Bin without harming your data.
Open Settings , go to System Storage, find Storage Sense under Storage management, and toggle it on. Click Storage Sense to set how often it runs—Weekly or During low disk space work for most users. Windows then automatically deletes temporary files, update logs, and old installation data without restarting.
How to Open Settings in 🪟 Windows 11
Settings is where Storage Sense lives, so start there. The quickest way in is the keyboard shortcut, which works from almost anywhere in Windows 11. If you prefer the mouse, the Start menu route works just as well.
- Press Win+I on your keyboard to open Settings (the central configuration app for Windows features and preferences). The Settings window opens with the left sidebar showing categories such as System, Bluetooth & devices and Network & internet.

Windows 11 Start menu with Settings gear icon highlighted. - If you would rather use the mouse, click the Start button on your taskbar and select the gear-shaped Settings icon. If you do not see it, click All apps and look for Settings in the list.
Navigating to Storage Settings
The Storage page shows how your disk is being used. It is worth a quick look before you change anything, because it tells you where the space is actually going. Temporary files are often only a small part of it.
- Make sure the System tab is selected in the left-hand sidebar of the Settings window.
- Click Storage in the main pane. Windows takes a few seconds to scan the drive, then shows a bar and a category list covering apps, temporary files, documents, and other media.
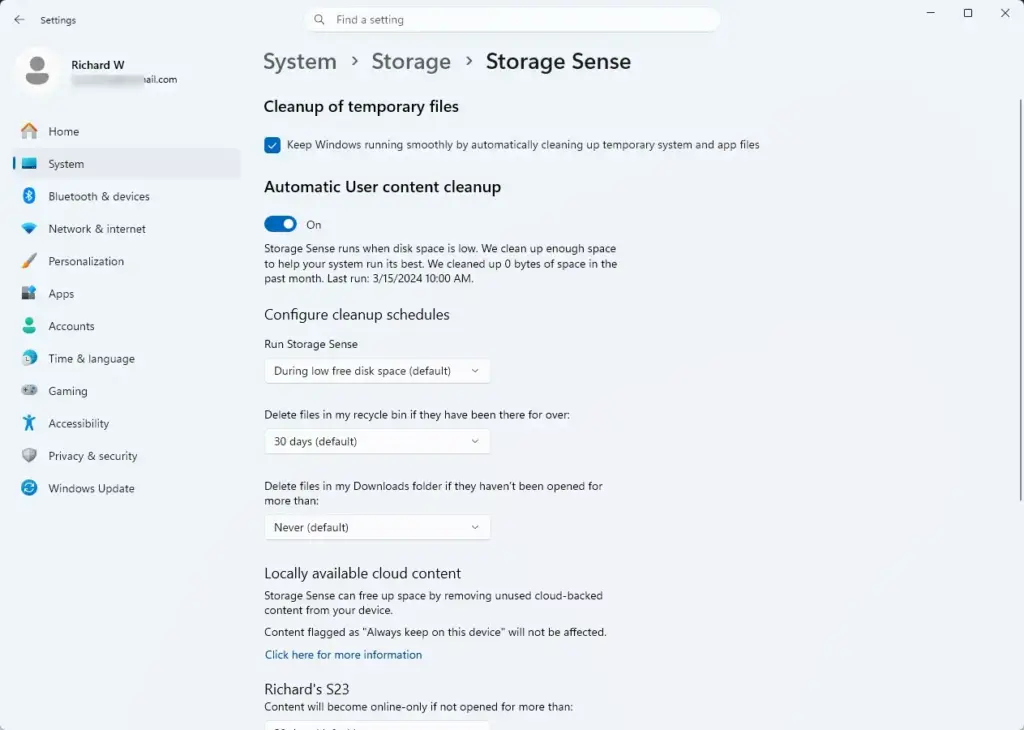
Settings › Storage › Storage Sense - Note the size next to Temporary files. If it is only a few hundred megabytes, Storage Sense will not free much, and the real space is elsewhere in the list.
Enabling and Configuring Storage Sense
Storage Sense runs in the background and removes temporary system and app files on a schedule, so you do not have to remember to clean the drive by hand. Turning it on takes under a minute. On a PC managed by an employer or school, these options may be greyed out or locked by policy. If that happens, ask your IT administrator.
- On the Storage page, find the Storage Sense toggle under the Storage management section. You may need to scroll down.
- Click the toggle switch to turn it from Off to On.
- Click the Storage Sense text row (not the toggle) to open its detailed scheduling and cleanup rules. A new page opens with the cleanup options.
- Check the box next to Keep Windows running smoothly by automatically cleaning up temporary system and app files if it is not already selected.
- Open the Run Storage Sense drop-down menu and choose how often Windows should run the cleanup. The options are During low free disk space, Every day, Every week, and Every month. For most people, Every week or During low free disk space is enough.
No restart is needed in either direction. Note that files Storage Sense has already deleted cannot be brought back.
Cleaning Temporary Files Manualy
If your drive is nearly full, you do not have to wait for the schedule. You can clear temporary files manually from the Storage page. Windows scans first and lets you pick exactly what to remove.
- Return to the main Storage settings page by clicking the back arrow at the top left of the window.
- Click Temporary files. Wait a few moments while Windows calculates the size of your update logs, thumbnail caches, and other temporary files. When the scan finishes, you will see a categorized list with a size beside each item.
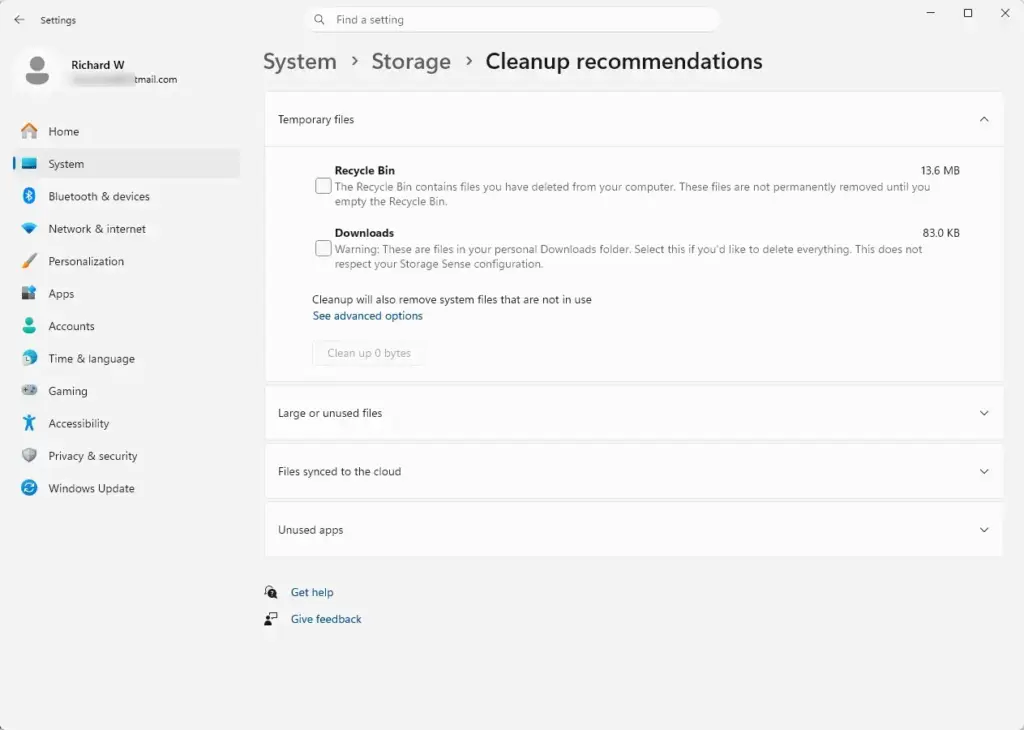
Settings › Storage › Cleanup recommendations - Review the list and check the boxes next to the items you want to remove, such as Windows Update Cleanup, Previous Windows installation(s), and Delivery Optimization Files. Items such as the previous Windows installation only appear if Windows has them on disk.
- Read the description under each category before ticking it. Be careful with Downloads if it appears in the list, because that is your personal Downloads folder, not a cache.
- Click the Remove files button at the top or bottom of the list, then confirm if Windows asks. The selected data is deleted right away, and the total at the top of the list drops.
Windows removes that folder on its own after a set period following an upgrade, so only clear it manually if you are sure you will not go back. Likewise, removing Windows Update Cleanup files means you cannot uninstall the updates they belong to.
Configuring Automatic Cleanup for the Recycle Bin and Downloads Folder
Storage Sense can also empty the Recycle Bin and clear out your Downloads folder automatically. This is useful for forgotten files that pile up over months. Be careful with these settings, because files deleted this way do not come back.
- Go back to the Storage Sense configuration page by clicking the Storage Sense row on the Storage page.
- Find the section that holds the Recycle Bin and Downloads options. Depending on your Windows 11 build, it may be labelled Cleanup of recommendations or Files. On recent builds, you may also need to turn on the Automatic User content cleanup toggle at the top of the page before these drop-downs become available.
- Open the drop-down under Delete files in my recycle bin if they have been there for over and choose a retention period such as 14 days, 30 days, or 60 days. Never switches this cleanup off.
- Open the drop-down under Delete files in my Downloads folder if they haven't been opened for over and choose a period. This clears out old installers and documents you no longer need. Leave it on Never if you keep important files in Downloads.
Windows 11 does not send files cleared from Downloads to the Recycle Bin, so check that folder for anything you want to keep before you pick a short period.
Advanced Storage Management: Using Disk Cleanup as a Backup
Disk Cleanup is the older utility that Storage Sense is replacing. It still works in Windows 11. It is useful if the Settings page will not load or fails to free space, or if you simply prefer its layout.
- Click the Start button, type Disk Cleanup into the search bar, and select the application from the search results.
- Select your primary operating system drive (usually C:) from the drop-down menu and click OK. Windows scans the drive and shows a list of file types with checkboxes.
- Click the Clean up system files button. This requires administrator privileges, so approve the User Account Control prompt if one appears. Select the drive again if asked, and wait for the second scan to finish.
- Check the boxes next to the file types you want to purge, and click OK. Click Delete Files in the confirmation box to finish.
Microsoft keeps Disk Cleanup for compatibility but no longer develops it, so its list can be shorter than the one on the Settings page.
Troubleshooting Storage Sense Not Freeing Up Space
If Storage Sense runs but your free space barely changes, the usual reason is that some temporary files are locked. Active background processes, open apps, or pending system updates can all hold files open, and Windows cannot delete a file that is in use. Work through these steps in order.
- Restart your computer to release file locks held by background applications and services. Then run the cleanup again.
- Run Windows Update and install anything pending, then restart again. Pending installation files often block temporary cleanup routines.
- Check for third-party antivirus software that might be intercepting file deletion and quarantining the cleanup process. Temporarily pause its real-time protection, run the cleanup, and turn it back on straight after.
- Verify that your user account has administrator privileges if you are trying to clear system-level temporary files and the Windows.old folder. A standard account will not be able to remove them.
If this didn't work
If Storage Sense still does not free up much space, the problem is probably not temporary files at all. Go back to the storage breakdown on the Storage page and look for the biggest categories. Large media libraries, unused games, and old apps are the usual culprits. System Restore can also take a lot of space through hidden shadow copies.
Move large personal files, such as videos, photo collections, and game installers, to an external drive or a cloud storage provider. Uninstall games and apps you no longer use. Doing this takes pressure off your main operating system partition far more than any temporary file cleanup will.
Is TSA PreCheck better than CLEAR?
TSA PreCheck and CLEAR serve different purposes. TSA PreCheck speeds up security screening at airport checkpoints. CLEAR uses biometric scanning to skip the ID verification line entirely. CLEAR is faster but costs more. Many travelers use both together for the quickest airport experience.
My CLEAR app isn't working. What should I do?
Try closing and reopening the CLEAR app first. Check that your phone has a strong internet connection and enough storage space. Update the app through your device's app store. If it still fails, uninstall and reinstall it. Contact CLEAR support if the problem persists.
Can I use TSA PreCheck through CLEAR?
No. TSA PreCheck and CLEAR are separate programs with different enrollment processes. You can use both at the same airport visit—CLEAR gets you through ID verification faster, then TSA PreCheck speeds up the security screening itself. Each requires its own membership and fee.
Do I still have CLEAR?
Check your CLEAR account status by opening the app or visiting their website and logging in. Your membership may have expired if you haven't renewed it. If you canceled it previously, you'll need to re-enroll and pay the membership fee to use it again.
Have a question about this guide?
Answered by AI from this guide. Good questions may be added to this page — please don't include personal details.
Did this guide fix your problem?

About the Author
Richard
Tech Writer, IT Professional
Richard is a writer at Geek Rewind who turns complex IT tasks into clear, step-by-step guides. He draws on years of hands-on experience in system administration and enterprise IT operations, focusing on Windows, Linux and WordPress: the problems people actually run into, and the fixes that work. His server and WordPress guides come from systems he runs himself. Richard builds and maintains the platform behind Geek Rewind, from its Ubuntu servers and Nginx configuration to its custom WordPress plugins. Many new tutorials start with readers' questions, and he's always glad to answer them in the comments.
No comments yet — be the first to share your thoughts!