How to Use Windows 11 Disk Cleanup and Storage Sense

Windows 11 Disk Cleanup and Storage Sense are two built-in tools that delete unneeded files to free up hard drive space on your PC. Disk Cleanup scans a drive and lets you clear out old temporary files by hand, one category at a time. Storage Sense runs in the background and removes junk on a schedule, or when the drive gets too full.
Smaller solid-state drives (SSDs, which store your files on memory chips instead of spinning disks) fill up fast, and these tools can win back several gigabytes in a few minutes. You open Disk Cleanup by searching for it in the Start menu . You find Storage Sense in the Settings app under System Storage. Both tools work the same way on Windows 11 Home and Pro.
Search for “Disk Cleanup” to remove temporary files. Enable “Storage Sense” in Settings System Storage for automatic cleanup. These tools free up disk space to improve performance.
Why Free Up Disk Space?
A full hard drive makes your computer run slowly, stops important system updates from installing , and blocks new downloads. Windows also needs free space for its page file and for temporary files while it works, so a drive that is nearly full hurts everything you do. Running Windows 11 disk cleanup regularly clears out old junk so your PC keeps enough room to run quickly and securely, without sudden slowdowns or low-storage warnings. As a rough rule, try to keep 10 to 15 percent of the drive free.
- Run slowly and take longer to open apps, because Windows has little room for temporary files and virtual memory.
- Have trouble installing important updates or new programs, since feature updates in particular need several gigabytes of free space.
- Make it harder to save new files or photos, or fail partway through a download.
Keeping free space on a drive helps a computer work faster and stay secure. It also means updates, which often include security fixes, can install without trouble.
How to Use the Disk Cleanup Tool
Windows 11 disk cleanup finds and deletes leftover temporary files, system caches, and installation logs that waste space. You open it from the Start menu , choose the drive to scan, and tick the boxes next to the file types you want to remove. It works on one drive at a time, so repeat the process for any other drive you want to clean.
Follow these steps:
- Click the Start button. It's the Windows logo at the bottom of the screen (at the left, or in the center if you use the default taskbar layout). The Start menu opens.
- Type
disk cleanupin the search box. Results appear as you type. - Click the Disk Cleanup app in the results. If it doesn't appear, check that you typed the name correctly and that it is listed under Best match.
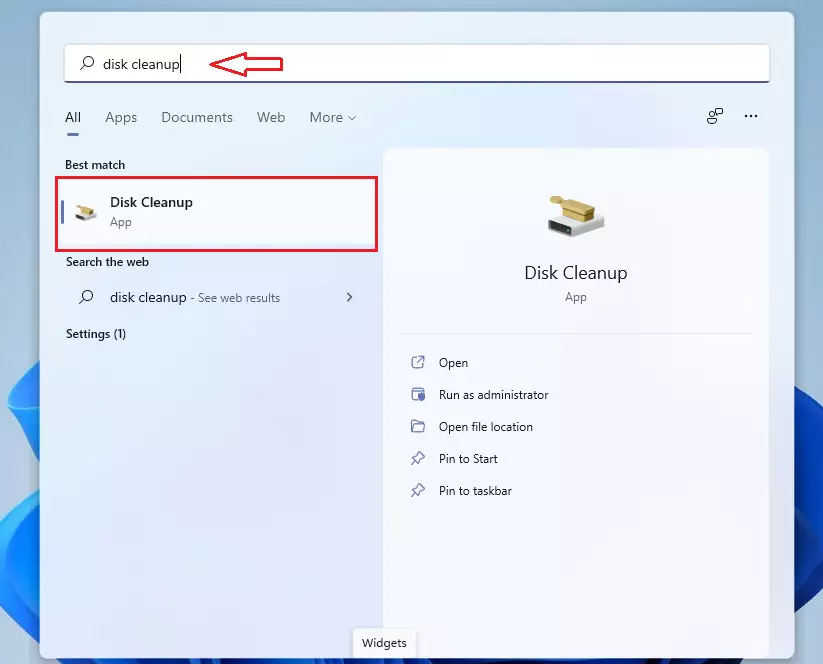
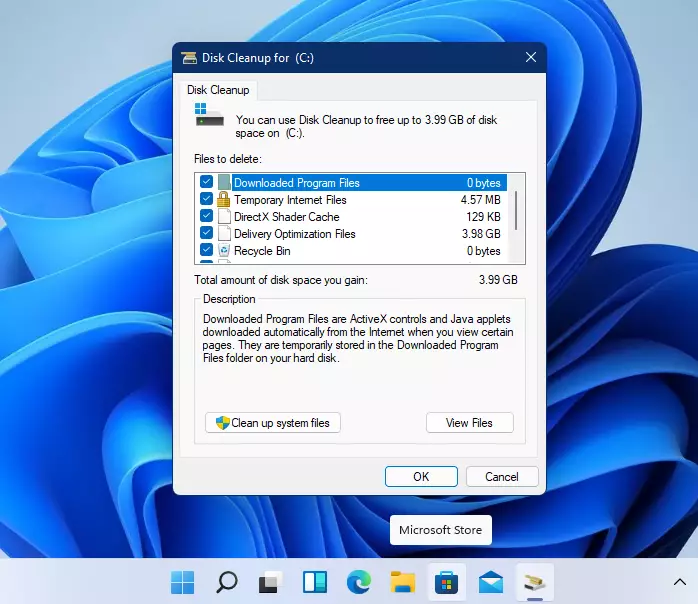
If a small Drive Selection box appears first, leave the drive set to C: (the drive Windows is installed on) or pick another one, then click OK. Disk Cleanup scans for a short while, and then a window opens with different categories of removable files. Common ones include:
- Temporary Internet Files (copies of web pages saved to speed up browsing)
- Downloaded Program Files (small add-on files that some websites and apps leave behind)
- Thumbnails (small pictures of your files)
- Tick the boxes next to the files you want to remove. Click a category to read a short description under the list. The size shown beside each one tells you how much space you would recover. Items such as the Recycle Bin are also listed, so check it holds nothing you still need before you tick it.
- To reclaim more space, click Clean up system files. Windows asks for administrator permission, so approve the prompt or enter an admin password if you use a standard account. Disk Cleanup then rescans and shows extra system categories, such as Windows Update Cleanup or Previous Windows installation(s). Tick the ones you want. Be careful with Previous Windows installation(s): deleting it removes your ability to roll back to the earlier version of Windows.
- Click OK. A box asks whether you are sure you want to permanently delete these files.
- Select Delete files to start the cleanup. A progress window appears. System file cleanup can take several minutes.
The utility clears the selected data from the computer, and the progress window closes when it finishes. There is no undo for deleted files, so only tick what you are sure about. To see how much space you gained, open Settings System Storage and look at the used and free figures for your drive.
How to Use Storage Sense to Clean Up Automatically
Storage Sense is a built-in Windows 11 feature that automatically deletes temporary system files, old downloads, and items in your Recycle Bin on a schedule you choose. Turn it on in the Settings app and you no longer have to clean the drive by hand every time space runs low. It is available on both Home and Pro. On a work or school PC, some options may be greyed out because your organization manages them.
Configure the feature using these steps:
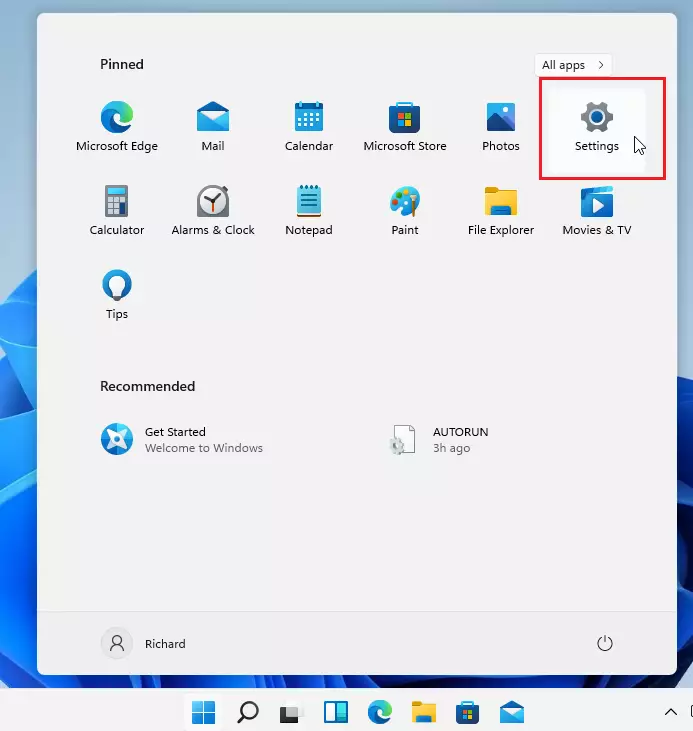
- Click the Start button, then select Settings. It looks like a gear icon. The Settings window opens. If you don't see the gear, click All apps and find Settings in the list.
- Go to System Storage You should see a bar showing how full your drive is, with a breakdown by file type below it.
- Turn on Storage Sense by clicking the switch. Depending on your Windows 11 version, the switch is either on the Storage page itself or inside the Storage Sense page, where it may be labelled Automatic User content cleanup. The switch should now read On.
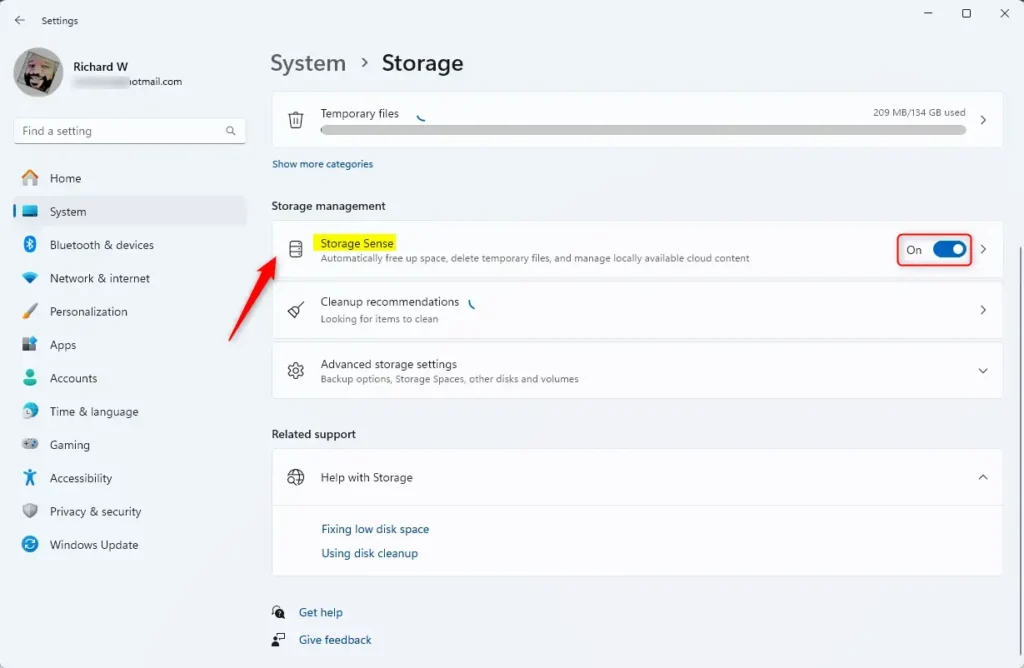
- Click the Storage Sense tile to see more settings. Here you choose how often Storage Sense runs: every day, every week, every month, or only when disk space is low. You also decide what kind of files it removes. You can set it to delete Recycle Bin items and Downloads folder files after a set number of days, such as 1, 14, 30 or 60, or choose Never. Be careful with the Downloads setting, because files removed this way are deleted and do not go to the Recycle Bin. To turn the feature off later, return to this page and switch it to Off. Click Run Storage Sense now if you want it to clean up right away.
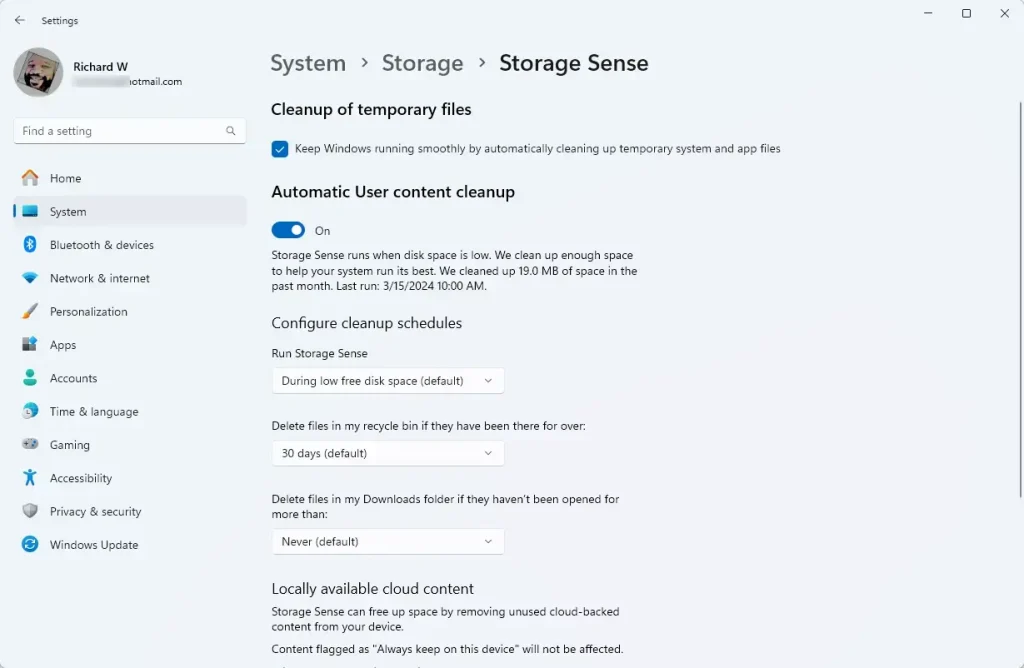
The default configuration suits most users and lets Windows handle the cleanup on its own. A restart is not needed for any of these settings. Change the Recycle Bin and Downloads options only if you know you want files removed sooner.
Summary
- Running low on disk space can slow your computer and cause update problems.
- Use Disk Cleanup to quickly remove old files you don't need, and use Clean up system files for extra space.
- Turn on Storage Sense to keep your disk clean automatically.
- Check your disk space regularly in Settings System Storage to keep your computer running fast and smooth.
Keeping your PC running fast means managing your storage with tools like Windows 11 disk cleanup and Storage Sense. Clear out junk files now and then, turn on Storage Sense, and make sure your drive always has enough free room to work properly. That helps you avoid slow performance and failed updates.
Did this guide fix your problem?

About the Author
Richard
Tech Writer, IT Professional
Richard is a writer at Geek Rewind who turns complex IT tasks into clear, step-by-step guides. He draws on years of hands-on experience in system administration and enterprise IT operations, focusing on Windows, Linux and WordPress: the problems people actually run into, and the fixes that work. His server and WordPress guides come from systems he runs himself. Richard builds and maintains the platform behind Geek Rewind, from its Ubuntu servers and Nginx configuration to its custom WordPress plugins. Many new tutorials start with readers' questions, and he's always glad to answer them in the comments.
No comments yet — be the first to share your thoughts!