How to Use Disk Cleanup in Windows 11

- 14 steps
- Needs administrator rights
- Includes a restart or sign-out
Disk Cleanup in Windows 11 is a built-in tool that deletes temporary files, cached data, and leftover update files to free up storage space. The quickest way to run it is to search for Disk Cleanup in the Start menu, choose your drive, tick the file types to remove, and click OK.
The tool is a classic desktop app (its program file is cleanmgr.exe) and it still ships with Windows 11, in both Home and Pro editions. Microsoft now steers people toward the Storage page in Settings, but Disk Cleanup remains the more detailed option, especially for old Windows Update files and the previous Windows installation.
This guide covers the full process, what each item on the list does, which items are risky, and what to do when Disk Cleanup is missing or frees almost nothing.
Search for Disk Cleanup in the Start menu, open it, choose your drive (C:), tick the file types you want removed, and click OK. Windows deletes temporary files, cached data and leftover update files, usually within a few minutes, and shows how much space it freed. Your documents, pictures and installed apps are not touched.
What Disk Cleanup Removes (and What It Leaves Alone)
Disk Cleanup works on one drive at a time and only touches files Windows knows are disposable. It does not uninstall apps, delete your documents, or empty folders like Documents and Pictures. If a large video collection or game library is filling your drive, Disk Cleanup will not find it.
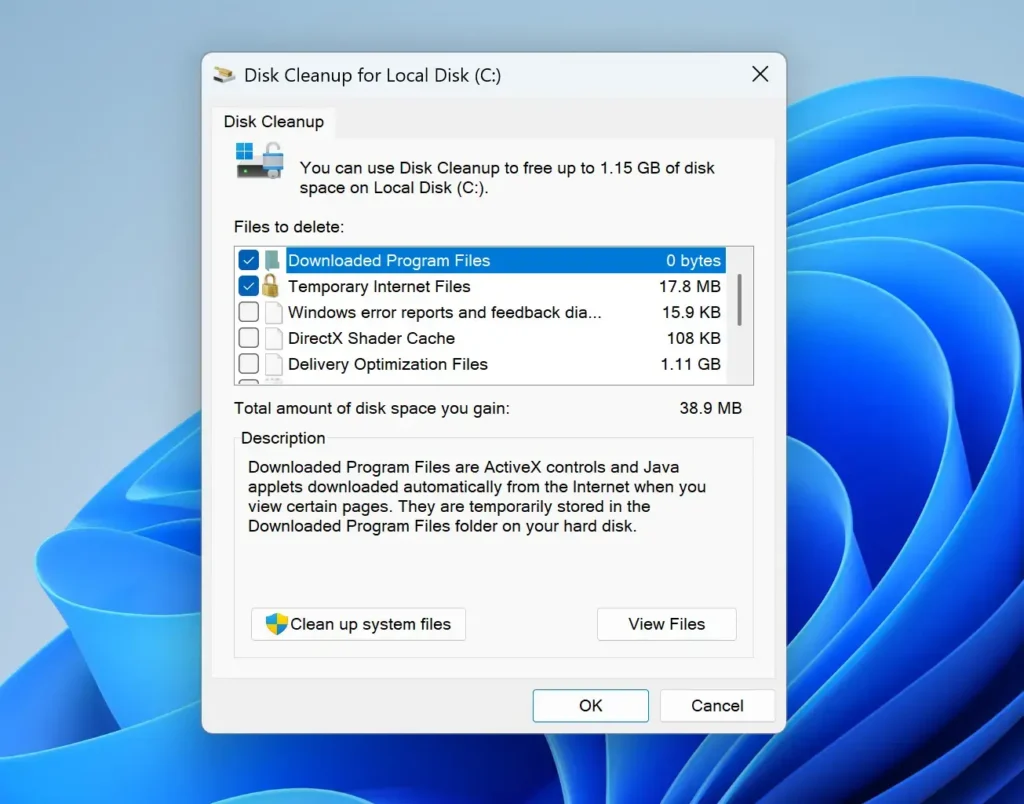
Your list may differ from this one, because it shows only the categories your PC has files for. Items with nothing to delete do not appear. These are the categories you will see most often:
- Downloaded Program Files: Small files that some older web components saved to your PC.
- Temporary Internet Files: The older Internet Explorer cache. Microsoft Edge and Google Chrome keep their own caches, which you clear from the browser’s settings.
- Recycle Bin: Files you already deleted. Clearing it here makes them permanent.
- Temporary files: Temporary files that apps leave behind in the Windows temp folders.
- Thumbnails: Saved previews of pictures and videos. Windows rebuilds them when you open a folder again.
- DirectX Shader Cache: Graphics data that games and apps save to load faster. Windows rebuilds it as needed.
Depending on your Windows 11 build, you may also see Downloads. This item covers everything in your Downloads folder. It is unchecked by default. Leave it unchecked unless you are sure nothing in that folder matters.
Before You Start
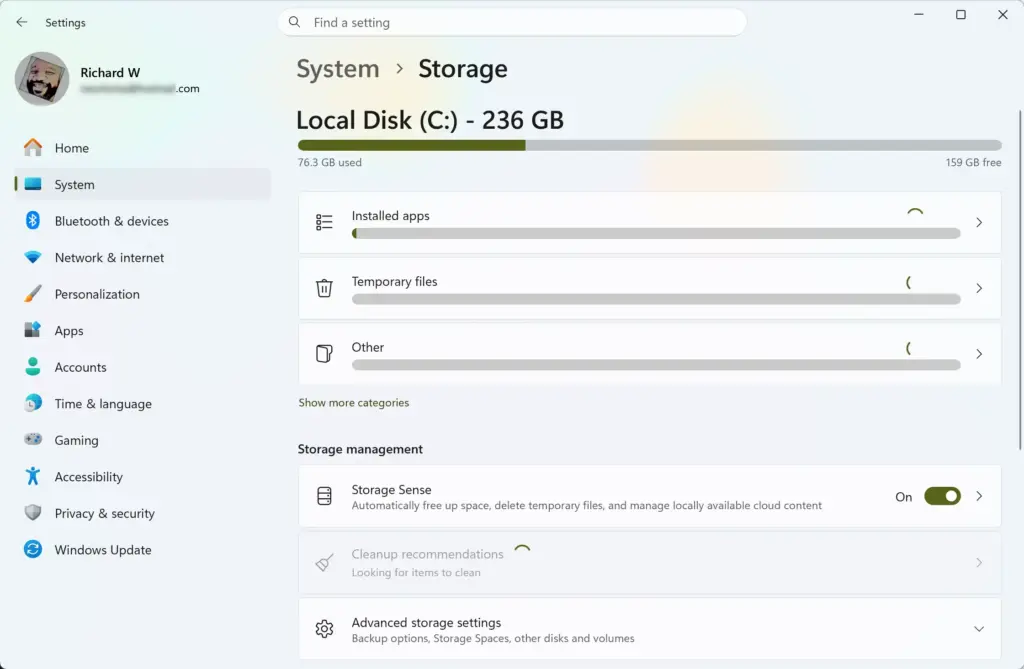
Check how much free space the drive has now, so you can measure the result. Open Settings System Storage and note the used and free figures for your main drive.
Close open apps, especially your browser and any installer or update window. Windows cannot delete a file while an app is using it. Close open apps first, so Disk Cleanup has more to remove.
The main list is safe to use from any user account, including a standard account. The Clean up system files option needs administrator rights, because it deletes protected Windows files. If you are signed in with a standard account, Windows asks for an administrator password at that point.
How to Use Disk Cleanup in 🪟 Windows 11: Step by Step
These steps run Disk Cleanup from start to finish, including the optional system files pass that removes old Windows Update files and the previous Windows installation.
- Search for Disk Cleanup. Click the Search box on the taskbar, or open the Start menu, and type Disk Cleanup. The Disk Cleanup app appears at the top of the results.
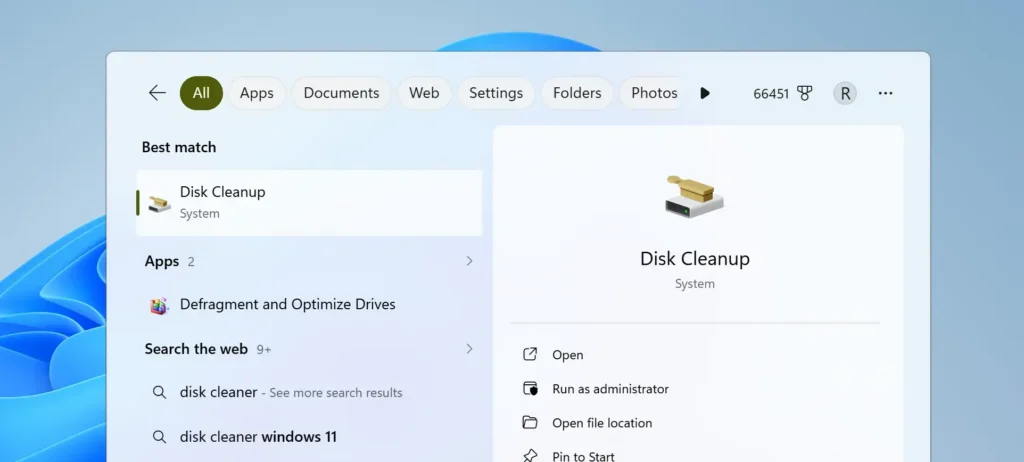
Start Menu - Open Disk Cleanup. Click Open beside the app name. If it does not appear in search, press Win+R, type cleanmgr, and press Enter.
- Choose the drive to clean. If your PC has more than one drive, a Disk Cleanup: Drive Selection window opens. Pick (C:), which is normally the Windows drive, and click OK. With a single drive, Windows skips this window.
- Wait for the scan to finish. A small window reads Disk Cleanup is calculating how much space you will be able to free on (C:). This takes anywhere from a few seconds to a couple of minutes.
- Review the Files to delete list. The Disk Cleanup for (C:) window opens on the Disk Cleanup tab. Each item has a checkbox and a size on the right.
- Tick the items you want to remove. Click an item to read its description in the Description box below the list. Click View Files to open the folder and see what is inside, where that button is available.
- Check the total at the top. The line Total amount of disk space you gain updates each time you tick or untick a box.
- Click Clean up system files. This button, at the bottom left, adds system-level items to the list. This step requires administrator privileges. Click Yes on the User Account Control prompt, or enter an administrator password. Skip this step and the next if you only want to clear the basic items.
- Choose the drive again if asked. Select (C:) and click OK. Disk Cleanup scans again, which takes longer than the first scan.
- Tick the system items you want. New entries such as Windows Update Cleanup, Delivery Optimization Files, Device driver packages, and Previous Windows installation(s) may appear. Read the risk notes in the next section before ticking them.
- Click OK. Windows asks Are you sure you want to permanently delete these files?
- Click Del Files. A progress window shows the cleanup running. It closes on its own when it finishes, with no completion message.
- Restart the PC if Windows asks. Cleanup of old update files sometimes completes during a restart. Otherwise, no restart is needed.
- Confirm the result. Open Settings System Storage and compare the free space with the figure you noted before you started.
Settings › System › Storage
Deleted items cannot be restored from Disk Cleanup. The Recycle Bin is not involved, and once you click Delete Files, the only way back is a backup. Before you click Delete Files, check the list of ticked items one more time.
Which Items Are Safe to Delete?
Most items are low risk because Windows recreates them when needed. A few are not, and you should know what you lose before you tick them.
Safe in almost every case
Temporary files, Thumbnails, DirectX Shader Cache, Delivery Optimization Files, and Temporary Internet Files are rebuilt or refilled automatically. The cost is small: folders full of pictures may take a moment longer to show previews, and a game may stutter briefly the first time it rebuilds its shader cache.
Delivery Optimization Files are update files Windows keeps so it can download or share them quickly. Removing them does not affect installed updates.
Check first before deleting
Recycle Bin is permanent. Open the Recycle Bin from the desktop and look inside first if you are not sure.
System error memory dump files hold crash details that Windows saves after a system error. Technicians use them to find the cause of the problem. Delete them unless you are troubleshooting a blue screen or sending the file to a support technician.
Device driver packages are older copies of drivers (the software that lets Windows talk to hardware). Removing them means you cannot roll back to a previous driver version. Skip this item if you recently updated a driver and are not sure it works.
Hard to undo
Previous Windows installation(s) is the Windows.old folder, which stores your earlier Windows setup after a major upgrade. It is often the largest item on the list, sometimes many gigabytes. It lets you go back to the earlier version of Windows for a limited time after an upgrade (Windows normally offers 10 days).
Deleting it ends that option. Tick it only when you are happy with the current version of Windows.
The item only appears after an upgrade, so a fresh install or an old, stable PC may not show it.
Use the More Options Tab
After you click Clean up system files, the window gains a second tab called More Options. It holds two shortcuts that can free large amounts of space, and both are one-way actions.
- Programs and Features: Click Clean up to open the list of installed programs, where you can uninstall apps you no longer use.
- System Restore and Shadow Copies (the saved copies of files that restore points rely on): Click Clean up to delete all restore points except the most recent one. Older restore points are gone permanently, which limits how far back you can roll your PC if something breaks. Do not use this when you are troubleshooting a problem.
Disk Cleanup asks you to confirm before it removes the restore points. Read the prompt before clicking Delete.
If Disk Cleanup Is Missing, Stuck, or Frees Very Little
These are the problems you are most likely to meet, and what each one means.
Disk Cleanup does not appear in search. Press Win+R, type cleanmgr, and press Enter. If that fails, open File Explorer and go to 📁C:\
If the file is missing, your Windows installation may be damaged. Use the Temporary files page in Settings System Storage instead, as it covers the same ground.
The Clean up system files button is missing. This happens when Disk Cleanup opens without administrator rights. Close the window and run it as an administrator, as described below. Search for Disk Cleanup again, right-click the result, and choose Run as administrator.
The scan takes a very long time. The system files scan checks update caches and old Windows files, so a few minutes is normal on a drive with many updates. Wait for it to finish rather than closing the window, since closing it mid-scan means starting over.
A small amount of space is freed. If the total is only a few hundred megabytes, the drive is probably full of your own files, apps, or games, not temporary data. Open Settings System Storage to see a breakdown by category, then work through those. The 10 ways to clean storage in Windows 11 guide covers them in order, and freeing up disk space with OneDrive helps if photos and documents are the main load.
The drive is full again within days. A drive that fills up again within days can point to a failing disk or an app that keeps writing data, rather than normal clutter. Run through checking hard disk drive health in Windows 11 to rule out hardware trouble.
Disk Cleanup vs Storage Sense
Storage Sense is the newer tool, built into Settings. It runs on a schedule, clears temporary files and Recycle Bin items automatically, and can manage OneDrive files that are stored locally. Disk Cleanup runs only when you open it and deletes only what you tick.
Use Disk Cleanup when you want to see exact sizes by category, remove old Windows Update files, or delete the previous Windows installation in one pass. Use Storage Sense when you want automatic upkeep. The two work well together, and the guide on using Windows 11 Disk Cleanup and Storage Sense shows how to set up both.
Disk Cleanup cleans files, not the layout of the drive. To see how the drive is divided into partitions, open Disk Management in Windows 11 instead. It also shows free space that no partition uses yet.
What to Do Next
Run Disk Cleanup again after the next major Windows update, since each update leaves behind new files that this tool can remove. If space is still tight after a full pass, open Settings System Storage and clear the largest categories listed there, or move large files to OneDrive or an external drive. Turn on Storage Sense if you want routine cleanup to happen without opening anything.
Have a question about this guide?
Answered by AI from this guide. Good questions may be added to this page — please don't include personal details.
Did this guide fix your problem?

About the Author
Richard
Tech Writer, IT Professional
Richard is a writer at Geek Rewind who turns complex IT tasks into clear, step-by-step guides. He draws on years of hands-on experience in system administration and enterprise IT operations, focusing on Windows, Linux and WordPress: the problems people actually run into, and the fixes that work. His server and WordPress guides come from systems he runs himself. Richard builds and maintains the platform behind Geek Rewind, from its Ubuntu servers and Nginx configuration to its custom WordPress plugins. Many new tutorials start with readers' questions, and he's always glad to answer them in the comments.
No comments yet — be the first to share your thoughts!