How to Turn On Storage Sense Temporary File Cleanup in Windows 11

Storage Sense is a built-in Windows 11 tool that finds and deletes junk files to free up disk space. It handles routine cleanup, such as old items in your Recycle Bin and temporary files left behind by apps and Windows itself.
Windows 11 can turn this feature on by itself when your drive runs low on free space. You can also set Storage Sense to run on a schedule, such as every week, so you don’t have to clean up by hand. This guide shows two ways to control its temporary file cleanup: the Group Policy Editor and the Registry Editor.
Open Settings System Storage, turn on Storage Sense, then enable the option to delete temporary files. On Windows 11 Pro and Enterprise, use Group Policy Editor to navigate Computer Configuration Administrative Templates System Storage Sense, double-click Allow Storage Sense Temporary Files cleanup, and select Enabled for automatic deletion.
What is Storage Sense?
Storage Sense frees up disk space by deleting files you no longer need. It targets temporary system files, old items in your Recycle Bin , and files sitting in your Downloads folder. Because it works in the background, you don’t have to hunt for junk files yourself.
- Deletes temporary files you don’t need, such as leftovers from apps and Windows updates
- Empties the Recycle Bin after a certain time, which you can set in its options
- Cleans files in your Downloads folder after a while. Check this setting before you use it, because files in Downloads are often ones you still want.
Storage Sense cleans up unused files automatically, so you don’t have to delete old downloads and temporary files by hand. That leaves more room for your programs and current data. It only touches the kinds of files listed above, not your documents or installed programs.
What happens when you turn it on? Storage Sense runs automatically when your disk space gets low and removes temporary files. If you also choose a schedule in its settings, it can run at regular intervals instead of waiting for low space.
On most PCs, Storage Sense is off by default, so temporary file cleanup does not run on its own. Windows may switch it on automatically if your drive gets low on space. You can activate it at any time to manage disk space by deleting unneeded files. You can also check or change it manually in Settings System Storage
Method 1Using Group Policy Editor
It is the cleaner method for managing automatic cleanup rules, but it is only included in Windows 11 Pro, Enterprise and Education. Windows 11 Home does not have it, so Home users should skip to the Registry Editor method further down.
A policy set here overrides the user's own choice. After you set it, the Storage Sense toggle in Settings may be greyed out or show a message that some settings are managed by your organization. That is expected.
- Click the Start button, type
Edit group policy, then press Enter. The Group Policy Editor window should open. If Windows says it can't find the file, you are on Home edition. - In the left pane of the window, expand the folders to follow this path:
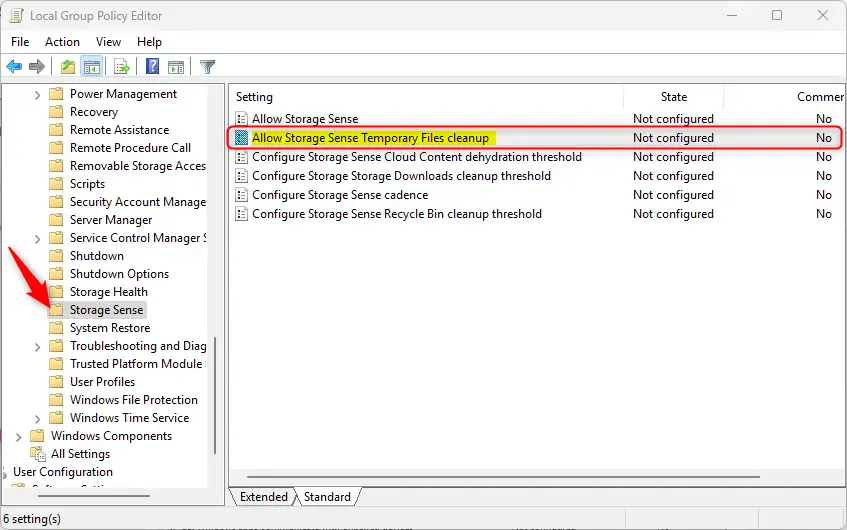
Computer Configuration > Administrative Templates > System > Storage Sense - In the right pane, find
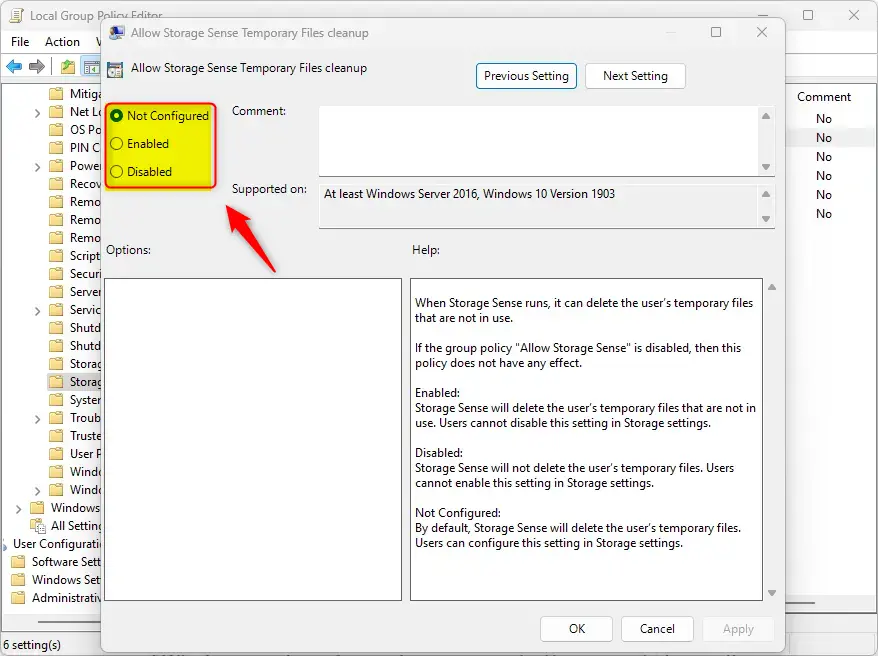
Allow Storage Sense Temporary Files cleanupand double-click it. A settings window for that policy should open. - Choose one of these options:
Not Configured– Leaves it as default (Storage Sense can be turned on or off by users)Enabled– Storage Sense will delete temporary files automatically and users won't be able to turn this offDisabled– Storage Sense won't delete temporary files and users can't turn it on
- Click
OKto save your changes. The policy window should close. - [REQUIRES ADMIN PRIVILEGES] Restart your computer to make sure the changes take effect. To undo the change later, open the same policy again and pick the default option from the list above.
Method 2Using Registry Editor
The Registry Editor is a tool for viewing and changing the database that stores low-level Windows settings. With it you can control temporary file cleanup by editing a registry value directly. This method works on every edition, including Windows 11 Home, which has no Group Policy Editor.
You need an administrator account to make the change.
- [REQUIRES ADMIN PRIVILEGES] Open the Registry Editor by typing
regeditin the Start menu search and running it as administrator. Click Yes if User Account Control asks for permission. - Navigate to this folder:
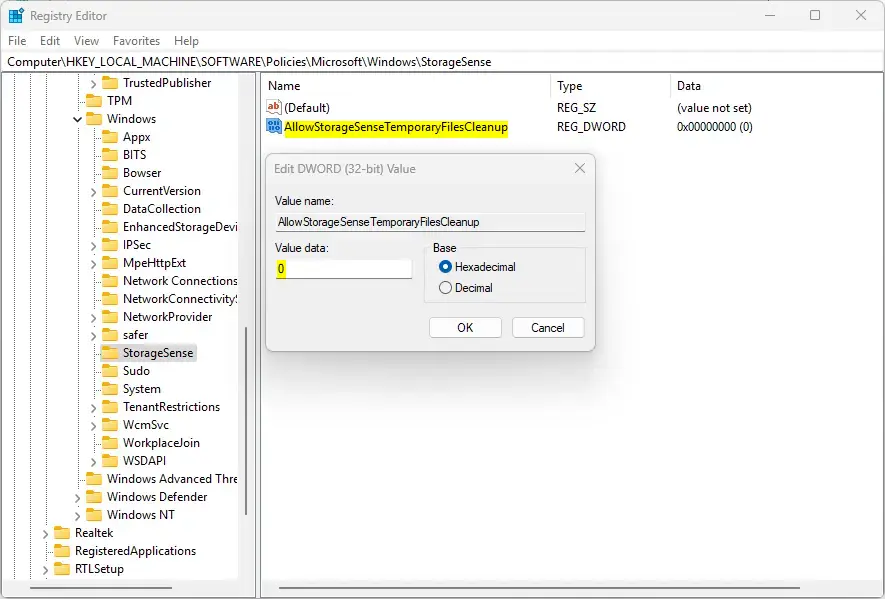
HKEY_LOCAL_MACHINE\SOFTWARE\Policies\Microsoft\Windows\StorageSense - Look for a value called
AllowStorageSenseTemporaryFilesCleanupin the right pane. - If it exists, double-click it and set the number to:
0to turn off temporary file cleanup1to turn on the cleanup
- If it doesn't exist, create it:
- Right-click an empty area in the right pane and select
New > DWORD (32-bit) Value. A new value should appear with its name highlighted. - Name it
AllowStorageSenseTemporaryFilesCleanup - Double-click it and set the value to
0to disable, or1to enable
- Right-click an empty area in the right pane and select
- Close Registry Editor and restart your PC. To undo the change later, return to the same value and set it back, or delete the value if you created it.
Summary
Storage Sense is a useful Windows tool that automatically removes temporary files. You can control its temporary file cleanup with either the Group Policy Editor (Pro, Enterprise and Education) or the Registry Editor (all editions, including Home). Restart your PC after either change, and reverse it at any time by setting the policy or value back.
Was this guide helpful?

About the Author
Richard
Tech Writer, IT Professional
Richard is a writer at Geek Rewind who turns complex IT tasks into clear, step-by-step guides. He draws on years of hands-on experience in system administration and enterprise IT operations, focusing on Windows, Linux and WordPress: the problems people actually run into, and the fixes that work. His server and WordPress guides come from systems he runs himself. Richard builds and maintains the platform behind Geek Rewind, from its Ubuntu servers and Nginx configuration to its custom WordPress plugins. Many new tutorials start with readers' questions, and he's always glad to answer them in the comments.
No comments yet — be the first to share your thoughts!