How to Check Reserved Storage in Windows 11


This guide shows two ways to check reserved storage on a Windows 11 PC: the Settings app and the command line in Windows Terminal. Both only read information. Neither changes anything on your system.
Open Settings , navigate to System, then Storage, and select “Show more categories” to find “System & reserved.” Alternatively, open Windows Terminal as an administrator and run the command `fsutil storagereserve query C:`.
What is Reserved Storage?
Reserved storage is a slice of your drive that Windows sets aside for updates, temporary files, system caches and optional features. Because the space is held back, Windows can still install updates and fix problems when your main storage is almost full.
On most PCs Windows reserves about 7 GB. The exact figure varies with your Windows version, the optional features and languages installed, and how much free space the drive has. It can grow or shrink over time, so a different number from what you expected is normal.
This space is not available for your personal files and programs. If your drive is nearly full, checking the reserved amount shows how much of the “missing” space belongs to Windows. That helps you decide whether low disk space is the reason the PC feels slow or updates keep failing.
Reserved storage may not be active on every PC. A machine that was upgraded from a much older version of Windows can have it turned off. If you see no reserved amount, that is the likely reason.
How to Check Reserved Storage Using the Settings App
The Settings app is the easiest way to see how much space reserved storage is using. The path is Settings System Storage Show more categories System & reserved It works the same on Windows 11 Home and Pro.
- Open the Settings app.
- Click the Start button (the Windows icon in the bottom-left corner) and select Settings.
- Or, press Windows key + I on your keyboard to open Settings right away.
- Click System in the left menu. The System options appear on the right.

Windows 11 System button in Settings - Click Storage on the right side. Windows may take a few seconds to scan your drive, then shows a bar with how much space is used and a list of categories such as Apps & features, Temporary files and Other.

Windows 11 Storage tile in Settings app - Click Show more categories to see all storage categories. The list is short until you do this, and System & reserved may be hidden.
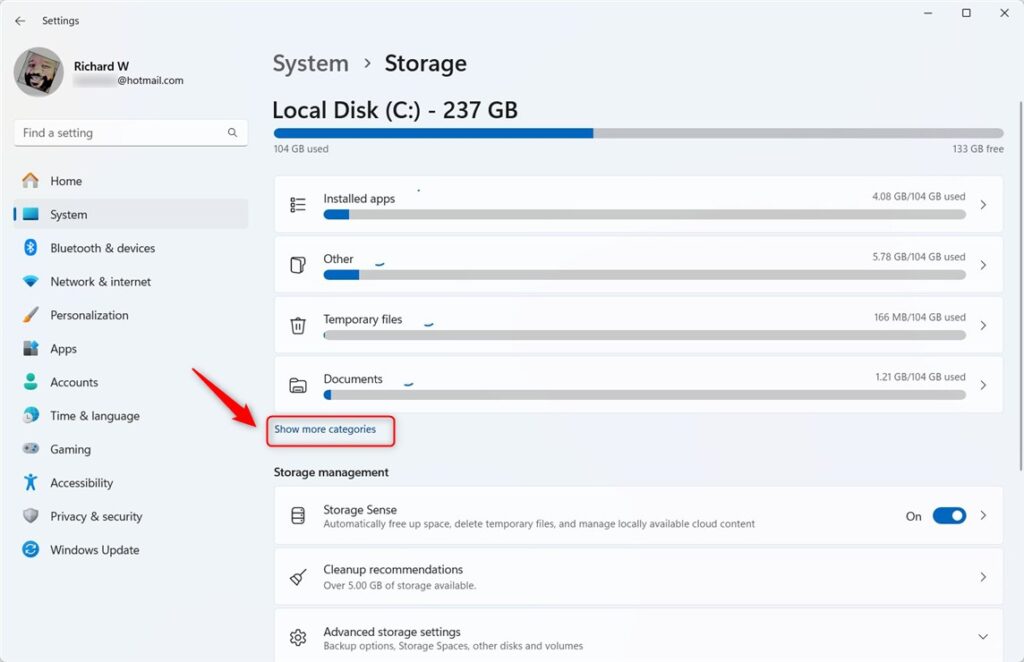
Windows 11 Storage show more categories link - Click System & reserved to open its details.
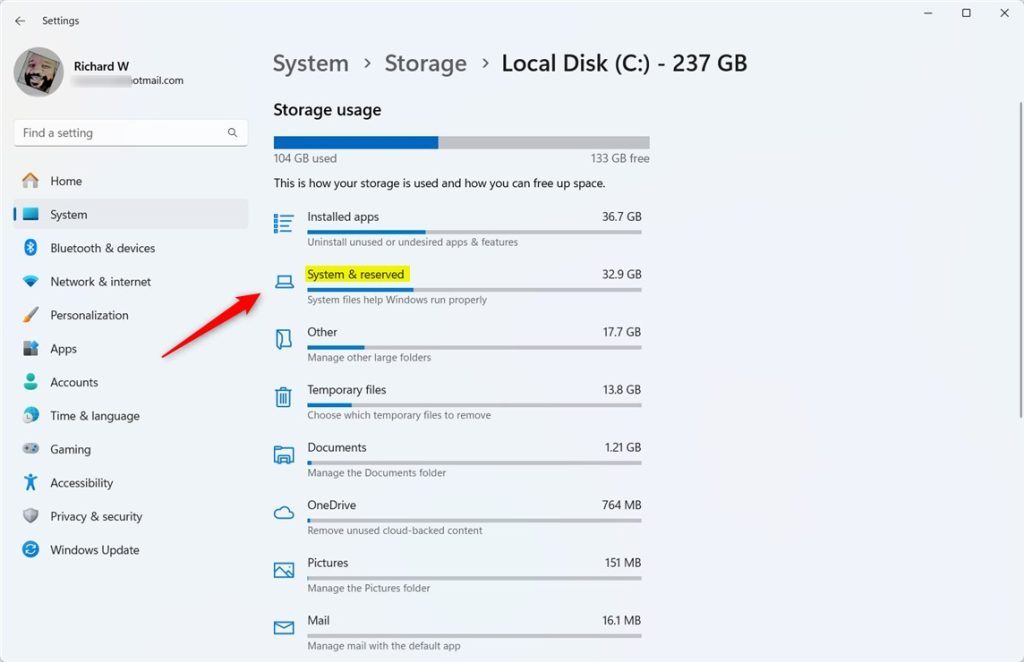
Windows 11 System & reserved storage tile - Look for the Reserved storage size on this page.
This shows how much space Windows has reserved for system use. You will also see other system items, such as the page file and system files, listed on the same page. Reserved storage is a separate line from those.
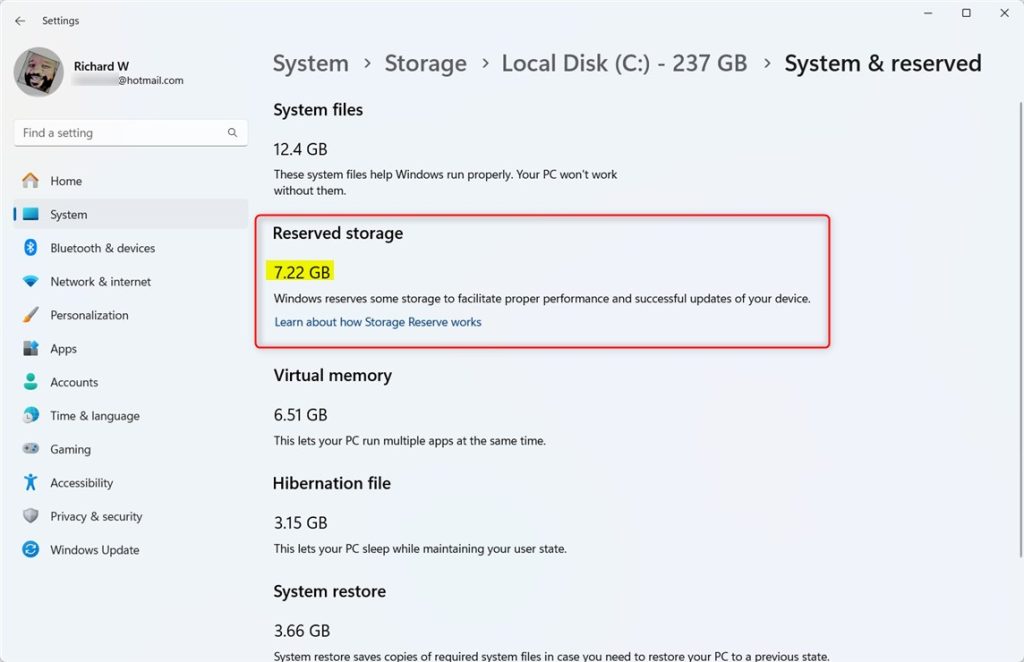
Windows 11 Reserved storage details - Close the Settings app when you're done. Nothing needs saving and no restart is needed.
How to Check Reserved Storage Using the Command Line
If you prefer the command line, you can check reserved storage from Windows Terminal. You need administrator rights, because the command queries system-level information. The steps are the same on Home and Pro. The command only reads data, so there is nothing to undo.
- [ADMIN] Open Windows Terminal as an administrator.
- Click the Start button, type Windows Terminal, right-click the result, and select Run as administrator.
- You can also right-click the Start button and choose Terminal (Admin).
- If a User Account Control prompt appears, click Yes.
- Learn more about opening Windows Terminal as admin
- Choose either the PowerShell or Command Prompt tab.
- You can switch tabs at the top of the Terminal window. The command works the same in either one.
- Make sure the tab title shows you are running with administrator rights. If the command fails with an access error, you most likely opened Terminal without them. Close it and start again.
- Type this command and press Enter:
fsutil storagereserve query C:This checks the reserved storage on your C: drive (usually your main drive).
- Read the result. It shows the reserved storage space in bytes. To convert bytes to gigabytes, divide the number by 1,073,741,824 (1 GB is 1,024 × 1,024 × 1,024 bytes).
- Close the Terminal window when you're done.
Summary
Reserved storage in Windows 11 keeps space ready for updates and important system tasks, helping your computer run smoothly. Knowing how to check its usage is key to managing your disk space. You can easily see how much space it's taking up by using the Settings app or the command line.- Reserved storage is space Windows keeps for updates and important system tasks.
- You can easily check it using the Settings app or the Command Prompt.
- Knowing your reserved storage size helps you manage your disk space better.
- Checking it regularly can prevent problems caused by low disk space.
- Keeping an eye on reserved storage ensures your Windows 11 PC runs smoothly and stays healthy.
Have a question about this guide?
Answered by AI from this guide. Good questions may be added to this page — please don't include personal details.
Did this guide fix your problem?

About the Author
Richard
Tech Writer, IT Professional
Richard is a writer at Geek Rewind who turns complex IT tasks into clear, step-by-step guides. He draws on years of hands-on experience in system administration and enterprise IT operations, focusing on Windows, Linux and WordPress: the problems people actually run into, and the fixes that work. His server and WordPress guides come from systems he runs himself. Richard builds and maintains the platform behind Geek Rewind, from its Ubuntu servers and Nginx configuration to its custom WordPress plugins. Many new tutorials start with readers' questions, and he's always glad to answer them in the comments.
No comments yet — be the first to share your thoughts!