How to Change How Often Windows Optimizes Your Drives in Windows 11

Drive optimization in Windows 11 is a built-in maintenance task. On traditional hard drives (HDDs) it defragments files. On solid-state drives (SSDs) it sends a retrim (TRIM) command, which tells the drive which blocks are free. Windows runs this task once every 7 days in the background by default.
You can change the schedule in the Defragment and Optimize Drives tool. You can have Windows check your storage daily, weekly or monthly, or turn the schedule off. You don’t need any extra software.
Go to the “Optimize Drives” window, click “Change settings,” and select your preferred frequency from Daily, Weekly, Monthly, or Off. Save your changes by clicking “OK.” This adjusts how often Windows automatically optimizes your computer’s drives.
Changing How Often Windows Optimizes Your Drives
Weekly is the default, and it suits most PCs. Change it only if your usage is unusual. A machine that sees heavy file churn may do better with daily runs. A PC that is rarely switched on may only need monthly runs. You may need to sign in with an administrator account to save changes.
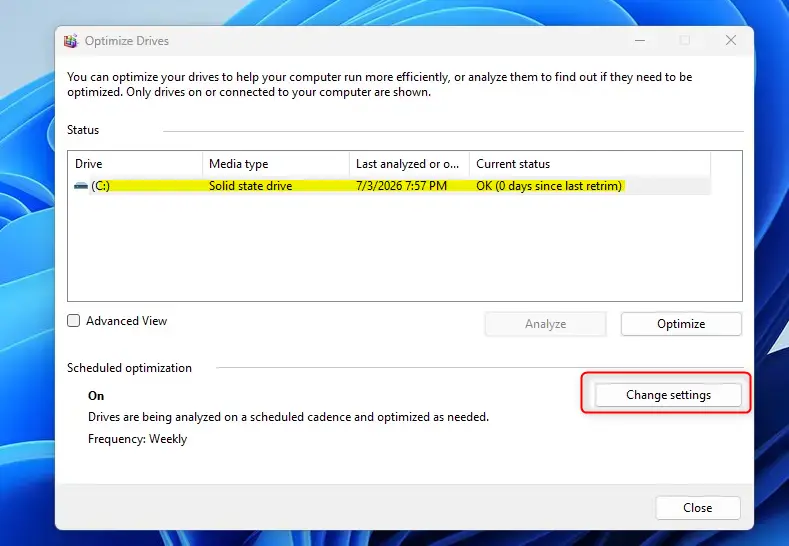
- Click Start, type Defragment and Optimize Drives, and press Enter. The Optimize Drives window opens with a list of your drives and their status.
- Look at the Scheduled optimization section at the bottom of the window. It shows the current plan, for example “Runs on: Weekly” or “Optimization turned off”.
- Click Change settings. A new window opens where you can edit the schedule. If the button is greyed out or the window asks for permission, you are not signed in as an administrator.
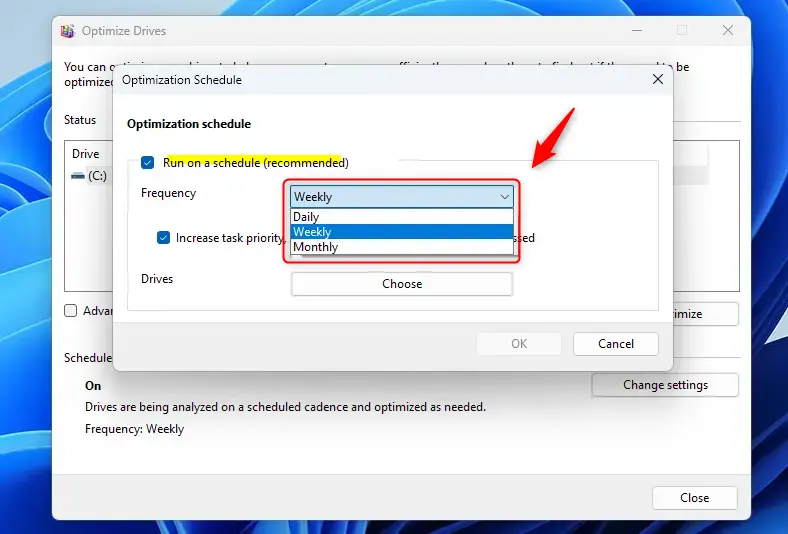
- Make sure the Run on a schedule (recommended) box is ticked. If it is not, the frequency options are unavailable and nothing runs automatically.
- Open the Frequency drop-down and pick one of the preset schedules:
- Daily: Your drives are optimized every day. This helps on drives that change a lot, but the task uses a little more system resources when it runs.
- Weekly: This is the default and works well for most people. Your drives are maintained regularly without getting in your way.
- Monthly: If you rarely use the computer, or your drives are mostly empty, once a month may be enough.
- To stop automatic optimization completely, clear the Run on a schedule (recommended) checkbox. That is the “Off” setting. If you do this, optimize your drives manually from time to time. In the main window, select a drive and click Optimize.
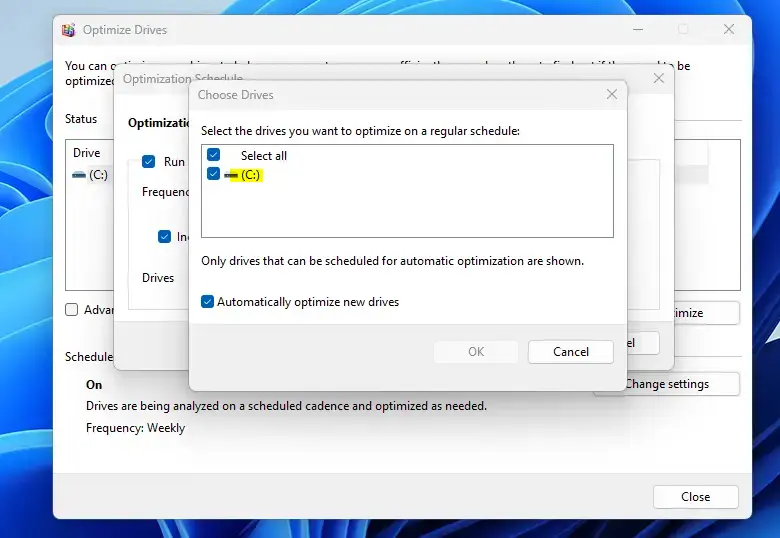
- Click Choose next to Drives if you want to limit which drives the schedule covers. A list of drives appears with a checkbox beside each one. Most people should leave every drive selected. The Automatically optimize new drives option, if shown, applies the schedule to drives you add later.
- Click OK to close the drive list, then click OK again in the schedule window to save. Back in the main window, the Scheduled optimization section should now show your new frequency. You don’t need to restart.
To undo the change, open the same window, click Change settings, set Frequency back to Weekly and click OK.
If you turn off automatic optimization, you are responsible for watching performance yourself. Noticeable slowdowns, long load times or heavily fragmented files mean a drive needs attention. In the Optimize Drives window you can select a drive and click Analyze to see how fragmented it is, then click Optimize to fix it. Older hard drives benefit most from regular maintenance, whether it runs automatically or by hand. SSDs need far less, because Windows only retrims them.
Reference:
Summary
Changing the drive optimization schedule takes only a few clicks. You can choose daily, weekly or monthly runs, or turn automatic optimization off and handle it manually. If you are unsure, leave it on weekly.
Have a question about this guide?
Answered by AI from this guide. Good questions may be added to this page — please don't include personal details.
Did this guide fix your problem?

About the Author
Richard
Tech Writer, IT Professional
Richard is a writer at Geek Rewind who turns complex IT tasks into clear, step-by-step guides. He draws on years of hands-on experience in system administration and enterprise IT operations, focusing on Windows, Linux and WordPress: the problems people actually run into, and the fixes that work. His server and WordPress guides come from systems he runs himself. Richard builds and maintains the platform behind Geek Rewind, from its Ubuntu servers and Nginx configuration to its custom WordPress plugins. Many new tutorials start with readers' questions, and he's always glad to answer them in the comments.
No comments yet — be the first to share your thoughts!