How to Enable or Disable Storage Sense in Windows 11

Storage Sense in Windows 11 automatically clears out junk files, such as old temporary items and files left in your Recycle Bin , so your drive doesn’t fill up. Windows keeps this feature turned off by default, but it turns it on automatically if your free space drops below 1 gigabyte.
You can turn Storage Sense on or off at any time and choose how often it cleans your files. That saves you from digging through folders by hand. This tutorial covers the two ways to control it for everyone who uses the PC: Local Group Policy Editor and Registry Editor.
Open Settings System Storage Storage Sense and toggle it on or off. If you need to enforce it for all users, press Win+R, type gpedit.msc, navigate to Computer Configuration Administrative Templates System Storage Sense, double-click Allow Storage Sense, and select Enabled or Disabled.
What Does Storage Sense Do?
- Deletes temporary files created by apps and the system
- Empties your Recycle Bin after files have been there for a set time
- Does not delete files in your Downloads folder or cloud storage unless you set it to
Who Can Change Storage Sense Settings?
If you are not, the tools below will either refuse to open or refuse to save your change.
How to Enable or Disable Storage Sense
There are two primary methods to control this setting for everyone using your PC. Use Local Group Policy Editor if you have Windows 11 Pro, Enterprise, or Education. Use Registry Editor if you have Home, or if you simply prefer it.
Option 1Using Local Group Policy Editor (For 🪟 Windows 11 Pro, Enterprise, Education)
Local Group Policy Editor lets you turn Storage Sense on or off by changing a system policy. It is only included in Windows 11 Pro, Enterprise, and Education. On Home, the Run command below will fail, so use the Registry Editor method instead.
- Press Win+R, type
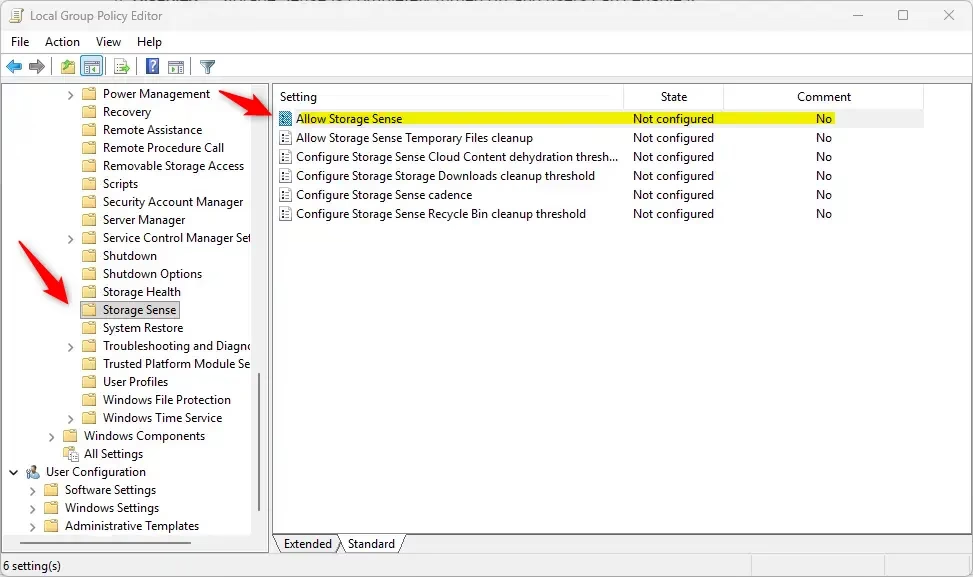
gpedit.msc, and press Enter. The Local Group Policy Editor window opens. - In the left panel, go to Computer Configuration Administrative Templates System Storage Sense The policies for Storage Sense now appear in the right panel.
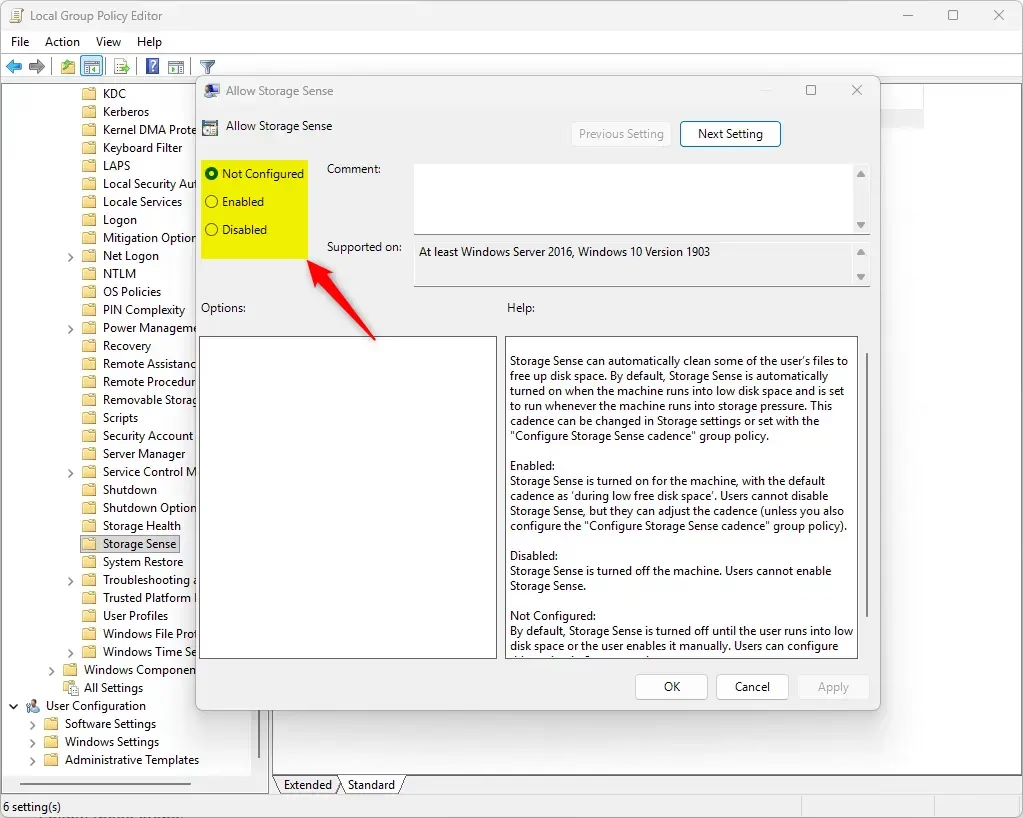
- In the right panel, double-click Allow Storage Sense. A settings window opens for that policy.
- Pick one of the three options:
- Not Configured – This lets users turn Storage Sense on or off themselves (default).
- Enabled – Storage Sense is always on, but users can change how often it runs.
- Disabled – Storage Sense is completely turned off and users can’t enable it.
- Click OK, then close the editor.
The change normally applies on its own within a short time. If Storage Sense still behaves the old way, restart the PC or sign out and back in. If you set the policy to Disabled or Enabled, the Storage Sense switch in Settings System Storage may be locked, with a note that some settings are managed by your organization. To undo the change, return to the same policy and select Not Configured.
Option 2Using Windows Registry (All 🪟 Windows 11 editions)
You open the tool through the Run command, go to HKEY_LOCAL_MACHINE\SOFTWARE\Policies\Microsoft\Windows\StorageSense, and create or change one DWORD value. Editing the registry can break things if you change the wrong entry, so consider exporting the key first (File Export) or creating a restore point.
Follow these steps:
- ⚠️ Admin Required: Press Windows + R, type
regedit, and press Enter. Click Yes if User Account Control asks for permission. Registry Editor opens. - Navigate to this key:
HKEY_LOCAL_MACHINE\SOFTWARE\Policies\Microsoft\Windows\StorageSense - If the StorageSense key doesn't exist, right-click the Windows key and choose New Key. Name the new key StorageSense, then select it.
- Right-click an empty area in the right pane, choose New DWORD (32-bit) Value, and name it AllowStorageSenseGlobal. If the value already exists, double-click it instead.
- Set the behavior you want. Double-click the value and type the number under Value data, then click OK:
- Delete the value or set it to Not Configured (default): Remove the AllowStorageSenseGlobal value.
- To always enable Storage Sense: Set the value to 1.
- To always disable Storage Sense: Set the value to 0.
- Close Registry Editor. If the change doesn't show up in Settings System Storage, restart the PC.
To undo the change at any time, delete the AllowStorageSenseGlobal value. Storage Sense then goes back to its default behavior. The three examples below show how the value looks for each result.
Default - Enable Storage Sense
reg delete "HKEY_LOCAL_MACHINE\SOFTWARE\Policies\Microsoft\Windows\StorageSense" /v AllowStorageSenseGlobal /fAlways enable Storage Sense
reg add "HKEY_LOCAL_MACHINE\SOFTWARE\Policies\Microsoft\Windows\StorageSense" /v AllowStorageSenseGlobal /t REG_DWORD /d 1 /fAlways disable Storage Sense
Storage Sense is a Windows 11 tool that automatically removes unneeded files to save computer space. Storage Sense is turned off by default, but an administrator can turn it on for all users. You can choose to let individual users decide whether to use Storage Sense, or leave the setting unconfigured. Turning Storage Sense on can help your PC run better.
Was this guide helpful?

About the Author
Richard
Tech Writer, IT Professional
Richard is a writer at Geek Rewind who turns complex IT tasks into clear, step-by-step guides. He draws on years of hands-on experience in system administration and enterprise IT operations, focusing on Windows, Linux and WordPress: the problems people actually run into, and the fixes that work. His server and WordPress guides come from systems he runs himself. Richard builds and maintains the platform behind Geek Rewind, from its Ubuntu servers and Nginx configuration to its custom WordPress plugins. Many new tutorials start with readers' questions, and he's always glad to answer them in the comments.




No comments yet — be the first to share your thoughts!