How to Clear the Delivery Optimization Cache in Windows 11

The Delivery Optimization cache in Windows 11 stores files from past Windows updates and app downloads so your PC can share them with other devices on your network. Over time, these temporary files can grow to several gigabytes on your drive.
Windows usually deletes these files on its own, but you can clear the cache manually with the built-in Disk Cleanup tool whenever you need the space back right away. The steps are the same on Windows 11 Home and Pro.
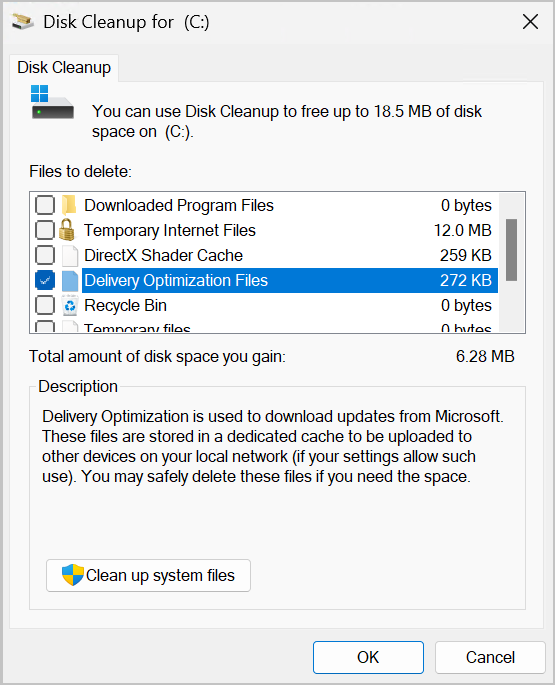
Open the search bar and type Disk Cleanup, then launch the app. Select your C: drive, wait for the scan, check the box next to Delivery Optimization Files, and click OK to delete them. The cache is cleared immediately without restarting.
Step-by-Step: Using Disk Cleanup
The files are deleted permanently and do not go to the Recycle Bin . That is safe here. If Windows needs any of them again, it downloads them again. The cache also fills up again over time as you install updates .
Clearing the cache while an update is downloading can slow it down or force it to restart the download.
- Open the search bar. Click the search icon on the taskbar , usually next to the Start button . A search box opens.
- Search for Disk Cleanup. Type
Disk Cleanupin the search box. The Disk Cleanup app should appear at the top of the results. - Launch the app. Click the Disk Cleanup result to open it. A small window titled Drive Selection appears.
- Select the drive. Open the drop-down list and choose your main Windows drive, which is usually labeled
C:. The Delivery Optimization cache is stored on the system drive, so this is the one you want. Then clickOK. - Wait for the analysis. Disk Cleanup now calculates how much space it can free. A progress bar shows while it scans. This can take a minute or two, longer on a slow hard drive.
- Find Delivery Optimization Files. When the scan finishes, a window lists the file types you can delete, with the space each one uses. Scroll through the list to find
Delivery Optimization Filesand tick the box next to it. If the item is missing, there is probably nothing cached on that drive, or you picked the wrong drive. Go back and check the drive you selected. - Choose what else to delete. Review the other items in the list. Only tick the ones you actually want to remove. Anything you leave unticked stays untouched. Check the total shown under the list to see how much space you will free.
- Start the cleanup. With
Delivery Optimization Filesticked, click theOKbutton at the bottom of the window. A confirmation message appears. - Confirm the deletion. The message asks whether you are sure you want to permanently delete these files. Click
Delete Filesto continue. - Let it finish. Disk Cleanup removes the selected files, including the contents of the Delivery Optimization cache. A progress window shows while it works, and it closes on its own when it is done. How long this takes depends on how much data is being removed and how fast your drive is. You don’t need to restart the PC afterward.
To confirm it worked, you can run Disk Cleanup again. The Delivery Optimization Files entry should now show a much smaller size, or be missing altogether.
References:
Summary
Clearing the Delivery Optimization cache frees up space on your drive in Windows 11. The built-in Disk Cleanup utility does the job in a few clicks, with no third-party software. If you need the space again later, repeat the same steps.
Frequently asked questions
How to clear the delivery optimisation cache in Windows?
To clear the Delivery Optimization cache, open Disk Cleanup from the Start menu. Select Delivery Optimization Files in the list, then click OK and confirm. Windows deletes these files permanently, skipping the Recycle Bin. Wait until any active Windows Update downloads finish before you start.
How to clear delivery optimization files in Windows?
Delete Delivery Optimization files by running Disk Cleanup and checking Delivery Optimization Files. The files are permanently removed, not sent to the Recycle Bin. Windows downloads any it needs again later, so this is safe. Check that Windows Update isn't installing anything before you start, since clearing the cache mid-download can cause it to restart.
How to delete delivery optimization files in Windows?
Open Disk Cleanup from the Start menu, choose the C: drive, then select Delivery Optimization Files under Files to delete. Click OK, then Delete Files. The deleted files cannot be recovered from the Recycle Bin, but Windows fetches them again if needed. Wait for any Windows Update downloads to finish first.
How to clear the delivery optimization cac...?
To clear the Delivery Optimization cache, run Disk Cleanup, tick the Delivery Optimization Files box, and confirm the deletion. Windows removes these files for good, skipping the Recycle Bin, and downloads new copies when it needs them. Make sure no Windows Update download is running before you begin.
How to cleanup delivery optimization cache and retrigger downloads?
Clearing the Delivery Optimization cache removes stored update files, and Windows downloads them again when it needs them. Open Disk Cleanup, select Delivery Optimization Files, and click OK. Windows Update then requests any files it still needs, so the next update check restarts those downloads. Check for active downloads before you clean up.
Still have a question?
Answered by AI from this guide. Good questions may be added to this page — please don't include personal details.
Did this guide fix your problem?

About the Author
Richard
Tech Writer, IT Professional
Richard is a writer at Geek Rewind who turns complex IT tasks into clear, step-by-step guides. He draws on years of hands-on experience in system administration and enterprise IT operations, focusing on Windows, Linux and WordPress: the problems people actually run into, and the fixes that work. His server and WordPress guides come from systems he runs himself. Richard builds and maintains the platform behind Geek Rewind, from its Ubuntu servers and Nginx configuration to its custom WordPress plugins. Many new tutorials start with readers' questions, and he's always glad to answer them in the comments.
No comments yet — be the first to share your thoughts!