The Windows 11 update cache holds temporary installation files in the 📁C:\Windows\SoftwareDistribution folder. It can grow to several gigabytes. When the files in it go bad, updates get stuck or fail with error codes like 0x800f0922.
Advertisement
Clearing this hidden folder breaks most update loops and frees disk space. It is safe as long as you stop the background update services first. This guide covers what the cache is, how to check your free space, how to run Disk Cleanup, and how to reset the cache by hand. The steps are the same on Windows 11 Home and Pro.
⚡ Quick Answer
To clear the Windows 11 update cache safely, stop the Windows Update and Background Intelligent Transfer services in an admin Command Prompt, delete the contents of 📁C:\Windows\SoftwareDistribution\Download, then restart the services. Windows rebuilds the folder and downloads fresh update files on your next check. Your installed updates are not affected.
Advertisement
What Is the 🪟 Windows 11 Update Cache and Why Does It Fail?
The update cache is a temporary storage area in the 📁C:\Windows\SoftwareDistribution folder. Your computer saves update files there before it installs them. The cache fails when download files get corrupted, your internet connection drops mid-download, or the drive runs out of space.
Think of the 📁C:\Windows\SoftwareDistribution folder as a temporary shopping cart. Windows puts all the pieces of an update into it, then installs them on your system. Once the update finishes, Windows is supposed to clean the folder out on its own. Sometimes it doesn’t, and old files pile up.
Failed updates often trace back to a power loss, an unstable connection, or a background app interrupting the download. Any of these can corrupt the files in the cache. Windows then tries to read the broken files, fails, and stops the installation. You see this as a stuck update, an endless loading circle, or a specific error code such as 0x800705aa. Clearing the damaged files out of the cache is the usual fix.
Advertisement
Clearing the cache is safe because it only removes temporary installation files. Windows 11 creates a new, empty folder and downloads fresh update files the next time you check for updates. Expect that next check to take longer than usual. Your update history list in Settings may also look shorter afterward. That is cosmetic, and your installed updates are not affected.
Checking Your Hard Drive Space Before You Start
Check your free disk space first. Windows needs plenty of open room to unpack large installation files. When space runs low, update errors keep coming back, and clearing the cache will not help for long.
You can check your storage in the Settings app:
Click the Start button and open the Settings app (the gear icon).Settings
Select System from the left-hand menu.
Click Storage. You should see a bar showing how full your main drive is, with a breakdown of what is taking up the space.
If the drive is nearly full, make room before you try to update again. Built-in tools like Disk Cleanup can remove temporary system files, old installation logs, and items in the Recycle Bin. The next section walks through it. If the drive is still tight after that, move or uninstall large files and apps you no longer use.
Advertisement
How to Clear Temporary System Files Using Disk Cleanup
Disk Cleanup is a built-in Windows 11 tool. It deletes leftover update files, temporary internet files, and system error reports to free up space. It does not touch your personal documents, photos, or installed apps.
Click the Start button, type Disk Cleanup into the search 🔍 bar, and click the app to open it.
If a window asks which drive to clean, choose your main drive (usually C:) and click OK. A short scan runs, then the list of deletable files appears.
Look through the list of file types.
Check the boxes next to items like Temporary files, Windows Update 🔃 Cleanup, and Previous Windows installations if you see them. If you don’t see them yet, the next step adds them. Deleting previous Windows installations removes your ability to roll back to the older version, so only tick it if you are happy with the current one.Settings › Windows Update
Click the Clean up system files button so the tool can find deeper system-level temporary files. This step needs administrator rights. Click Yes or enter an administrator password if a prompt appears. The scan runs again and the list may grow.
Click OK, then select Delete Files to confirm. Let the tool finish before you move on. A progress window shows while it works and closes when it is done.
Safely Clearing the Windows Update Cache Step-by-Step
To clear the update cache safely, stop the background update services first, then rename the SoftwareDistribution and catroot2 folders. Windows will not let you delete these folders while those services are running. That is why the stop-and-rename method is needed to fix stuck downloads.
📝Good to KnowRenaming also gives you a way back.
Windows builds fresh folders and leaves the old ones in place. If something goes wrong, you still have the originals. Once updates work normally again, you can delete the renamed copies to reclaim the space.
Advertisement
📝Good to KnowYou need to be signed in with an administrator account.
Follow these steps in order, and restart your PC when you finish so the services start cleanly:
Step 1Open the Command Prompt as an Administrator
Opening the Command Prompt as an administrator on Windows 11 gives you the high-level system permissions needed to stop update services and rename cache folders. You can launch this elevated command window quickly using the Run dialog box and keyboard shortcuts.
Press the Win+R on your keyboard to open the Run dialog box.Run dialog
Type cmd into the text box.
Press and hold down the Ctrl + Shift keys on your keyboard, and then press Enter. Note: This step requires administrator privileges. Click Yes on the pop-up window that asks if you want to allow this app to make changes to your device.
You should now see a black window with white text, labeled “Administrator: Command Prompt”.
Step 2Stop the Windows Update Services
Stopping the Windows update services via the command prompt prevents Windows from using the update cache folders while you try to fix them. You must shut down core background services like wuauserv and bits before you can safely rename or clear stuck update files.
💻Code
net stop wuauserv
💻Code
net stop cryptSvc
💻Code
net stop bits
💻Code
net stop msiserver
Wait a moment for each command to report that the service was stopped successfully. If a service fails to stop, do not panic; just move on to the next one.
Step 3Rename the Update Cache Folders
Renaming the SoftwareDistribution and catroot2 folders instead of deleting them tricks Windows into creating fresh new update directories while keeping a safe backup copy. This manual rename method lets your computer start fresh with updates while keeping your old files secure.
Advertisement
To clear the Windows 11 update cache safely, you need to stop the Windows Update service first by opening the Command Prompt as an administrator and typing specific commands one line at a time. Specifically, you must type net stop wuauserv and press Enter after that command to stop the service from running in the background. Stopping this service matters because it prevents system files from staying locked while you delete old update downloads from the SoftwareDistribution folder.
If you get an error saying a file is open or in use, make sure you stopped all the services correctly in Step 2. Restart your computer if necessary, and repeat the commands.
Step 4Restart the Update Services
Restarting your Windows update services in the command prompt turns your system’s update checker back on after you clear your cache. Turning these background services back on allows Windows to download fresh update files and check for new system patches normally.
You must type specific commands into the command prompt one line at a time and press the Enter key after each command to safely clear the Windows 11 update cache. Opening the command prompt with administrator rights lets you stop the Windows Update service by typing net stop wuauserv and pressing Enter. This important step stops the system from using the cache files while you try to delete them, preventing errors and file damage during the cleanup process.
Advertisement
💻Code
net start wuauserv
💻Code
net start cryptSvc
💻Code
net start bits
💻Code
net start msiserver
Once all services have restarted successfully, you can close the command prompt window by typing exit and pressing Enter.
Finally, restart your computer normally. Once your computer boots back up, open your Windows Update settings and check for updates again. Your computer will build a brand-new cache and install your updates cleanly.
Advanced Troubleshooting: Resetting Update Components via Settings
The Windows Update troubleshooter is a built-in settings tool that automatically finds and fixes broken update components when manual cache clearing does not work. Running this automated troubleshooter is a great alternative if you want to avoid using the command prompt.
You can run the Windows Update troubleshooter by following these steps:
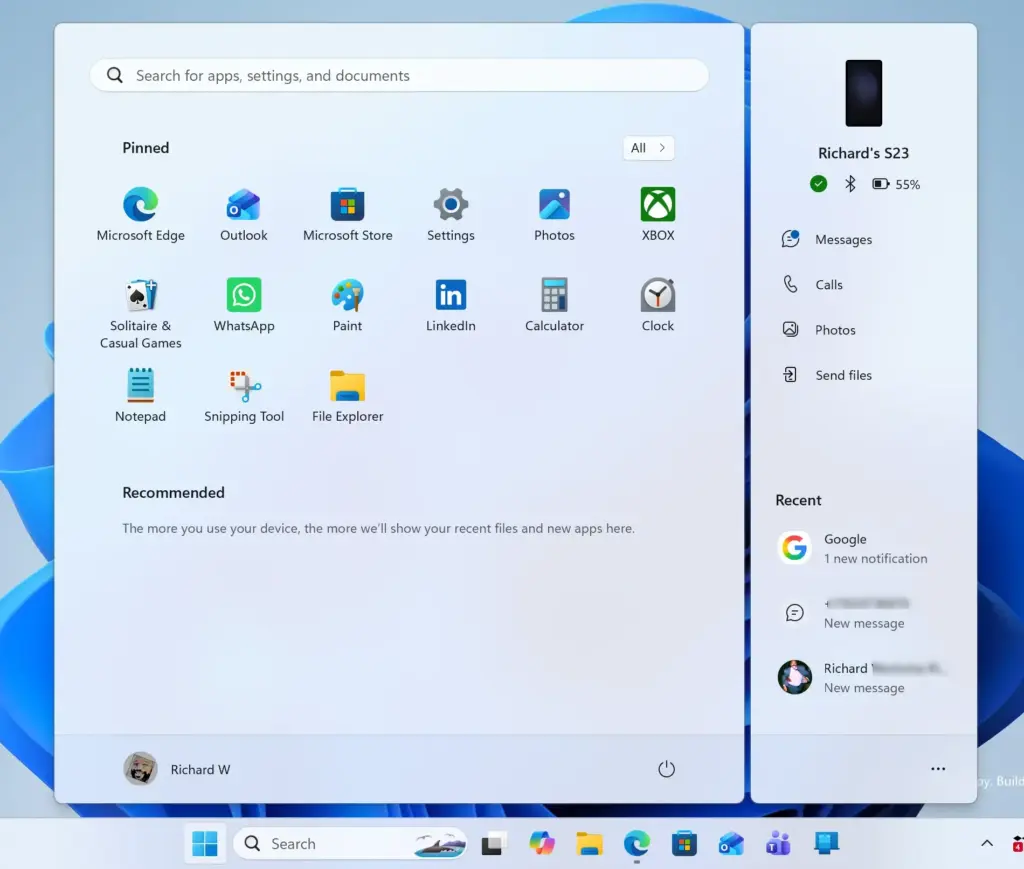
Open the Start menu ⊞ and click on Settings.Start Menu
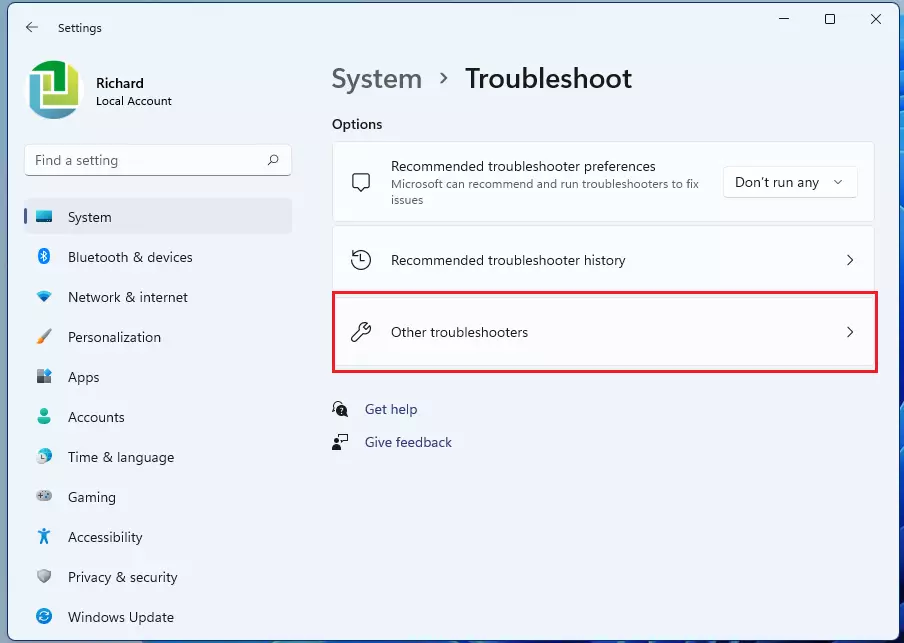
Go to the System tab on the left menu.
Click on Troubleshoot, and then select Other troubleshooters.windows 11 other troubleshooters tilewindows 11 other troubleshooters tile
Find Windows Update 🔃 in the list and click the Run button next to it. Note: This step requires administrator privileges.
Follow any on-screen prompts as the troubleshooter automatically detects and fixes issues with your update settings, temporary files, and service registrations.
Advertisement
After the Windows Update troubleshooter finishes fixing your system, restart your computer to clear out any leftover error files and make sure the new settings work. Once your computer turns back on, open the Windows Update settings menu and try downloading your updates once more. This final restart stops old update tasks from running in the background, which helps prevent new download errors from blocking your installation.
Pro Tips for Keeping Your 🪟 Windows 11 Update System Healthy
Keeping your Windows 11 update system healthy requires simple habits like maintaining at least 15 to 20 gigabytes of free hard drive space and never interrupting active system downloads. Following these best practices prevents future update bottlenecks and keeps your computer running smoothly.
Keep your storage cleanNever let your C drive fill up entirely. Keep at least 15 to 20 gigabytes of free space open so Windows has room to unpack large system upgrades.
Do not interrupt active downloadsWhen an update is downloading or installing, let your computer finish its work. Shutting down your computer or cutting the power mid-update is the number one cause of cache corruption.
Maintain a stable connectionIf you have a slow or spotty internet connection, try connecting your computer directly to your router using an Ethernet cable before downloading massive system upgrades.
Clean old backups periodicallyAfter a major Windows version upgrade, the system keeps old installation files for ten days in case you want to roll back. If you are happy with your current version, use Disk Cleanup to wipe those old files out and reclaim gigabytes of lost space.
Summary
Clearing the Windows 11 update cache safely fixes stuck downloads and stubborn error codes by stopping background update services and renaming corrupted temporary folders. Regular disk cleanups and keeping enough free hard drive space will keep your system running smoothly and prevent future update failures.
Remember to check your available hard drive space regularly, use built-in tools like Disk Cleanup to keep your system tidy, and always follow the steps carefully using administrator privileges. Once you clear out that old cache, your PC will download fresh update files and install them without any trouble. Take the next step today by checking your system storage and running the Windows Update troubleshooter if your system needs a quick tune-up.
📬 Get new Windows tips in your inbox
One email when we publish something worth your time. We send a link to confirm. No spam, unsubscribe anytime.
Share
Have a question about this guide?
Answered by AI from this guide. Good questions may be added to this page — please don't include personal details.
Richard is a writer at Geek Rewind who turns complex IT tasks into clear, step-by-step guides. He draws on years of hands-on experience in system administration and enterprise IT operations, focusing on Windows, Linux and WordPress: the problems people actually run into, and the fixes that work.
His server and WordPress guides come from systems he runs himself. Richard builds and maintains the platform behind Geek Rewind, from its Ubuntu servers and Nginx configuration to its custom WordPress plugins.
Many new tutorials start with readers' questions, and he's always glad to answer them in the comments.
One email when we publish a guide worth your time — new Windows features, the fixes that actually
work, and a heads-up when Microsoft breaks something. Unsubscribe in one click.
📬 Get new Windows tips in your inbox
One email when we publish something worth your time. We send a link to confirm. No spam, unsubscribe anytime.






No comments yet — be the first to share your thoughts!