How to Fix Windows Update Failures in Windows 11

Windows update failures happen when your Windows 11 PC gets stuck downloading or installing system patches, which leaves security holes open. They usually show up as cryptic error codes or as endless loading loops inside the Settings app. Sometimes an update reaches 100% and then rolls back after a restart.
You can fix most update blocks by running the built-in Windows Update troubleshooter or by clearing stuck temporary files from your system folders. These steps get your PC downloading the latest updates again without touching your personal files. Work through the sections in order, because the quick, low-risk fixes come first. After each fix, go to Settings Windows Update and click Check for updates to see whether the problem is solved.
Run the built-in troubleshooter first: open Settings System Troubleshoot Other troubleshooters, click Run next to Windows Update , then accept any fix it offers. If that fails, free up space on your C: drive under Settings System Storage, then check Settings Windows Update with Check for updates after each fix.
1Use the Windows Update Troubleshooter
Windows has a built-in tool that finds and fixes common update problems automatically. It resets update services, clears some stuck settings and checks for pending restarts. It takes only a minute or two and changes nothing you need to undo, so run it first. You need to be signed in to Windows, and an administrator account works best.
- Open Settings. You can press the Win plus I to get there quickly.
- Go to System Troubleshoot Other troubleshooters. You should now see a list of troubleshooters.
- Find Windows Update and click Run.
- Wait while the troubleshooter detects problems. If it finds one, it either fixes it or offers a fix. Accept it if you see an option such as Apply this fix.
- Close the troubleshooter when it finishes and restart your PC if it says a restart is needed.
- Go to Settings Windows Update and click Check for updates .
If the troubleshooter says it could not identify the problem, that is fine. It only means the cause is elsewhere, so move on to the next sections.
2Clear Up Storage Space
Windows 11 update failures often happen because there isn’t enough storage space on your computer for the update to download and install. Windows needs room for the download, for the unpacked files, and for a copy of your current version in case it has to roll back. Monthly updates need only a little space, but a feature update can need 20 GB or more. If the system drive (usually C:) is nearly full, the update may fail partway through or never start.
To check how much space you have, open Settings System Storage The bar at the top shows how full your drive is. To free up space, try these:
- Open Temporary files under Storage. Tick the items you don't need, such as temporary files, the Recycle Bin and old downloads, then click Remove files. Read each description first, especially for Downloads, so you don't delete something you want.
- Turn on Storage Sense in the same Storage page, so Windows cleans up temporary files for you.
- Uninstall apps and games you no longer use from Settings Apps Installed apps
- Move large photos, videos and other files to an external drive or cloud storage.
Once you have freed up space, restart your PC and try the update again. If your drive is small and always full, an external drive is the simplest way to make room for future updates.
3Fix Hard Drive Errors
Hard drive errors can cause Windows 11 update failures by stopping new files from being written correctly to your storage. You can find and repair these problems with a built-in check command in Command Prompt. It scans the drive and fixes faults automatically so your updates can finish installing. This method also works on Windows 11 Home.
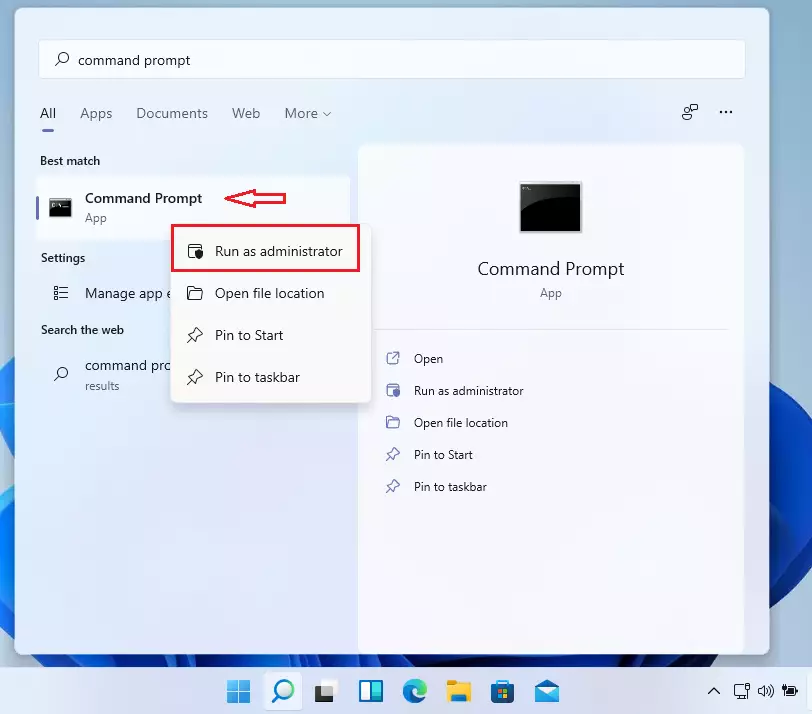
- Click Start and type cmd. Command Prompt should appear at the top of the results.
- Right-click Command Prompt and choose Run as administrator.
- Click Yes if User Account Control asks for permission. A window titled Administrator: Command Prompt should open. If you don't see that title, close the window and try again, because the command will not work without admin rights.
Type the following command and press Enter:
chkdsk/f C:Your computer will check for errors and may ask you to restart to finish the repair. This happens when the drive is in use by Windows itself. If it asks whether to run the check the next time the PC restarts, type Y, press Enter, and then restart.
The check runs before Windows loads, and on a large drive it can take a long time. Don't switch the PC off while it runs. When Windows starts again, go back to Settings Windows Update and check for updates.
4Rename the SoftwareDistribution Folder
Corrupted files inside the SoftwareDistribution folder (the folder where Windows keeps temporary update files) often cause stubborn Windows 11 update failures. You can clear out these broken downloads by renaming the folder in Command Prompt. Windows then creates a fresh, clean folder and downloads your pending updates again. Renaming is safer than deleting, because the old folder stays on the disk if you need it.
- Open Command Prompt as an administrator. Click Start, type cmd, right-click Command Prompt, choose Run as administrator, then click Yes on the permission prompt.
Type these commands one by one, pressing Enter after each line. Run them in the order shown and wait for each one to finish before you type the next. Each command should return you to a blank prompt, and you may see short messages confirming what it did. If one command shows an error, stop and read it before you continue.
net stop bitsnet stop wuauservren C:\Windows\SoftwareDistribution SoftwareDistribution.bakren C:\Windows\System32\catroot2 catroot2.baknet start bitsnet start wuauserv
Restart your computer and try the update again. Go to Settings Windows Update and click Check for updates. The first check can take longer than usual, because Windows has to rebuild its update history and download the files again.
Once updates install normally, you can delete the old renamed folder to get its space back. If something goes wrong, you can rename it back instead.
5Repair System Files
Damaged system files are a leading cause of Windows 11 update failures, because missing or broken core components stop the installation. You can fix them with two built-in command-line tools, DISM and SFC. They scan your operating system and replace damaged parts with healthy copies, using an online source for the first repair. Because of that, make sure you are connected to the internet before you start.
Note: This step requires an administrator account.
- Open Command Prompt as an administrator. Click Start, type cmd, right-click Command Prompt, and choose Run as administrator.
- Type this command and press Enter:
DISM.exe /Online /Cleanup-image /RestorehealthWait for it to finish. A progress bar appears, and it can sit at one percentage for a few minutes. That is normal, so don't close the window. The whole scan can take 15 to 30 minutes or more, depending on your drive. Once it reports that it completed successfully, type this command and press Enter:
sfc /scannowWhen the second scan finishes, read the result. It will say that it found no problems, that it repaired corrupt files, or that it found files it could not repair. If it repaired files, restart your PC and check for updates again. If it could not repair some files, run both commands once more and then restart.
Common Windows Update Error Codes
Windows 11 update error codes tell you why an update failed, so you can skip the guesswork and apply the right fix. Common codes like 0x8007000d point to corrupted installation data, while codes like 0x800f0922 usually mean your computer cannot reach the Microsoft update servers properly.
To find the code for a failed update, open Settings Windows Update Update history. Failed updates are listed with an error code beside them. Search for that exact code if it isn't listed below.
- 0x8007000d: Usually means data is missing or corrupted. Run the DISM and SFC repairs, then reset the SoftwareDistribution folder.
- 0x800f0922: Often caused by a lack of connection to update servers or low system partition space. Check your internet connection, turn off any VPN while you update, and free up drive space.
- 0x80070005: Access denied error, often caused by antivirus software. Temporarily turn off any third-party antivirus, run the update again, and turn the antivirus back on afterward. Also make sure you are signed in as an administrator.
- 0x80244017: Connection issues with the update service. Check your network, try a different connection if you can, and run the Windows Update troubleshooter again.
- 0x800f081f: Source files could not be found during the update process. Run the DISM and SFC repairs while connected to the internet.
Frequently Asked Questions
Summary
If Windows updates are failing, start by using the Windows Update troubleshooter. If that does not work, clear space on your hard drive, check the drive for errors, repair system files with DISM and SFC, and reset your update components. Restart and check for updates after each step, so you know which one worked. These steps will help keep your PC secure and up to date.
If you have tried everything and the same error keeps coming back, note the error code from Update history and search for it. A repair install of Windows 11 from official installation media is the next step, and it can keep your files and apps. Back up anything important first.
Did this guide fix your problem?

About the Author
Richard
Tech Writer, IT Professional
Richard is a writer at Geek Rewind who turns complex IT tasks into clear, step-by-step guides. He draws on years of hands-on experience in system administration and enterprise IT operations, focusing on Windows, Linux and WordPress: the problems people actually run into, and the fixes that work. His server and WordPress guides come from systems he runs himself. Richard builds and maintains the platform behind Geek Rewind, from its Ubuntu servers and Nginx configuration to its custom WordPress plugins. Many new tutorials start with readers' questions, and he's always glad to answer them in the comments.
[…] Windows Update also has a feature that allows users to get up to date as soon as possible by turning on the “Get me up to date” settings. When enabled, Windows prompts you to restart as quickly as possible (even during active hours) to finish updating. This feature will also notify you 15 minutes before resuming so you can make sure your device is on and plugged in. […]
[…] Windows Update helps you install patches and fix bugs. Updates also keep your personal information safe by fixing […]