How to Manage Microsoft Store App Updates in Windows 11


Microsoft Store app updates in Windows 11 keep your installed programs secure by downloading security patches and new features in the background. By default, Windows checks for and installs these updates every few hours without asking you.
You can turn off automatic updates in the Microsoft Store app settings if you want to save internet data or stop downloads from slowing down your PC. Managing updates manually lets you pick when new versions download. The trade-off is that you must remember to check, or apps will fall behind.
Turn automatic updates off in Microsoft Store settings by clicking your profile, selecting Settings, and toggling App updates. If updates fail, run wsreset.exe from the Run dialog to clear the cache.
Why Update Your Apps?
App updates patch security holes and fix bugs. Outdated software leaves your PC open to attacks, and attackers often target flaws that have already been fixed in a newer version. Updating your applications regularly is one of the simplest ways to improve overall security.
If you turn automatic updates off, set a reminder to update by hand, for example once a week.
What Are Microsoft Store Apps?
Microsoft Store apps are programs downloaded from the official Store. They differ from traditional desktop software, which relies on standalone installers. Store apps usually update automatically by default.
Some programs do not use the Store mechanism at all. Browsers, games launchers and many older desktop programs have their own internal updater tools. The Store settings in this tutorial do not control those programs, so check each one’s own settings if you want to manage its updates.
Method 1Turn Off Updates in the Microsoft Store App
The switch for automatic updates lives in the Microsoft Store app settings. You need to open the Store and go through your profile menu to reach it.
- Open the Microsoft Store app from the Start menu.
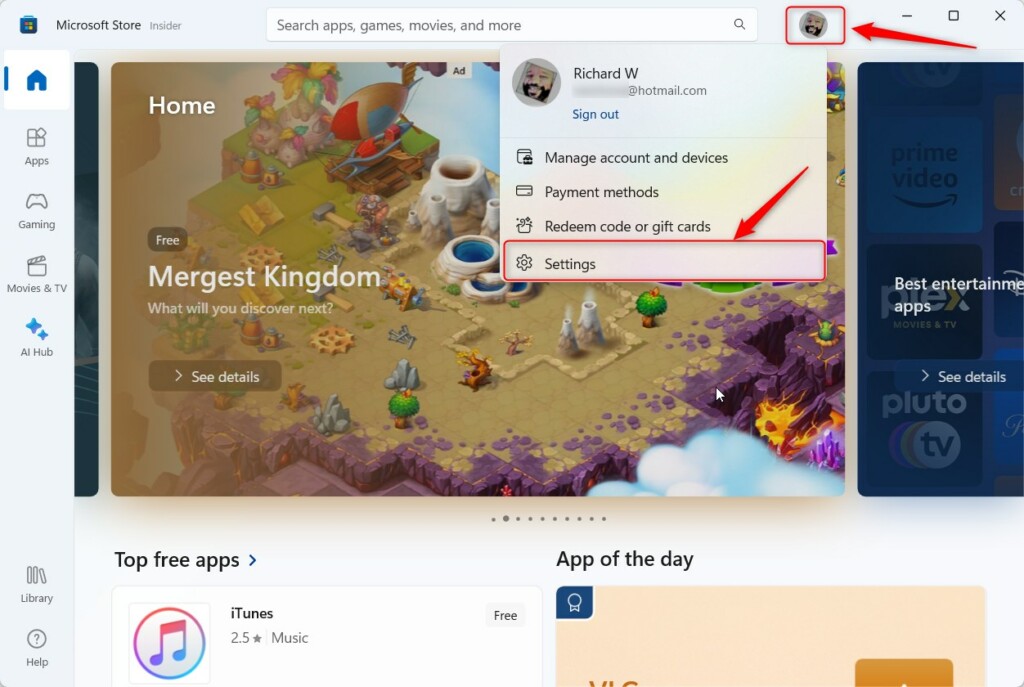
- Click your profile picture in the top right corner. A menu opens below it.
- Select Settings. In some Store versions this entry is labelled App settings. The Store settings page then opens.
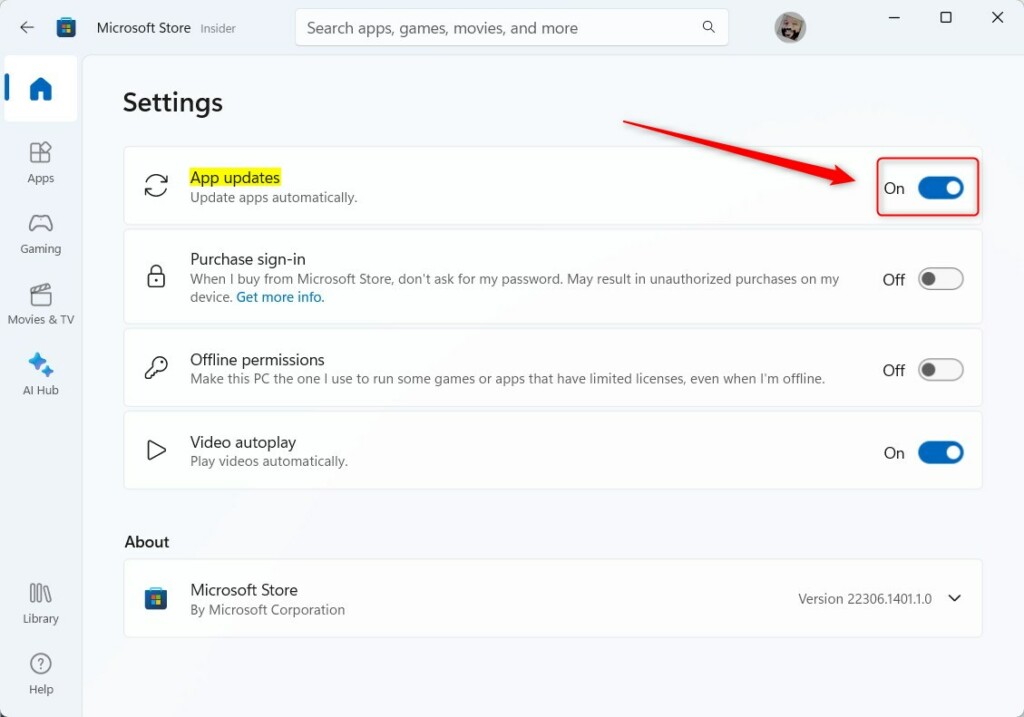
- Find App updates in the settings list.
- Click the switch to set it to On or Off. On lets the Store update apps automatically. Off stops automatic updates.
No restart is needed. The change takes effect straight away. To undo it, return to the same page and flip the switch back.
With the switch off, you can still update apps by hand. Open the Store, click Library, then click Get updates. The Store lists each app with a pending update and downloads them.
If the switch is greyed out or missing, a policy set by your organization or by one of the methods below may be controlling it. Check the Group Policy and Registry sections further down.
Troubleshooting Failed Updates
Stuck downloads often need the Microsoft Store cache cleared. The cache can hold corrupted temporary files that block the Store from fetching updates. Typical signs are an update that sits at "Pending" or "Waiting" for a long time, or a Store page that will not load. Try the steps below in order.
1Use the WSReset Command
Running the WSReset command clears the Microsoft Store cache. It fixes stuck Store app updates without removing any of your installed apps. The tool resets the Store backend and forces it to fetch fresh update lists from Microsoft servers.
- Press Windows Key + R on your keyboard. The Run dialog opens.
- Type
wsreset.exeand press Enter. - A blank window will appear. Do not close it. Wait for it to close on its own, which can take up to a minute. The Store then opens automatically.
Once the Store is open, go to Library and click Get updates to see whether the stuck updates now download. If nothing happens, restart your PC and try again.
2Run the Windows Update Troubleshooter
If failures persist, run the official Windows Update Troubleshooter. This diagnostic utility checks system services such as BITS (Background Intelligent Transfer Service), which coordinates background file transfers. If BITS or a related service is stopped or broken, Store downloads can stall even when your internet connection is fine. Follow the prompts, apply any fixes it offers, and restart your PC if it asks you to.
Method 2Use the Group Policy Editor (Admin Only)
The Group Policy Editor (a tool used to manage system settings across Windows) lets you turn off automatic Microsoft Store app updates for every user account on your computer at once. This works well if you manage several accounts and want full control over when software updates happen.
The Group Policy Editor is included in Windows 11 Pro, Enterprise and Education. It is not available in Windows 11 Home. On Home, use the Registry method further down.
Use these steps when you need centralized update control. You need to be signed in with an administrator account.
- Press Windows Key + R, type
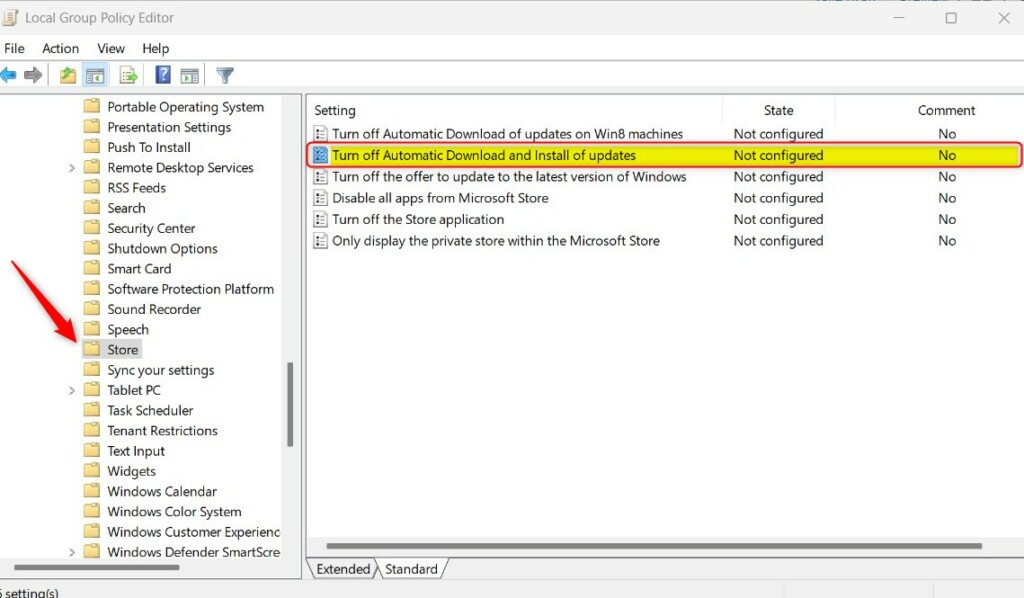
gpedit.msc, and press Enter. The Local Group Policy Editor opens. - In the left pane, go to:
Computer Configuration\Administrative Templates\Windows Components\Store - In the right pane, find Turn off Automatic Download and Install of updates and double-click it. A settings window opens.
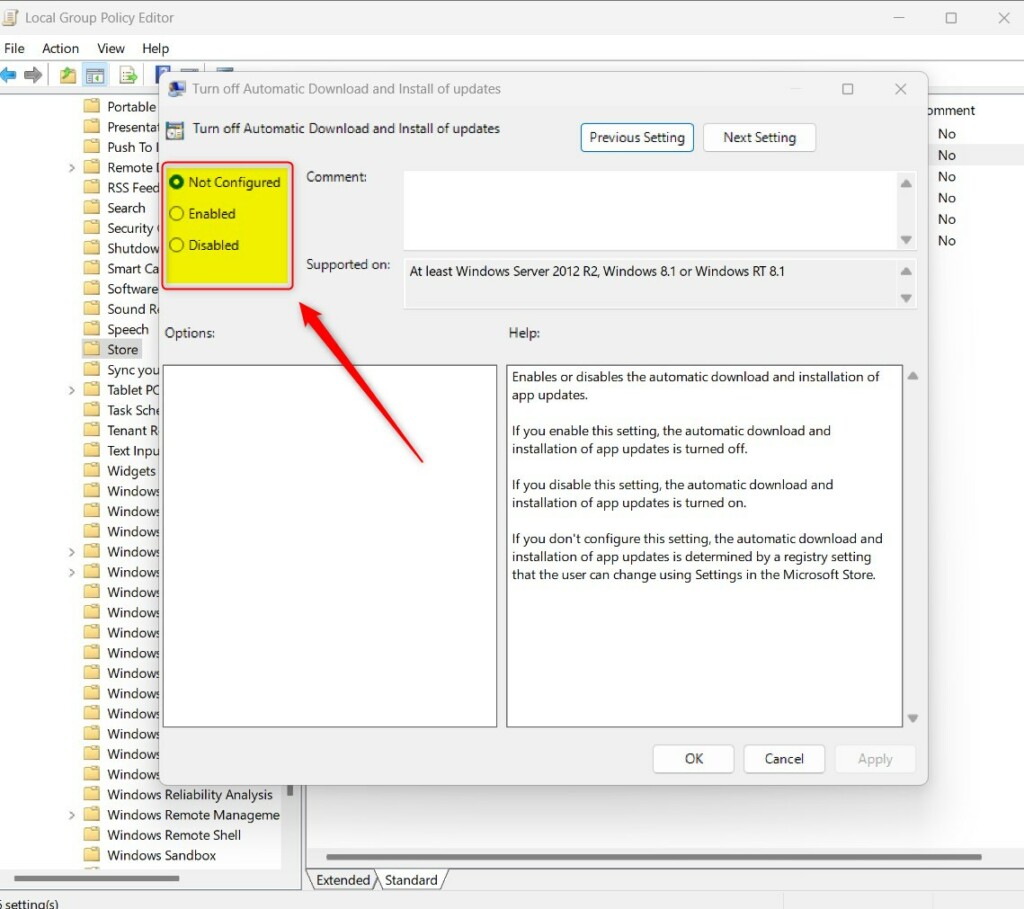
- Set it to Enabled to stop updates or Disabled to allow them. Click Apply, then OK.
The policy normally applies on its own within a short time. If the Store still behaves the same way, restart your PC. To undo the change, open the same policy and set it to Not Configured, which returns the Store to its default behavior.
Method 3Use the Registry Editor (Admin Only)
The Registry Editor (a database that stores low-level Windows settings) lets you block Microsoft Store app updates on Windows versions that do not include the Group Policy Editor, such as Windows 11 Home. It produces the same update restriction by changing the system keys directly.
Use this method when the policy tools are missing from your edition of Windows. Back up the registry or create a restore point first, because a wrong change in the registry can cause problems. You need an administrator account.
- Press Windows Key + R, type
regedit, and press Enter. Click Yes if User Account Control asks for permission. - In the left pane, navigate to:
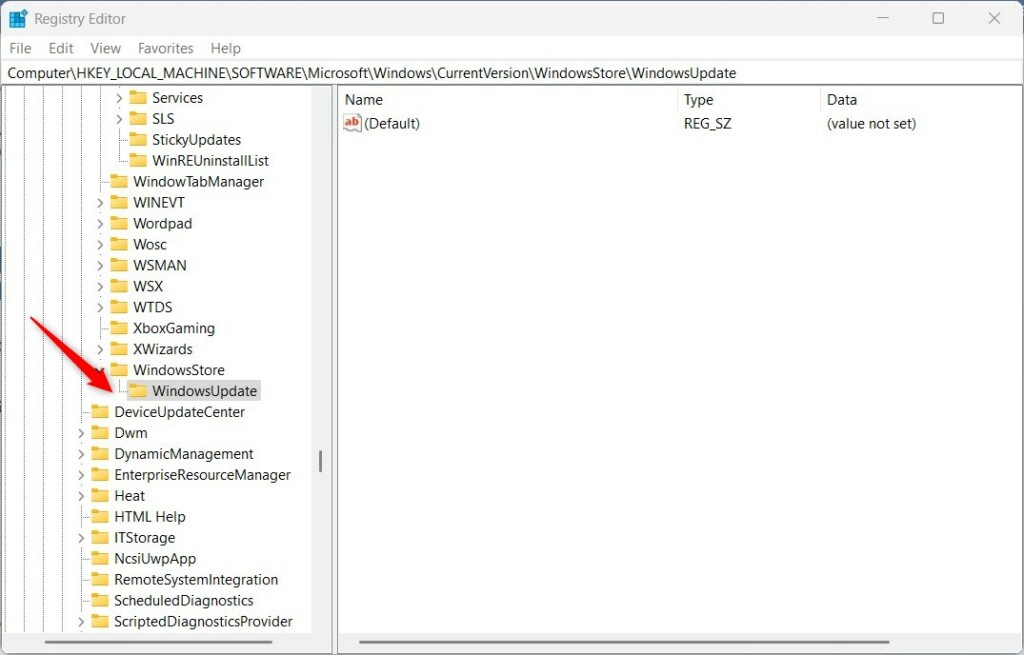
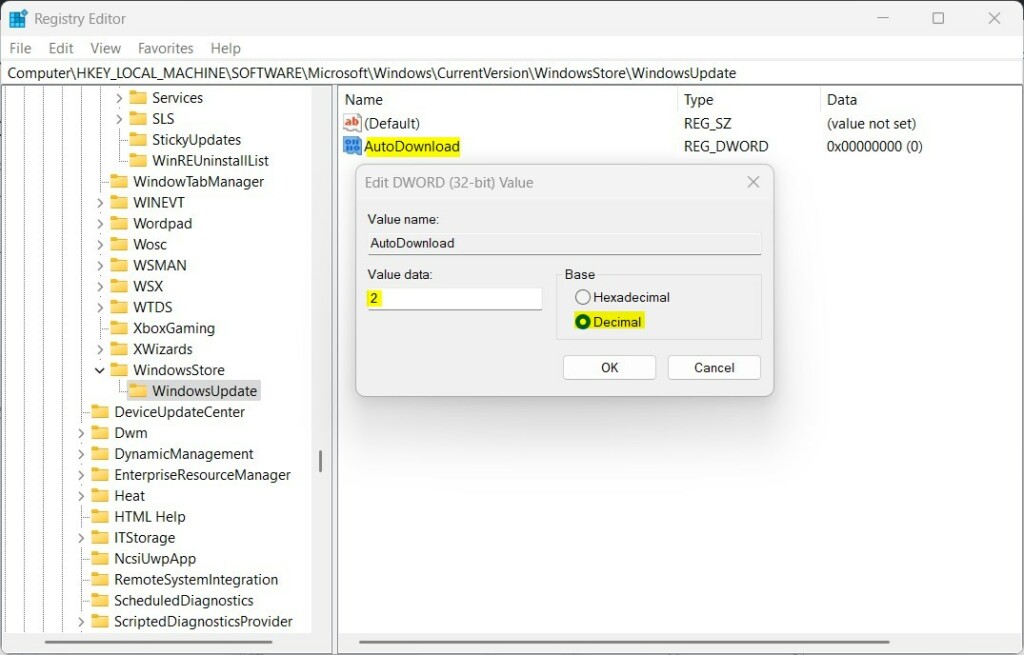
HKEY_LOCAL_MACHINE\SOFTWARE\Microsoft\Windows\CurrentVersion\WindowsStore\WindowsUpdateIf part of this path does not exist, right-click the parent key, select New Key, and name it to match. - Right-click an empty area in the right pane, select New DWORD (32-bit) Value, and name it
AutoDownload. - Double-click the new value and set it to 4 to stop updates or 2 to allow them. Click OK.
Restart your PC so the change is picked up. To undo it, set the value back to 2, or right-click the value and select Delete to remove it.
Summary
Controlling software updates helps maintain system performance and security compliance. Pick the method that fits your edition of Windows: the Store settings for a single user, Group Policy for all accounts on Pro and higher, or the Registry on Home. Whichever you choose, check for updates by hand regularly if you turn automatic ones off.
Have a question about this guide?
Answered by AI from this guide. Good questions may be added to this page — please don't include personal details.
Did this guide fix your problem?

About the Author
Richard
Tech Writer, IT Professional
Richard is a writer at Geek Rewind who turns complex IT tasks into clear, step-by-step guides. He draws on years of hands-on experience in system administration and enterprise IT operations, focusing on Windows, Linux and WordPress: the problems people actually run into, and the fixes that work. His server and WordPress guides come from systems he runs himself. Richard builds and maintains the platform behind Geek Rewind, from its Ubuntu servers and Nginx configuration to its custom WordPress plugins. Many new tutorials start with readers' questions, and he's always glad to answer them in the comments.
No comments yet — be the first to share your thoughts!