How to Install Pending Updates in Windows 11

- 16 steps
- Needs administrator rights
- Includes a restart or sign-out
Pending updates in Windows 11 are updates that Windows has found or downloaded but has not finished installing. The fastest way to install them is Settings Windows Update, where you select Check for updates, then Download & install all, and restart when prompted.
This guide covers the full process, what the status labels mean, and how to fix an update that stays on Pending install. The steps apply to current Windows 11 releases, and the same menus appear in both Home and Pro.
Open Settings Windows Update, select Check for updates, then select Download & install all to install every pending update in Windows 11. The status moves from Downloading to Installing, and Restart now appears when a restart is needed. Repeat Check for updates after signing in until you see “You’re up to date”.
What “pending” means in Windows Update
Windows shows a status under each update name. Labels such as Pending install, Downloading, Installing and Restart required tell you where the update is in the process. Pending means Windows knows about the update but has not started or finished installing it.
Updates wait for several ordinary reasons. Your PC may be outside the time Windows reserves for installs, or a restart from an earlier update may be outstanding. It may also be on battery or a metered connection (a connection with a data limit, which Windows treats cautiously). Some managed work PCs also have updates paused or blocked by an administrator.
Most pending updates install after a manual check and a restart. If yours does not, the troubleshooting section below covers the usual causes in order.
Before you start
Some quick checks can head off a failed install. Run through them before you start.
- Plug in a laptop. Windows may delay or stop installs on low battery, and a power loss mid-install can damage the update.
- Save your work. Most updates need a restart. The PC restarts as soon as you select the button, so save open files first.
- Check free storage. Open Settings System Storage. Updates need room to download and unpack, and a nearly full drive is a common reason they stall.
- Connect to a stable network. Updates can be several hundred megabytes, and a dropped connection restarts the download.
Install pending Windows updates in 🪟 Windows 11
These steps install every pending update from start to finish, using Windows Update in Settings.
- Open Settings. Press Win+I, or right-click the Start button and select Settings.
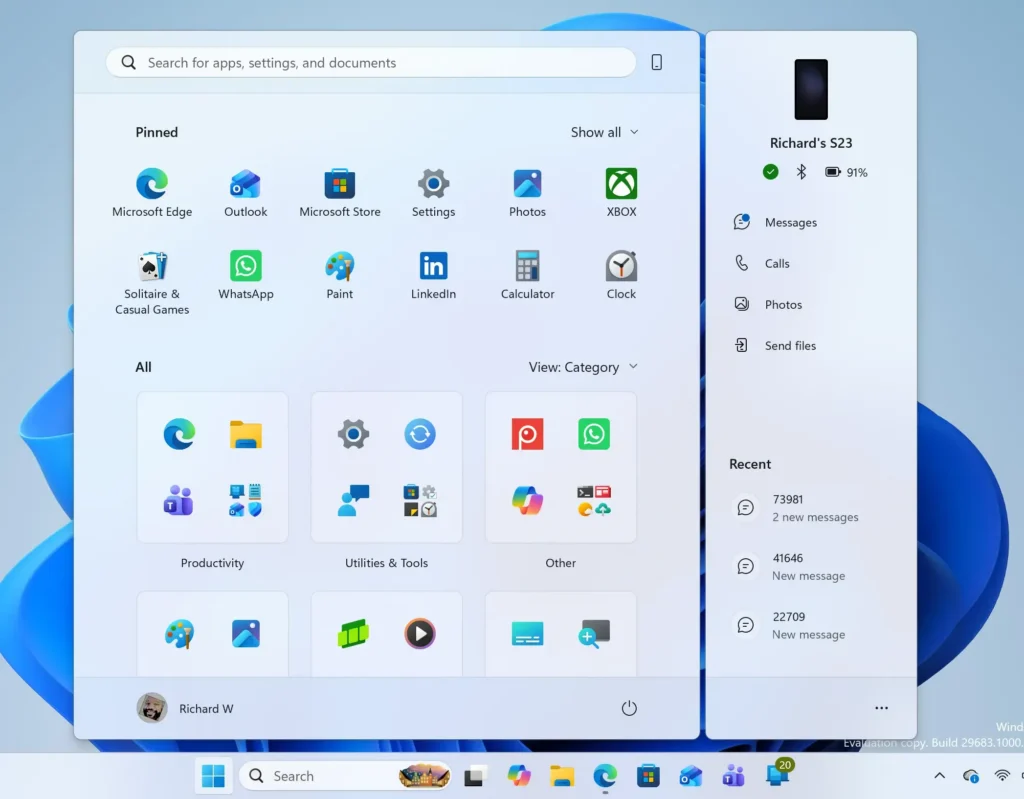
Windows 11 Start menu search panel for opening OpenSSH Client settings - Select Windows Update. It is the last item in the left-hand list. The page shows either your current status or a list of waiting updates.
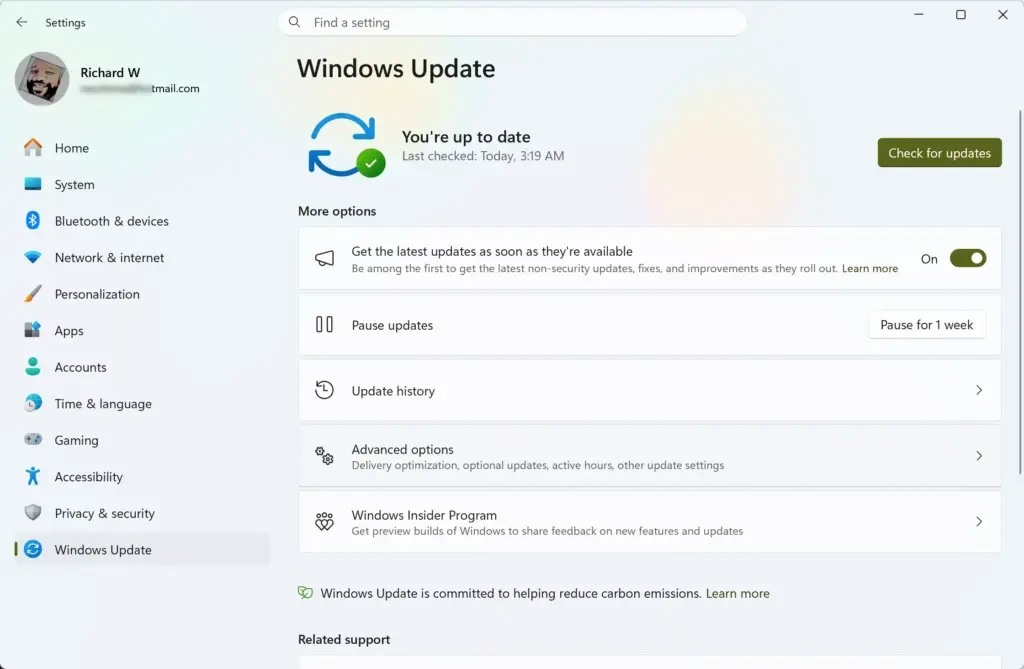
Settings › Windows Update - Select Check for updates. This forces Windows to contact Microsoft now instead of waiting for its schedule. Wait a few seconds while the status reads Checking for updates.
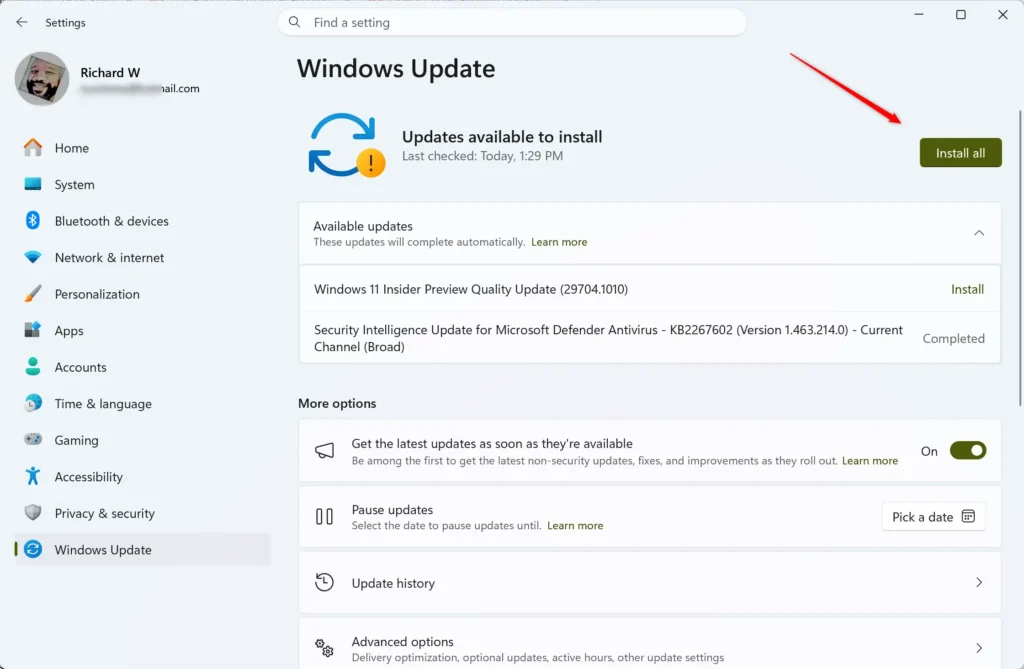
- Look at the update list. Pending updates appear under the status banner with names like “2026-10 Cumulative Update for Windows 11” or a version number. A banner reading “You’re up to date” means nothing is waiting.
- Select Download & install all. If you see only one update, the button reads Download & install. The status then changes to Downloading with a percentage.
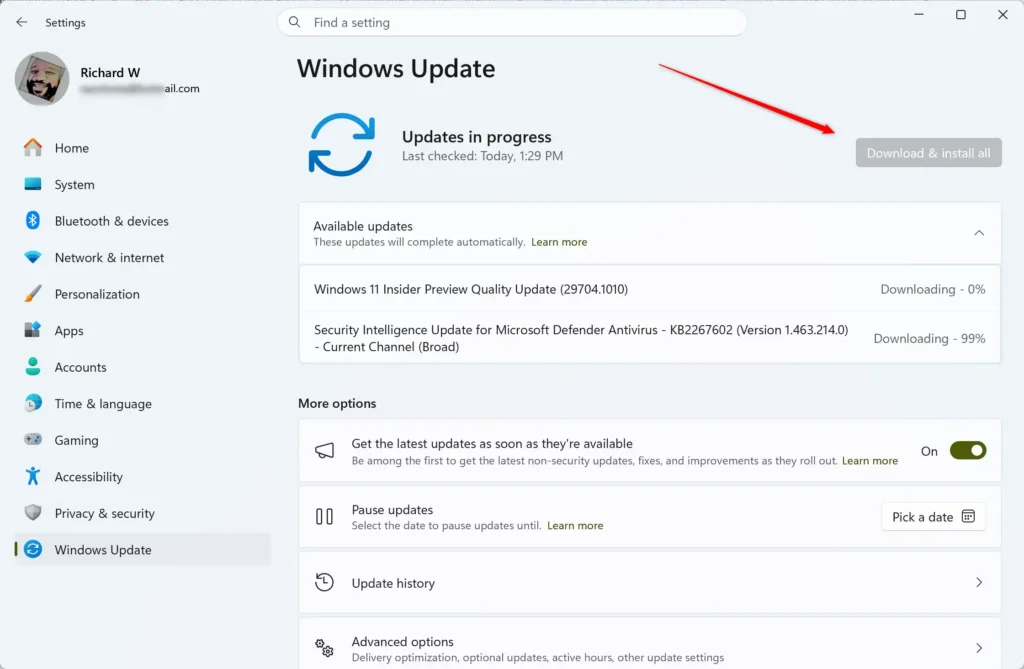
Settings > Windows Update - Wait for the install to finish. The status moves to Installing. You can keep working, but avoid shutting the PC down, because that can interrupt the update.
Settings > Windows Update - Select Restart now. This appears when the update needs a restart, with the status Restart required. Choose Schedule the restart instead if you are not ready; it lets you pick a time.
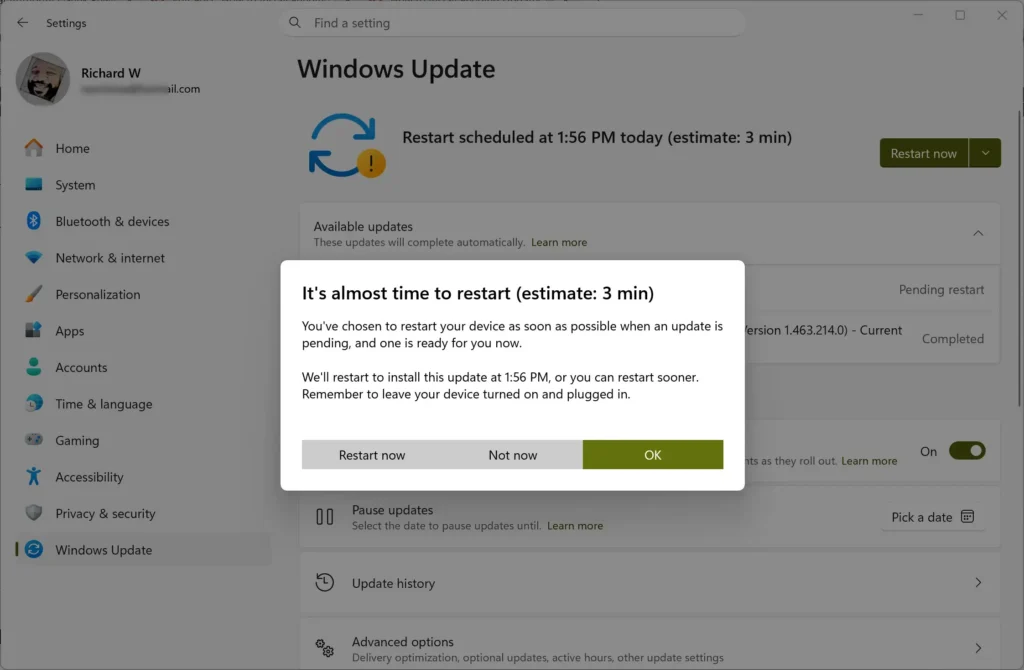
Settings > Windows Update - Wait during the restart. The screen shows “Working on updates” with a percentage. The PC may restart more than once. Do not hold the power button unless the screen has not changed for a long time.
- Sign in and reopen Windows Update. Go back to Settings Windows Update after you reach the desktop.
- Select Check for updates again. Some updates only appear after earlier ones are installed, so a second check often finds more.
- Repeat until you see “You’re up to date”. That banner, with a recent “Last checked” time, confirms nothing is pending.
If you only need the basic check, the guide on how to check for Windows 11 updates covers it in shorter form.
Install optional updates and driver updates
Windows does not install some updates on its own. These include optional preview updates and some driver updates (software that lets Windows talk to your hardware). They do not appear in the main list, so the earlier steps do not install them.
Open Settings Windows Update Advanced options Optional updates to see whether any are waiting. Select the ones you want and choose Download & install. The guide to checking for and installing optional updates in Windows 11 walks through this page. If you would rather control drivers separately, see how to turn driver updates with Windows Update on or off.
If an update stays on Pending install
Work through these fixes in order. They go from the quickest to the most involved, and most pending updates clear within the first three.
Restart the PC
An earlier update may be waiting on a restart before the next one can start. Select Start Power Restart, then reopen Settings Windows Update and select Check for updates.
Use Restart, not Shut down. On many PCs, Shut down can save part of the system state for a faster start, called Fast startup, so it may not finish the update.
Resume paused updates
Paused updates stay pending until the pause ends. If Settings Windows Update shows Updates paused with a date, select Resume updates. Windows then starts the check again.
Select Resume updates to end a pause early. Two guides explain the limits if you pause updates yourself in future. They cover how to pause and resume updates for Windows 11 and how to pause Windows 11 updates for up to 35 days.
Check for a metered connection
Windows may hold back large downloads on a metered connection. Open Settings Network & internet Wi-Fi, select your network, and check that Metered connection is off. On Ethernet, select the Ethernet entry instead.
Alternatively, open Settings Windows Update Advanced options and turn on Download updates over metered connections. Turn it off again afterwards if your data plan is limited.
Free up storage
Then return to Windows Update and select Check for updates.
Run the Windows Update troubleshooter
The troubleshooter looks for common faults and fixes some automatically. Open Settings System Troubleshoot Other troubleshooters, find Windows Update, and select Run.
Follow the prompts and apply any fixes it offers. When it finishes, restart the PC and check for updates again.
Check the Windows Update service
Windows Update relies on a background service of the same name. This step needs an administrator account, so Windows may ask you to confirm the change.
- Open Services. Select Start, type
services.mscand press Enter. - Find Windows Update. Scroll the list until you see the entry with that name.
- Double-click Windows Update. The Properties window opens.
- Check the Startup type. It should not read Disabled. If it does, change it to Manual or Automatic and select Apply.
- Select Start. If the service is stopped, this starts it. Select OK and check for updates again.
Repair system files with SFC and DISM
Damaged system files can block updates. These two commands, SFC (System File Checker, which scans Windows system files) and DISM (Deployment Image Servicing and Management, which repairs the Windows component store), scan for and fix damage. They need administrator rights, so open Terminal (Admin) by right-clicking the Start button and selecting Terminal (Admin). Then run each command and wait for it to finish.
sfc /scannowDISM /Online /Cleanup-Image /RestoreHealthBoth can take several minutes, and progress may appear to stall at a percentage for a while. Restart the PC afterwards and check for updates once more.
Review the update history for failures
Open Settings Windows Update Update history. Failed updates show a status of Failed to install and often an error code. Search the exact code and KB number (the number Microsoft gives each update, such as KB followed by digits) to find the cause.
The error code and KB number are also what you need if you install the update by hand.
Install the update manually
If one update keeps failing, download it directly from the Microsoft Update Catalog and run the installer. This skips the download that Windows Update normally does, but the update still has to pass Windows’ compatibility checks, which confirm it suits your PC. The guide on how to manually download and install Windows 11 updates covers the full process.
If Check for updates is missing or greyed out
On a PC managed by an employer or school, Windows Update may show the message “Some settings are managed by your organization”. The administrator controls which updates install and when. Ask your IT department to make this change, because you cannot do it yourself without their permission.
On a personal PC, the button may have been removed by a policy setting. The guide on how to disable Check for updates in Windows 11 explains what hides it and how that change works. Reversing that policy setting brings the button back.
Confirm the updates installed
Open Settings Windows Update Update history. Successful updates are listed under sections such as Quality Updates, with a status of Successfully installed and the install date.
To check the Windows version itself, press Win+R, type winver and press Enter. The window shows the Windows version and the OS build, the exact release number that identifies your update level. After a feature update, the version number changes. After a monthly update, the build number changes.
Remove an update that causes problems
If a new update causes trouble, you can remove it. Open Settings Windows Update Update history, scroll to Related settings, and select Uninstall updates. Choose the update, select Uninstall, and confirm.
Windows may reinstall the update on its next check, so pause updates if you need time to wait for a fix. The guide on how to uninstall Windows updates in Windows 11 covers the options in more detail.
What to do next
If updates still fail after the fixes above, note the error code from Update history and search it with the KB number, then try the manual install route. For more update tasks, the Windows 11 Updates and Maintenance Hub collects the related guides. If automatic installs interrupt your work, you can also disable automatic updates in Windows 11, though installing security updates regularly remains the safer habit.
Frequently asked questions
How to install optional 🪟 Windows 11 updates?
To install optional updates, open Settings Windows Update, then select Advanced options and Optional updates. Tick the updates you want, such as driver or feature updates, and select Download & install. Windows does not install these automatically, so skip any you do not need.
How to schedule updates in 🪟 Windows 11?
Windows 11 does not offer a set install time for updates, but you can keep restarts out of your working hours. Open Settings Windows Update Advanced options, then select Active hours and enter your start and end times. Windows will not restart for updates during that window.
How to disable automatic updates in 🪟 Windows 11?
Pausing updates is the safest way to stop them for a while. Open Settings Windows Update, select Pause updates, and pick a pause length of up to five weeks. Turning off updates for good leaves your PC open to security flaws, so avoid it on a personal computer.
How to schedule automatic updates in 🪟 Windows 11?
Windows 11 does not let you pick an exact time for automatic installs. Instead, set Active hours under Settings Windows Update Advanced options so Windows avoids restarting while you work. You can also use Restart options to schedule a restart for a time you choose after updates install.
Still have a question?
Answered by AI from this guide. Good questions may be added to this page — please don't include personal details.
Did this guide fix your problem?

About the Author
Richard
Tech Writer, IT Professional
Richard is a writer at Geek Rewind who turns complex IT tasks into clear, step-by-step guides. He draws on years of hands-on experience in system administration and enterprise IT operations, focusing on Windows, Linux and WordPress: the problems people actually run into, and the fixes that work. His server and WordPress guides come from systems he runs himself. Richard builds and maintains the platform behind Geek Rewind, from its Ubuntu servers and Nginx configuration to its custom WordPress plugins. Many new tutorials start with readers' questions, and he's always glad to answer them in the comments.
No comments yet — be the first to share your thoughts!