How to Use System File Checker in Windows 11


System File Checker (SFC) is a built-in Windows 11 tool. It scans your computer for missing or damaged system files and replaces them automatically. You run it with the sfc /scannow command in Command Prompt (a text-based tool for running commands). It often fixes random app crashes, odd error messages and startup problems without reinstalling Windows.
The scan usually takes about 5 to 15 minutes, depending on how fast your PC and drive are. If SFC finds a damaged file, it replaces it with a good copy from a protected backup folder on your drive. You need an administrator account to run it. The same steps work on Windows 11 Home and Pro.
Open Command Prompt as administrator, then type DISM.exe /Online /Cleanup-Image /Restorehealth and press Enter. After DISM completes, type sfc /scannow and press Enter to scan and repair system files.
Step 1Open Command Prompt as an Administrator
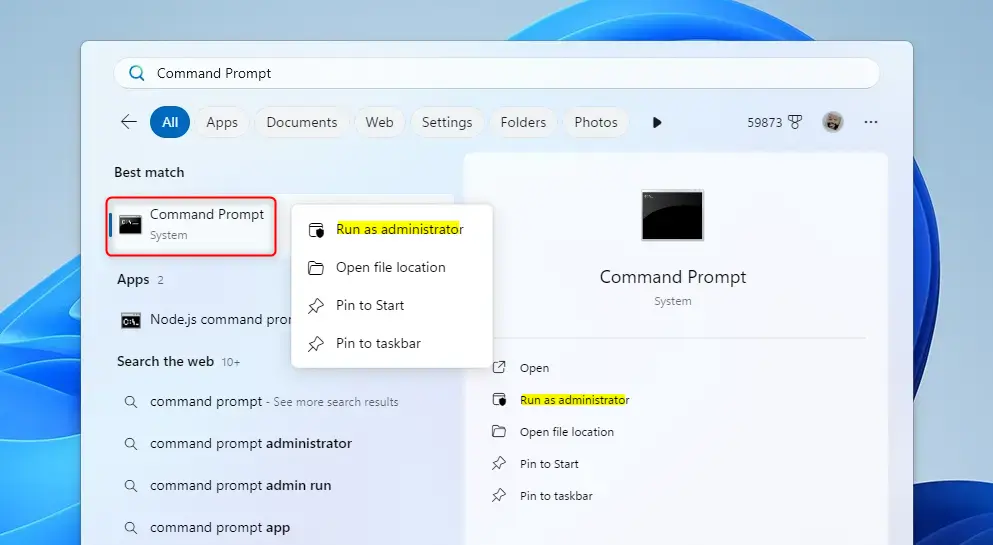
SFC changes protected system files, so Command Prompt must run with administrator rights. Without them the command fails with a message saying you must be an administrator. Here is how to open it with full rights:
- Click the Search icon or box on the taskbar, usually at the bottom of the screen. A search panel opens.
- Type
Command Promptinto the search box. Command Prompt appears at the top of the results. - Right-click Command Prompt. A small menu opens. (You can also click Run as administrator in the pane on the right side of the search panel.)
- Click Run as administrator.
- If a box asks “Do you want to allow this app to make changes to your device?”, click Yes. If you are signed in with a standard account, Windows asks for an administrator password instead.
A black Command Prompt window opens. The title bar reads “Administrator: Command Prompt”. If it does not say Administrator, close the window and start again.
Step 2Run the DISM Tool First
Run the Deployment Image Servicing and Management tool (DISM, a utility that repairs the Windows system image) before SFC. SFC takes its replacement files from that image. If the image is damaged, SFC can fail to repair anything. Running DISM first gives SFC a clean source to work from.
Here is how to run DISM:
- Check that the administrator Command Prompt window from Step 1 is still open. If you closed it, open it again as an administrator.
- Type the DISM command given for this step exactly as written. Check the spaces and slashes, because the command fails if they are wrong.
- Press Enter. A progress bar appears.
- Wait for it to finish. The bar can sit at 20 percent for a long time, which is normal. Do not close the window. DISM usually downloads any files it needs through Windows Update, so keep the PC online.
- Look for the message saying the operation completed successfully. Then continue to the SFC scan.
If DISM reports an error, check your internet connection and run it once more before moving on.
Now run System File Checker. It compares every protected system file against a known good version and replaces any file that does not match.
Here is how to run SFC:
- Stay in the administrator Command Prompt window. If you closed it, open it again as an administrator (go back to Step 1).
- Type the following command. Watch the spaces; there is one between sfc and the slash:Code
sfc /scannow - Press the
Enterkey. The scan starts and a message reads "Beginning system scan. This process will take some time." - Wait while the percentage counts up to 100. Do not close the window or shut down the PC during the scan. The count may pause for a while, which is normal.

When the scan ends, Windows shows one of these results:
- Windows Resource Protection did not find any integrity violations. Your system files are fine. The problem you are chasing is probably somewhere else, such as a driver or an app.
- Windows Resource Protection found corrupt files and successfully repaired them. SFC fixed the damage. Restart your PC so the repaired files load, then check whether the problem is gone.
- Windows Resource Protection found corrupt files but was unable to fix some of them. Run DISM again, restart, and run SFC a second time. If it still fails, the damage is deeper and may need a repair install of Windows.
- Windows Resource Protection could not perform the requested operation. This usually means Command Prompt is not running as administrator, or another process is blocking the scan. Reopen Command Prompt as an administrator and try again.
SFC has no undo. It only replaces files that are damaged or missing, so it is safe to run. If you want a safety net before a big repair, create a restore point first.
Reference:
Summary
The System File Checker (SFC) is a built-in Windows tool that finds and fixes corrupted system files on your computer. Open Command Prompt as an administrator, run DISM first to repair the system image, then run SFC and restart if it repairs anything.
Have a question about this guide?
Answered by AI from this guide. Good questions may be added to this page — please don't include personal details.
Did this guide fix your problem?

About the Author
Richard
Tech Writer, IT Professional
Richard is a writer at Geek Rewind who turns complex IT tasks into clear, step-by-step guides. He draws on years of hands-on experience in system administration and enterprise IT operations, focusing on Windows, Linux and WordPress: the problems people actually run into, and the fixes that work. His server and WordPress guides come from systems he runs himself. Richard builds and maintains the platform behind Geek Rewind, from its Ubuntu servers and Nginx configuration to its custom WordPress plugins. Many new tutorials start with readers' questions, and he's always glad to answer them in the comments.
No comments yet — be the first to share your thoughts!