How to Delete Files from Your Computer but Keep Them in OneDrive on Windows 11
Keeping files on both your computer and in OneDrive at the same time uses up storage space on your PC. OneDrive syncs your files, meaning a copy lives locally and another in the cloud, which is handy for quick access.
Local copies of files on your computer can be deleted while remaining safely stored in OneDrive cloud storage. This process frees up space on your Windows 11 hard drive.
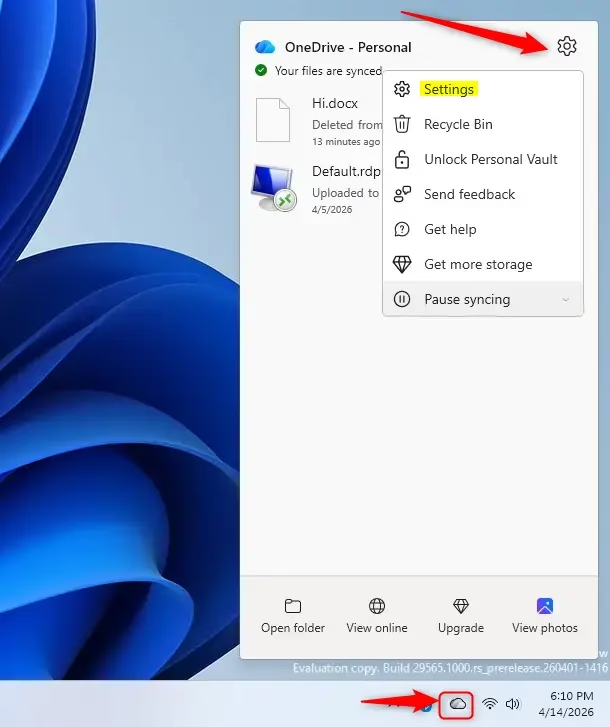
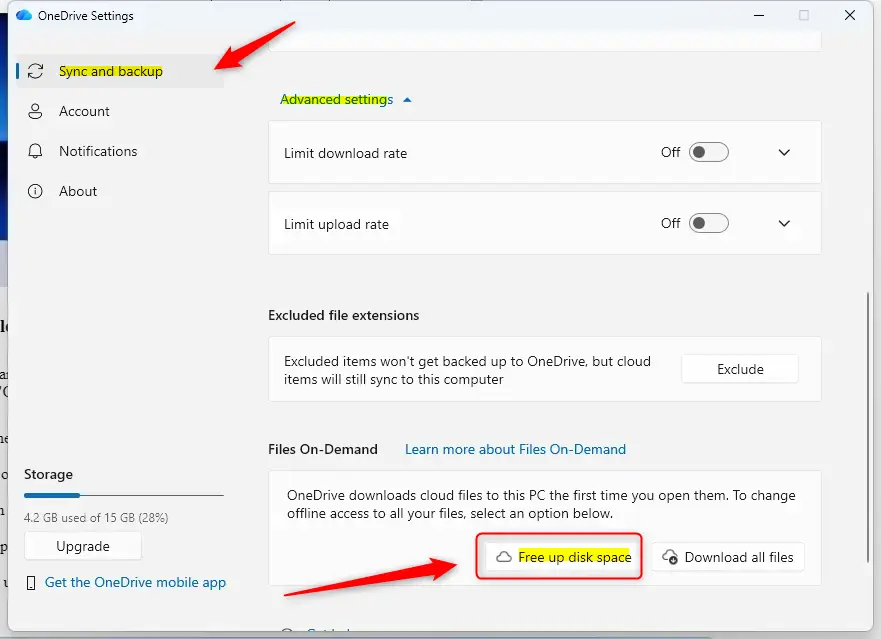
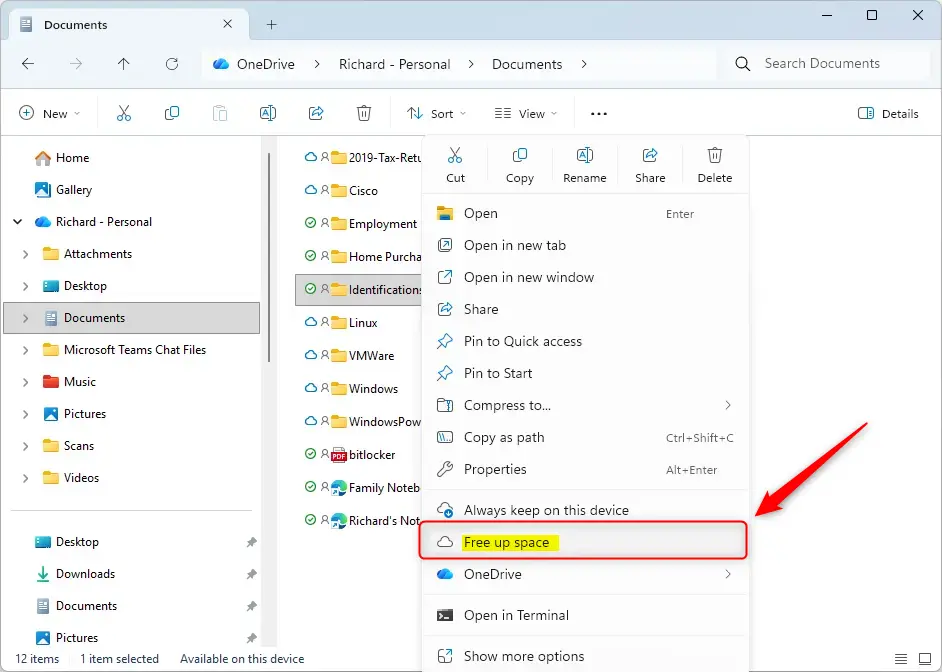
Right-click on the OneDrive icon in your system tray and select Settings. Ensure “Save space and download files as you use them” is checked under the Account tab. Then, in File Explorer, right-click desired files or folders and select “Free up space” to make them online-only.
Why Use OneDrive Files On-Demand?
OneDrive Files On-Demand is a handy feature that lets you see all your files in File Explorer without taking up space on your computer. Files marked as ‘online-only’ only download when you actually open them, which is great for saving storage. You get to decide which files always stay on your PC and which ones are just in the cloud.
Step 1Find Your OneDrive Files on Your PC
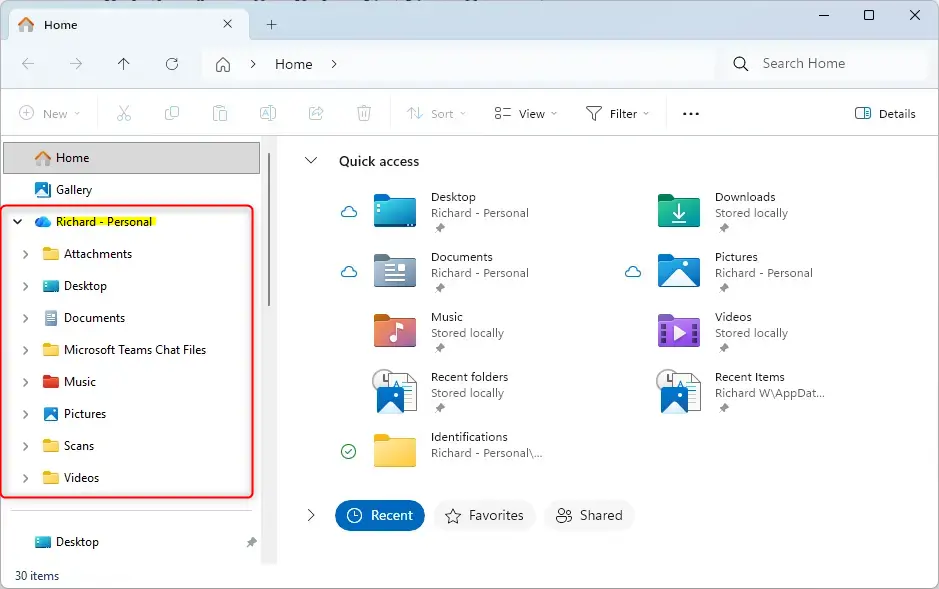
You can easily find all your OneDrive files right on your Windows 11 computer using File Explorer, just like any other folder. To get there, open File Explorer by clicking the yellow folder icon on your taskbar or by pressing the Windows key and the letter E at the same time. Once File Explorer is open, look for ‘OneDrive’ listed on the left side and click it to see everything you have saved there.
- Open File Explorer. You can click the folder icon on your taskbar or press
Windows key + E.
- Look for “OneDrive” in the left-hand side of File Explorer. Click on it to see your files.
- Find the files or folders you want to remove from your computer.
Step 2Turn On Files On-Demand
OneDrive Files On-Demand saves computer storage space, and this feature often turns on automatically. To check or turn on OneDrive Files On-Demand, find the small OneDrive cloud icon in the bottom-right corner of your screen, near the clock. If you do not see the OneDrive cloud icon, click the small upward-pointing arrow. Right-click the OneDrive cloud icon and select 'Settings' to open OneDrive's options and make sure Files On-Demand is active.
- Find the OneDrive cloud icon. It’s usually in the bottom-right corner of your screen, near the clock. If you don’t see it, click the small arrow pointing up.
- Right-click the OneDrive icon. A menu will appear.
- Choose “Settings”. This opens the OneDrive settings window.
- Click on the “Account” tab.
- Look for “Files On-Demand”. Make sure the option “Save space and download files as you use them” is selected.
Step 3Make Files “Online-Only”
With Files On-Demand turned on, you can now choose to keep specific files or entire folders set to ‘online-only’ to save valuable space on your computer. Open your OneDrive folder in File Explorer and locate the items you want to move to the cloud. Right-click on the file or folder you want to make online-only, and then look for an option like ‘Smart Sync’ or ‘Free up space’.
- Open your OneDrive folder in File Explorer.
- Find the files or folders you want to make “online-only”.
- Right-click on the file or folder. A menu will show up.
- Look for an option like “Smart Sync” or “Free up space”. The exact words might be slightly different.
- Choose “Free up space”. If the file was downloaded, its icon will change to a cloud. This means it is now online-only.
What the icons mean:
- 📝Good to KnowBlue cloud icon: The file is online-only. It is in OneDrive but not on your computer. You need internet to open it.
Green circle with a white checkmark: The file is on your computer and in OneDrive. It takes up space.
White circle with a blue outline and a green checkmark: The file is always available on your computer. OneDrive will not remove it.
Reference:
https://support.microsoft.com/en-us/onedrive/delete-files-or-folders-in-onedrive
Summary
Using OneDrive’s Files On-Demand lets you see all your files in File Explorer without using up your computer’s storage space.
Can I use OneDrive online only?
A blue cloud icon next to a OneDrive file or folder indicates that the file is only available online. Online-only files don't take up space on your computer.
Was this guide helpful?

About the Author
Richard
Tech Writer, IT Professional
Richard, a writer for Geek Rewind, is a tech enthusiast who loves breaking down complex IT topics into simple, easy-to-understand ideas. With years of hands-on experience in system administration and enterprise IT operations, he’s developed a knack for offering practical tips and solutions. Richard aims to make technology more accessible and actionable. He's deeply committed to the Geek Rewind community, always ready to answer questions and engage in discussions.


No comments yet — be the first to share your thoughts!