How to Lock Your OneDrive Personal Vault

Personal Vault is a protected folder in OneDrive. Opening it takes extra verification, such as a fingerprint, a face scan, a PIN or a security code sent to you. Locking it keeps your private files safe when you step away from your PC. The vault locks on its own after a period of inactivity, but you can also lock it by hand in two clicks whenever you want.
Setup requires a Microsoft account with two-step verification turned on. With this security feature, you approve sign-ins on your phone before you can get in. If you have not set it up yet, do that first. Without it, the vault asks you to verify your identity every time you open it.
Open OneDrive, find Personal Vault, and click the Lock button near the top of the window. Your files are secured immediately and the vault returns to its locked screen. You can also let it lock automatically after 20 minutes of inactivity on the web or 3 minutes on mobile.
Go to Your Personal Vault
You can only lock a vault that is open, so start by getting into it.
- Open OneDrive, either on the OneDrive website or from the OneDrive folder in File Explorer .
- Find the Personal Vault folder in your file list.
- If the vault is already locked, open it and complete the verification it asks for. Once you pass, you should see the files inside.
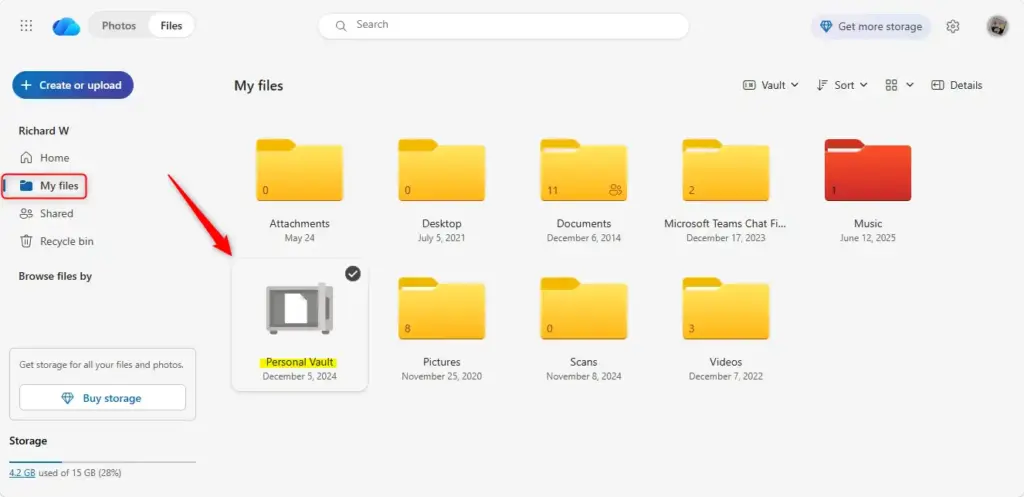
Select the “Lock” Option
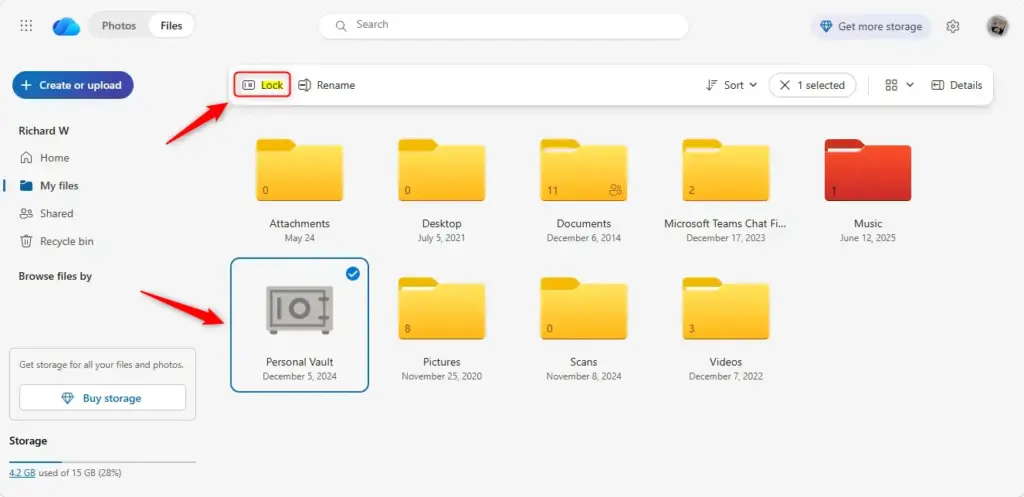
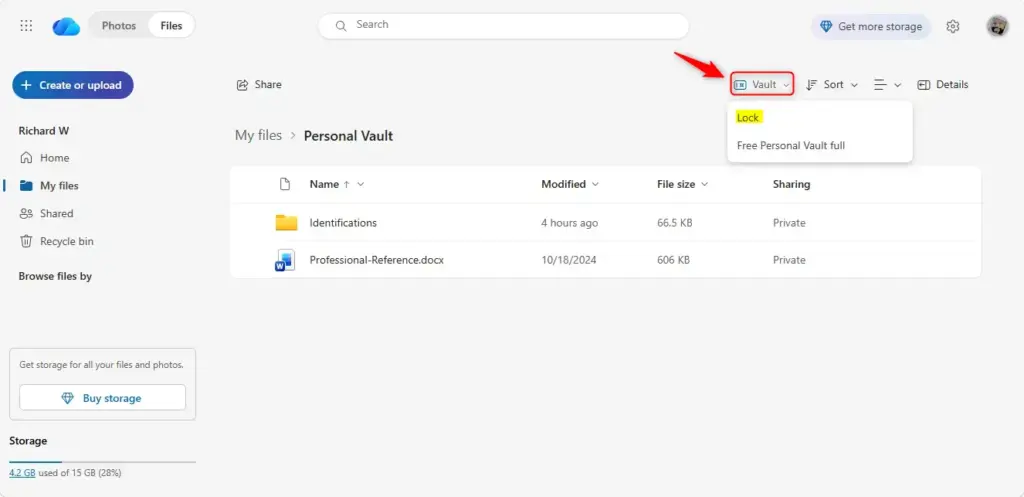
With the vault open, you can lock it right away.
- Look near the top of the window for the Lock button.
- Click Lock. The contents are secured immediately, and the vault goes back to its locked screen.
Confirm Locking
A confirmation prompt may appear before the vault locks. If it does, confirm it. To undo the lock, open the vault again. You will have to verify your identity again, because a locked vault never skips that step.
Automatic Locking and Inactivity Settings
A background timer seals it after 20 minutes of inactivity. This helps on shared computers, public workstations and your own private machine alike. If you forget to lock up and walk away, the files are still protected.
Understanding Auto-Lock Times
Auto-lock times differ by device. On the OneDrive website, your vault locks automatically after 20 minutes of inactivity. The mobile app on your phone or tablet locks much sooner, after just 3 minutes of inactivity.
- On the Web (onedrive.com): Your Personal Vault usually locks after about 20 minutes of not doing anything. If you don't click anything or use your files for 20 minutes, it will lock.
- On Mobile Devices (OneDrive App): The auto-lock time is often shorter on phone apps, usually around 3 minutes of no activity. Phones are lost or picked up by someone else more easily, so the shorter timer makes sense.
Adjusting Auto-Lock Settings
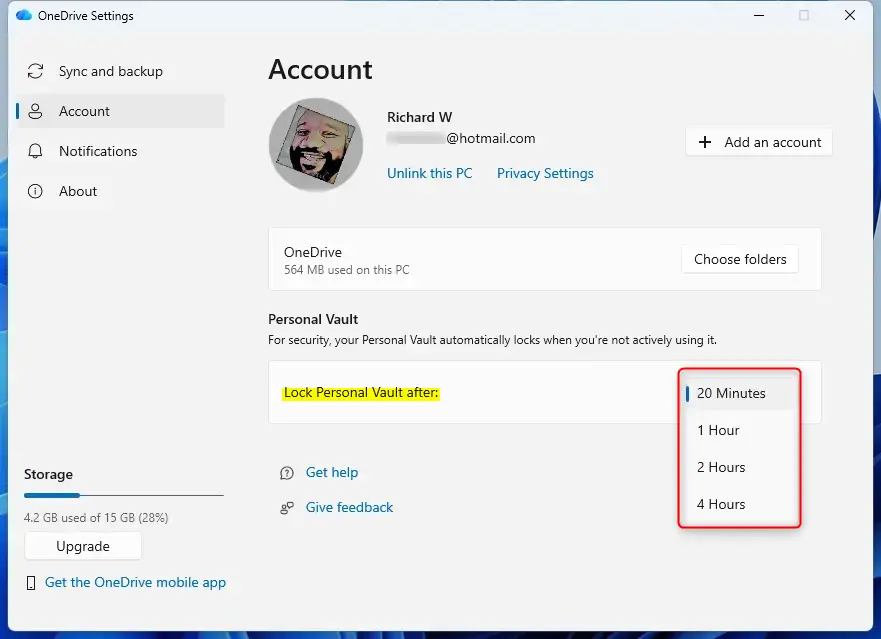
The setting is in the OneDrive cloud menu on your computer or in the app settings on your phone. A shorter time is safer. A longer time means fewer unlock prompts. Pick the one that fits how often you leave your screen. The exact labels can differ slightly between OneDrive versions.
- Access OneDrive Settings: On your computer, click the OneDrive cloud icon in the taskbar, usually in the bottom-right corner. If you don't see it, click the arrow to show hidden icons. Click the gear icon (Settings), then choose Settings. On your phone, open the OneDrive app, tap the Me icon (usually at the bottom), and then select Settings.
- Find Personal Vault Settings: Look for a section called Account or Personal Vault. Inside it, you should see the auto-lock or inactivity timer option for your Personal Vault.
- Choose Your Time: You'll probably see a list or a dropdown menu with different times. Pick one and close the window. The new time applies the next time you open the vault. Longer times mean you won't have to unlock as often, but they also give someone more time to reach your files if your device is left unattended. To go back, open the same setting and choose your old time again.
Reference:
https://support.microsoft.com/en-US/onedrive/protect-your-onedrive-files-in-personal-vault
Summary
To sum up, your vault locks automatically after 20 minutes of inactivity in a web browser and 3 minutes in the mobile app. You can adjust the timeout in the settings menu, and you can still lock the vault by hand at any moment with the Lock button.
Have a question about this guide?
Answered by AI from this guide. Good questions may be added to this page — please don't include personal details.
Did this guide fix your problem?

About the Author
Richard
Tech Writer, IT Professional
Richard is a writer at Geek Rewind who turns complex IT tasks into clear, step-by-step guides. He draws on years of hands-on experience in system administration and enterprise IT operations, focusing on Windows, Linux and WordPress: the problems people actually run into, and the fixes that work. His server and WordPress guides come from systems he runs himself. Richard builds and maintains the platform behind Geek Rewind, from its Ubuntu servers and Nginx configuration to its custom WordPress plugins. Many new tutorials start with readers' questions, and he's always glad to answer them in the comments.
No comments yet — be the first to share your thoughts!