Download a Driver from the Microsoft Update Catalog

- 29 steps
- Needs administrator rights
- Includes a restart or sign-out
When Windows Update and Device Manager cannot find a driver, the Microsoft Update Catalog may have one. It is a Microsoft website that stores drivers and updates as downloadable files. On Windows 11, it gives you a way to install a driver yourself. The quickest route starts in Device Manager, where you copy the device’s hardware ID (a code that identifies the exact hardware model). Search for it on the catalog, download the .cab file, extract it, and point Device Manager at the folder.
The steps are the same on Windows 11 Home and Pro. Installing the driver needs administrator approval, and some drivers ask for a restart when they finish.
To download a driver from the Microsoft Update Catalog, open Device Manager, double-click the device, and on the Details tab choose Hardware Ids from the Property list. Copy the top value, then paste it into the search box at catalog.update.microsoft.com. Sort by Last Updated, pick a Drivers row that matches your system type, and click Download to save the.cab file.
What You Need Before You Start
Three details decide whether you get the right driver, so check them first.
- The device name or hardware ID. The steps below show where to find the ID. It is more reliable than a product name because several models can share a name.
- Your system type. Open Settings System About and read System type under Device specifications. It says 64-bit (x64) or ARM-based. A driver built for the wrong type will not install.
- A browser. Older guides mention ActiveX (an old browser add-on technology) and Internet Explorer (an old Microsoft browser). The current catalog site works in Microsoft Edge and other modern browsers, so you do not need to change any security settings.
Steps to Download a Driver from the Microsoft Update Catalog
These steps find the hardware ID, search the Microsoft Update Catalog, download the driver package, and install it. Follow them in order.
- Open Device Manager. Right-click the Start button and select Device Manager. A list of device categories appears.
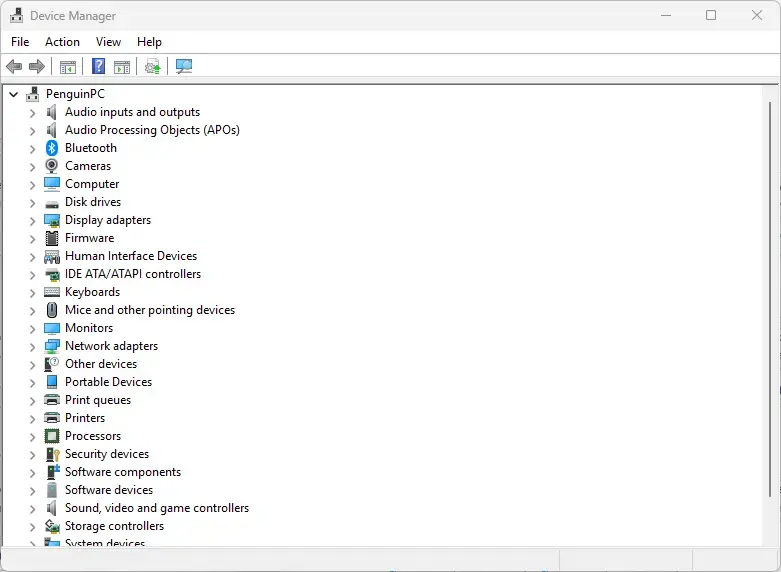
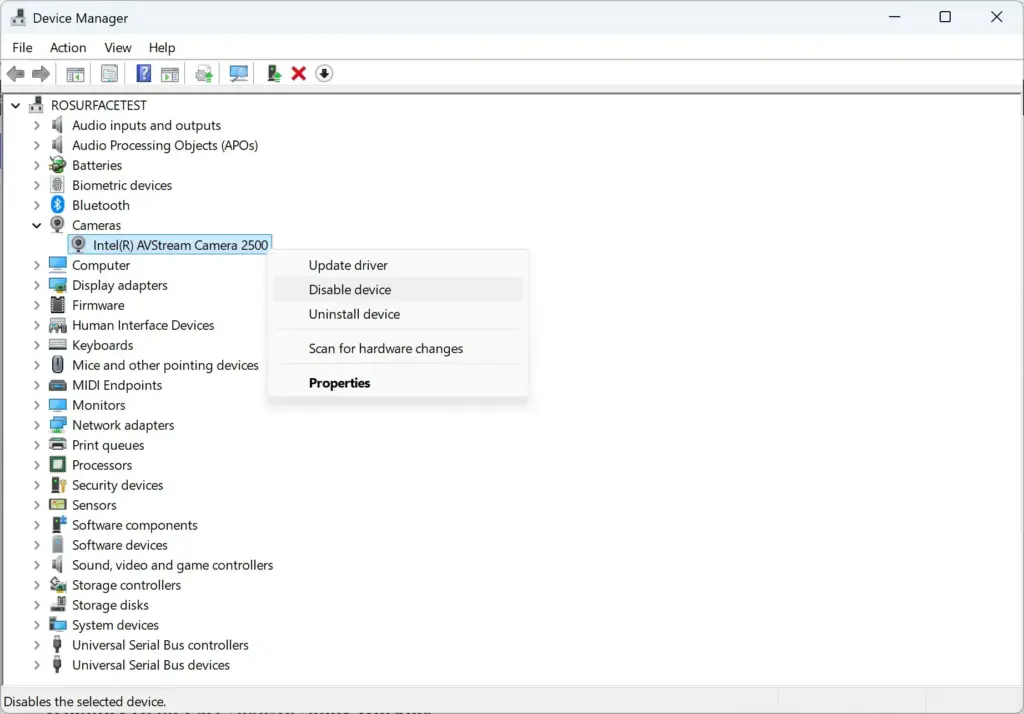
Windows 11 Device Manager window showing hardware and drivers. - Find the device that needs a driver. A device with no working driver sits under Other devices or shows a yellow warning triangle. If the device works but you want a newer driver, expand its category instead.
- Double-click the device. Its Properties window opens.
- Select the Details tab. The tab shows a Property drop-down list.
Device Manager - Choose Hardware Ids from the Property list. The Value box fills with one or more lines of text.
- Right-click the top value and select Copy. The top line is the most specific match. It starts with letters such as PCI\VEN_ or USB\VID_.
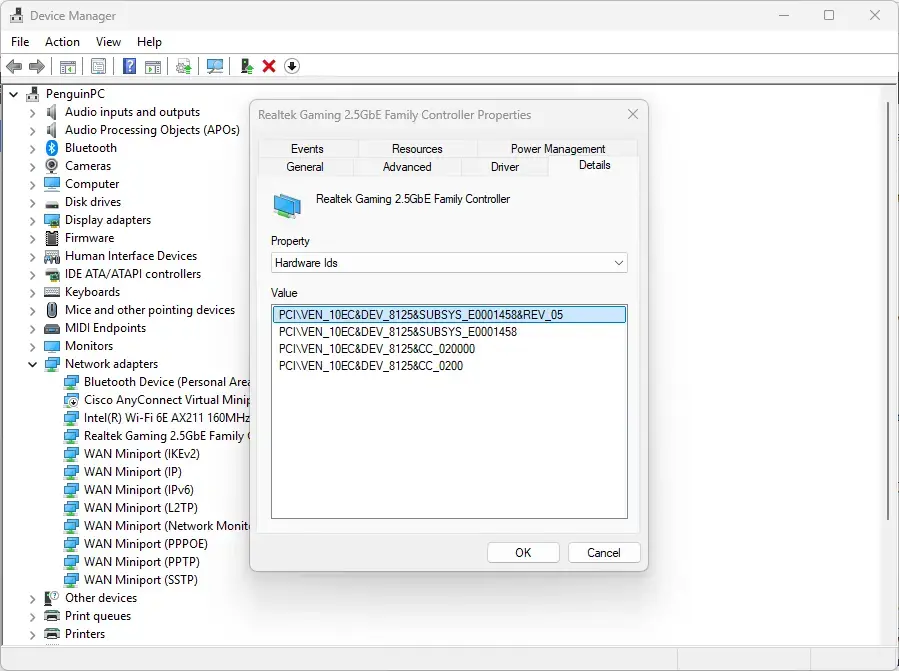
Device Manager showing network adapter hardware details in Windows 11 - Open the Microsoft Update Catalog. Go to https://www.catalog.update.microsoft.com/ in Edge or another browser. The search box is near the top of the page.
- Paste the hardware ID into the search box and press Enter. A table of results appears. If the page reports that it found no results, paste a shorter ID. Keep only the manufacturer (vendor) and device parts of the ID, such as the VEN_ and DEV_ values for a PCI device, and search again.
- Click the Last Updated column heading. The table sorts by date. Click it a second time if the oldest drivers appear first.
- Check the Products and Classification columns. Pick a row whose Classification is Drivers. In Products, look for Windows 11 or a Windows 10 entry that covers later versions, and match the architecture (x64 or ARM64) shown in the title to your system type.
- Click the driver title to confirm the match. A details window opens. If it has a Driver Details tab, check that your hardware ID appears in the list there.
- Close the details window and select Download on the row you chose. A small Download window opens with a link to a file ending in .cab.
- Click the file link. The browser saves the .cab file, usually to Downloads. If Edge warns that the file is not commonly downloaded, open the download list and select Keep, since you reached the file through the catalog yourself.
- Open Terminal. Right-click the Start button and select Terminal. A command window opens. A standard window is enough for this step.
- Create a folder for the driver files. Type the command below and press Enter.Code
mkdir C:\Drivers\extracted - Extract the .cab file with the expand command. A .cab file (cabinet file) is a compressed package, and this command unpacks it. Replace USERNAME and driver.cab with your own account name and the real file name, then press Enter.Code
expand -F:* "C:\Users\USERNAME\Downloads\driver.cab" C:\Drivers\extractedThe window lists each file as it expands. The folder now holds an .inf file (the driver’s setup information file), and usually a .sys or .cat file.
- Return to Device Manager and close the device’s Properties window. Right-click the device and select Update driver. The Update Drivers wizard opens.
- Select Browse my computer for drivers. The wizard asks for a folder location.
- Click Browse, choose the 📁C:\
Drivers\ folder, and select OK. The folder path appears in the wizard.extracted - Leave Include subfolders ticked and select Next. This step needs administrator privileges. Approve the User Account Control prompt, or enter an administrator password if you use a standard account. Windows then installs the driver.
- Select Close when the wizard finishes. It reports that Windows has successfully updated your drivers. Restart the PC if Windows asks you to.
Check That the Driver Installed
Open Device Manager again. The yellow warning triangle should be gone, and the device should sit under its proper category instead of Other devices.
To confirm the version, right-click the device, select Properties, and open the Driver tab. Driver Date and Driver Version should match the row you downloaded from the catalog.
Download Several Drivers at Once with the Basket
The catalog has a basket (a holding list) for collecting more than one package. Add each driver you need to it before you download. It saves repeated downloads when you set up several devices.
- Select Add on each row you want. A View basket link near the top of the page shows the running count.
- Select View basket. The page lists everything you added.
- Select Download. The catalog asks for a destination folder.
- Choose a folder and confirm. The catalog saves each package in its own subfolder, ready to extract.
Each file in a basket download is a .cab package. Follow the extract and install steps above for each one.
Install the Driver with PnPUtil Instead
PnPUtil is a built-in command-line tool that adds a driver package to the Windows driver store (the protected folder where Windows keeps installed driver packages). It helps when the Update Drivers wizard rejects a folder or when you want to install every .inf file in one pass. Open Terminal as an administrator, because this command needs administrator privileges. Right-click Start and select Terminal (Admin), then run:
pnputil /add-driver C:\Drivers\extracted\*.inf /subdirs /installPnPUtil prints a summary that says how many packages it added. If it reports a driver as added but not installed, no device in this PC matches that package. Go back to the catalog and check the hardware ID.
Fix Problems When the Driver Will Not Install
Most failures come from a mismatch between the package and the device or the system.
- “The folder you specified doesn’t contain a compatible software driver for your device.” The package does not match the device, or it targets a different architecture. Return to the catalog and check the hardware ID and the x64 or ARM64 label.
- “The best drivers for your device are already installed.” Windows ranked the installed driver as equal or better. Use Have Disk only if you are sure the package is correct. First, go back in the wizard and select Let me pick from a list of available drivers on my computer. Then select Have Disk and point it at the .inf file.
- The driver installs but the device still fails. Windows can block a driver that has a known security flaw. The guide to the Microsoft Vulnerable Driver Blocklist in Windows 11 explains how that list works.
- The catalog shows many near-identical rows. Take the newest one that lists Windows 11 and your architecture. If it fails, try the next newest version.
For Bluetooth adapters, the same idea works with a different route. See how to update the Bluetooth driver using Device Manager in Windows 11, or reinstall the Bluetooth driver in Windows 11 if the existing driver is damaged.
How to Undo a Driver Installed from the Catalog
You can roll back a driver from the Microsoft Update Catalog without harming your files. Rolling back changes only the driver, not your documents. Use this when the device misbehaves after the update.
- Open Device Manager. Right-click Start and select Device Manager.
- Right-click the device and select Properties. The Properties window opens.
- Select the Driver tab.
- Select Roll Back Driver. Choose a reason when asked and confirm. Windows restores the previous driver.
If Roll Back Driver is greyed out, Windows has no earlier driver saved for that device. This is common when the device had no working driver before you installed the new one. In that case, select Uninstall device on the same tab. Then restart the PC, and Windows tries to install a driver automatically.
Why Windows May Replace the Driver Later
Windows Update can install a different driver for the same device, and it may overwrite the one you chose. A feature update can do the same. If the device stops working again, repeat the steps above and check the version on the Driver tab.
For printers, the guide to stopping Windows from updating your printer driver automatically covers how to keep your chosen version.
What to Do Next
If the device still fails after a correct driver install, go back to the catalog and try the next older version from the same hardware ID search. For Bluetooth devices, use the reinstall guide linked earlier in this article: Bluetooth driver reinstall steps from Microsoft documentation. Keep the extracted 📁C:\
Have a question about this guide?
Answered by AI from this guide. Good questions may be added to this page — please don't include personal details.
Did this guide fix your problem?

About the Author
Richard
Tech Writer, IT Professional
Richard is a writer at Geek Rewind who turns complex IT tasks into clear, step-by-step guides. He draws on years of hands-on experience in system administration and enterprise IT operations, focusing on Windows, Linux and WordPress: the problems people actually run into, and the fixes that work. His server and WordPress guides come from systems he runs himself. Richard builds and maintains the platform behind Geek Rewind, from its Ubuntu servers and Nginx configuration to its custom WordPress plugins. Many new tutorials start with readers' questions, and he's always glad to answer them in the comments.
No comments yet — be the first to share your thoughts!