How to Turn On Automatic Updates in the Microsoft Store on Windows 11

Automatic updates in the Microsoft Store on Windows 11 download and install newer versions of your apps in the background. Whenever your PC is online, Windows handles app updates itself, so you get bug fixes and improvements without checking for them by hand.
The setting is in the Microsoft Store app and takes less than a minute to change. It works the same on Windows 11 Home and Pro. Once it is on, you don’t need to restart the PC or do anything else.
Open the Microsoft Store, click your profile icon in the top-right corner, select Store Settings, scroll to App updates, and switch the toggle to On. Windows then downloads and installs app updates in the background automatically.
Get New Features Faster
App developers fix bugs, patch security problems and add features all the time. With automatic updates on, those changes reach your PC soon after they are released. You don’t have to remember to check, and you are less likely to run an old version with a known problem.
Let’s Turn On Automatic Updates!
Turning this on takes a few clicks. You open the Store, go to its settings, and flip one switch. The steps below show each part.
Step 1Open the Microsoft Store
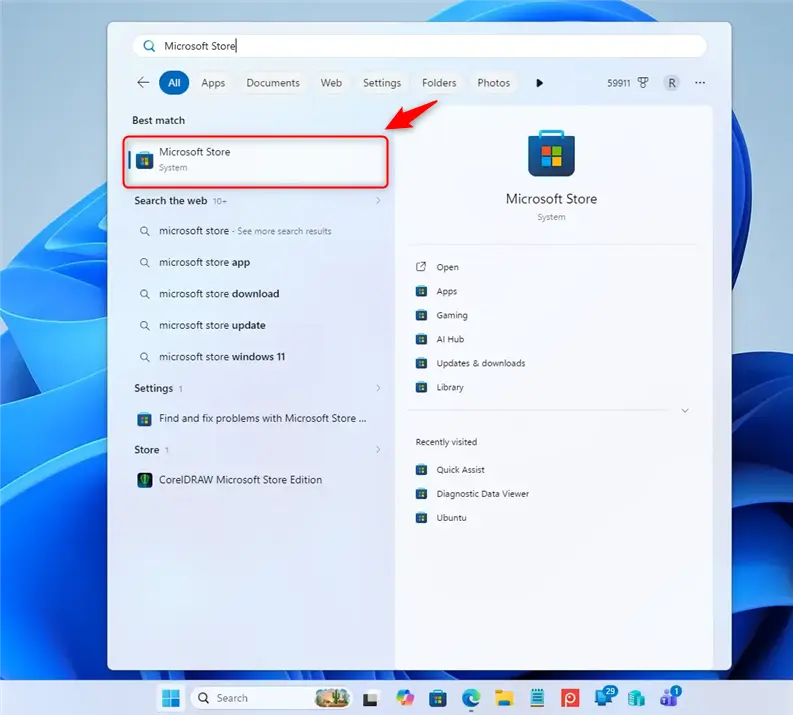
First, open the Microsoft Store.
- Click the Start button. By default it is the Windows logo in the middle of the taskbar . If you have moved the taskbar icons to the left, it is in the bottom-left corner.
- Type “Microsoft Store” in the search box. The search results appear as you type.
- Click Microsoft Store in the results. The Store window opens on its home page.
Check Windows Update , then try again.
Step 2Go to Store Settings
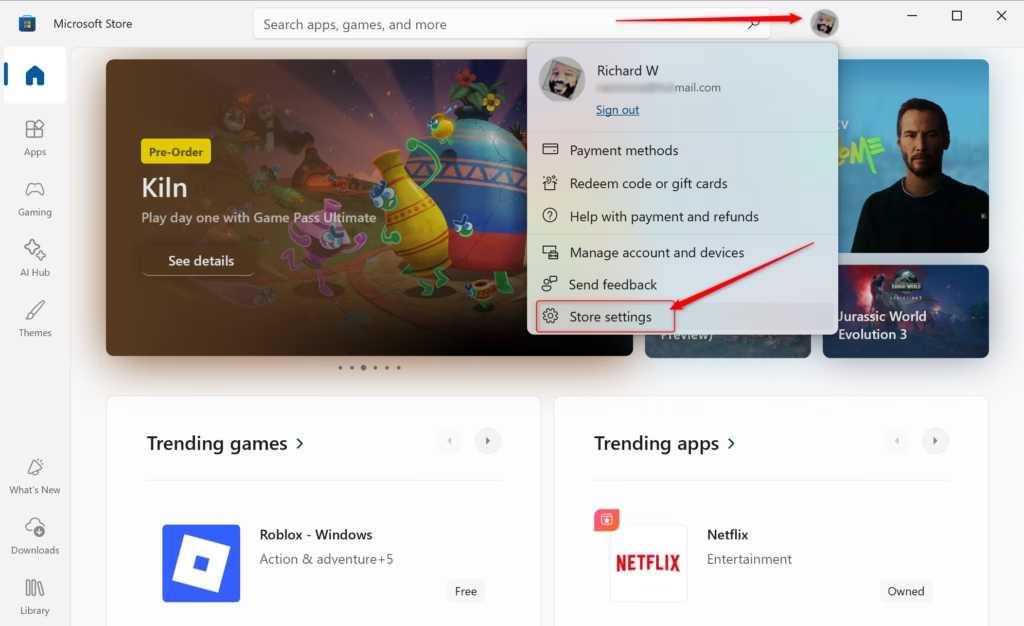
Next, find the Store's settings once the window is open.
- Look at the top-right corner of the Store window for your profile picture or icon. If you aren't signed in, it shows a generic person icon.
- Click the profile picture. A small menu opens.
- Choose Store Settings from the menu. In current versions of the Store this entry may be labeled App settings. It is the same page. The settings page then opens.
Step 3Turn On App Updates
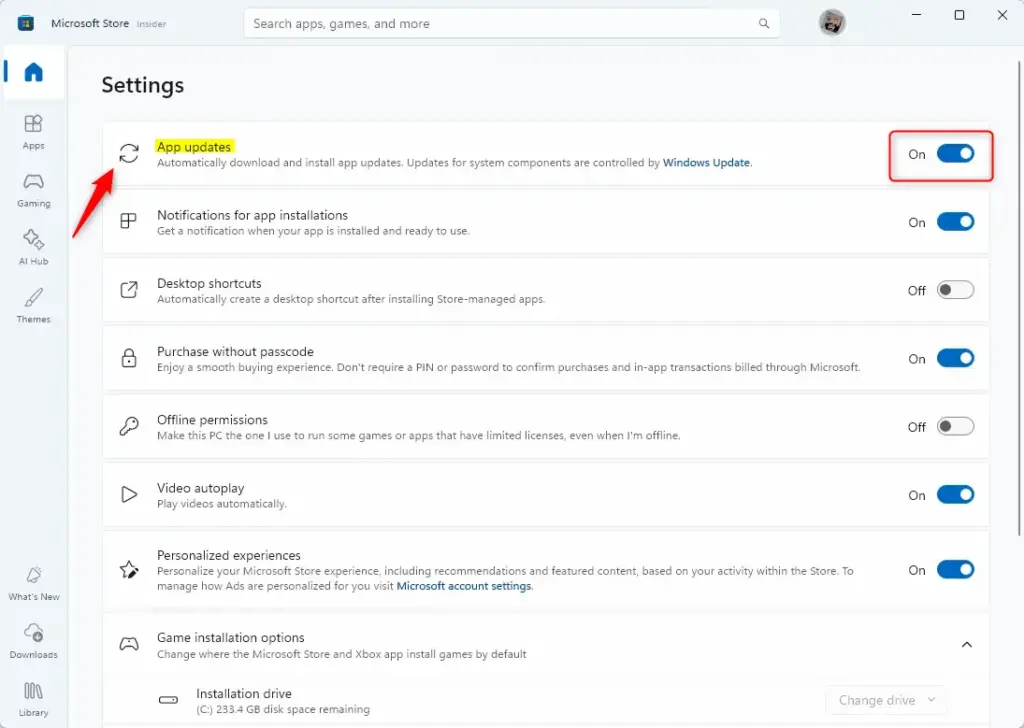
In short, to turn on Microsoft Store auto updates in Windows 11, open the Microsoft Store app, click your profile icon, open the settings page, and switch the App updates toggle to On. Windows then downloads and installs new versions of your installed apps in the background, and you no longer have to check for them yourself.
- Scroll down the settings page if you don't see the app update options at the top.
- Find the section for app updates.
- Look for the option called App updates.
- Click the switch next to App updates so it reads On. The switch changes color and moves to the right. Some versions also show a checkmark.
In that case, ask your IT administrator.
To undo the change, return to the same page and set App updates to Off. You can still update apps by hand. Open Library in the Store and click Get updates.
Reference:
https://support.microsoft.com/en-us/windows/apps/turn-on-automatic-app-updates
Summary
With automatic app updates on, your installed apps refresh themselves, stay stable and pick up new features soon after release. You no longer have to check for updates by hand, and the setting is easy to switch off if you ever want to control updates yourself.
Was this guide helpful?

About the Author
Richard
Tech Writer, IT Professional
Richard is a writer at Geek Rewind who turns complex IT tasks into clear, step-by-step guides. He draws on years of hands-on experience in system administration and enterprise IT operations, focusing on Windows, Linux and WordPress: the problems people actually run into, and the fixes that work. His server and WordPress guides come from systems he runs himself. Richard builds and maintains the platform behind Geek Rewind, from its Ubuntu servers and Nginx configuration to its custom WordPress plugins. Many new tutorials start with readers' questions, and he's always glad to answer them in the comments.
No comments yet — be the first to share your thoughts!